Enable Wireguard in Synology 918+
Some applications only working in same broadcast, so vpn feature is must have when access personal resource (e.g: NAS) from Internet. The artical only cover Wireguard, but not include theory.
Install APP
Follow up by the Github for synology-wireguard, not summarized again. Just put the spk that base on DSM7.0:
Follow base on DSM7.2:
Config Wireguard Server
Generate Server and Client key
Due to private and public key, so totally 4 key files, do by follow cmd:
# wg genkey | tee server-privatekey | wg pubkey > server-publickey
# wg genkey | tee client-privatekey | wg pubkey > client-publickey
# ls -l |grep key
-rw-r--r-- 1 root root   45 Feb 18 12:08 client-privatekey
-rw-r--r-- 1 root root   45 Feb 18 12:08 client-publickey
-rw-r--r-- 1 root root   45 Feb 18 12:08 server-privatekey
-rw-r--r-- 1 root root   45 Feb 18 12:08 server-publickey
Config wg0 conf
Follow wg0 conf file, due to I am not require forward traffics via my Synology Server, and just access my APP in same LAN, so not config “0.0.0.0/0” in “AllowedIPs”:
frank@frank-server:/etc/wireguard$ more wg0.conf
[Interface]
Address = 192.168.2.1/32
PrivateKey = <server-privatekey>
ListenPort = <internal port>
MTU = 1300
PostUp = iptables -A FORWARD -i %i -j ACCEPT; iptables -t nat -A POSTROUTING -o ovs_eth0 -j MASQUERADE
PostDown = iptables -D FORWARD -i %i -j ACCEPT; iptables -t nat -D POSTROUTING -o ovs_eth0 -j MASQUERADE

[Peer]
PublicKey = <client-publickey>
AllowedIPs = 192.168.2.2/32
And in my Server, public port is not eth0, but is ovs_eth0:
frank@frank-server:/etc/wireguard$ sudo ovs-vsctl show
    Bridge "ovs_eth0"
        Port "eth0"
            Interface "eth0"
        Port "ovs_eth0"
            Interface "ovs_eth0"
                type: internal
    Bridge "ovs_eth1"
        Port "ovs_eth1"
            Interface "ovs_eth1"
                type: internal
        Port "eth1"
            Interface "eth1"
Auto Enable when Power On
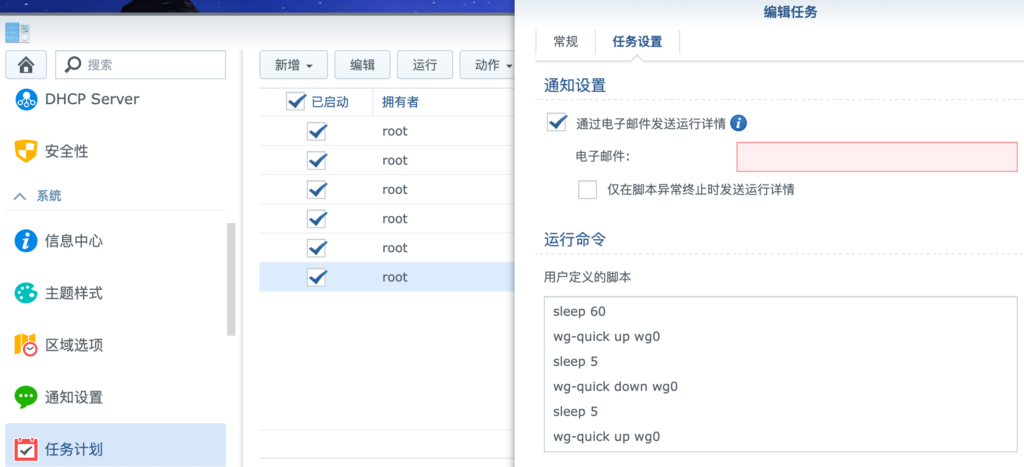
Add the script to task, same with Github:
Config Wireguard Client
Follow client conf, same as above, If only let the Internal LAN traffics via Wireguard, only config in AllowedIPs, e.g “AllowedIPs = 192.168.1.0/24” indicates that the destination route of the traffic through the VPN is only in 192.168.1.0/24.
[Interface]
Address = 192.168.2.2/24
MTU = 1300
PrivateKey = <client-privatekey>

[Peer]
AllowedIPs = 0.0.0.0/0
Endpoint = <public IP address>:<external port>
PersistentKeepalive = 25
PublicKey = <server-publickey>
2021.04.09 更新:在MacOS上使用Wireguard
Wireguard在MacOS上发布了相应的客户端,可惜的是只能换账号才能下载,由于一些原因,是在不想因为这个就换个账号,所以直接使用brew安装了wireguard(brew的安装,可以参考这篇文章:Homebrew国内如何自动安装):
$ brew install wireguard-tools
$ mkdir /usr/local/etc/wireguard
$ mv /Users/xxx/Downloads/NAS.conf /usr/local/etc/wireguard/wg0.conf
$ sudo wg-quick up wg0
Warning: `/usr/local/etc/wireguard/wg0.conf' is world accessible
[#] wireguard-go utun
[+] Interface for wg0 is utun4
[#] wg setconf utun4 /dev/fd/63
[#] ifconfig utun4 inet 192.168.2.2/24 192.168.2.2 alias
[#] ifconfig utun4 mtu 1300
[#] ifconfig utun4 up
[#] route -q -n add -inet 0.0.0.0/1 -interface utun4
[#] route -q -n add -inet 128.0.0.0/1 -interface utun4
[#] route -q -n add -inet 1.203.174.171 -gateway 172.20.10.1
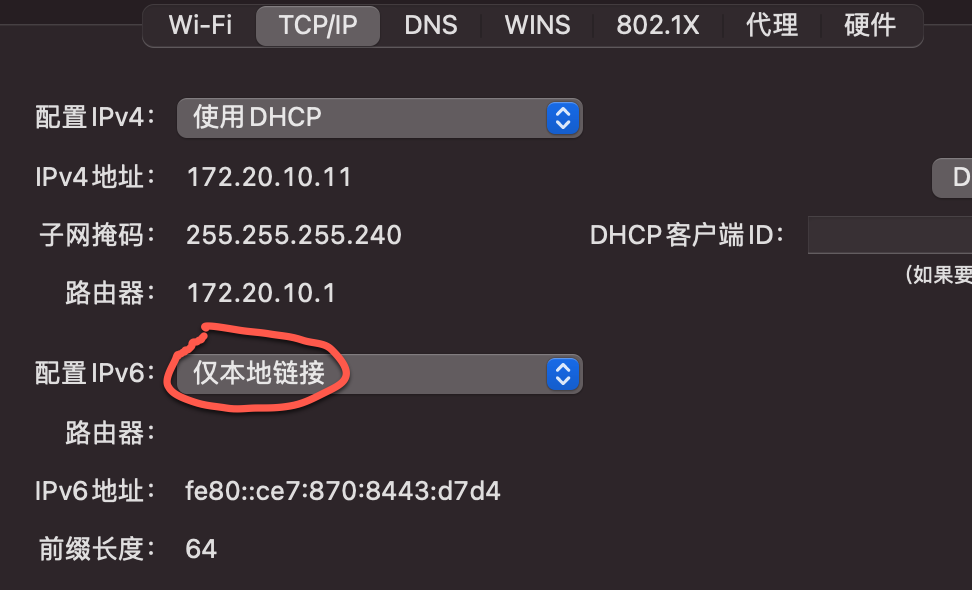
[+] Backgrounding route monitor这里需要注意的是,默认情况下MacOS 的DNS是支持IPv6的,如果在conf里配置了域名,会自动进行ipv6的dns解析,这样会导致出现问题,如下:
$ wg-quick up wg0
Warning: `/usr/local/etc/wireguard/wg0.conf' is world accessible
[#] wireguard-go utun
[+] Interface for wg0 is utun4
[#] wg setconf utun4 /dev/fd/63
[#] ifconfig utun4 inet 192.168.2.3/24 192.168.2.3 alias
[#] ifconfig utun4 mtu 1300
[#] ifconfig utun4 up
[#] route -q -n add -inet 0.0.0.0/1 -interface utun4
[#] route -q -n add -inet 128.0.0.0/1 -interface utun4
[#] route -q -n add -inet 240e:304:2b83:5a00:211:32ff:fea1:4e0f -gateway 172.20.10.1
route: bad address: 240e:304:2b83:5a00:211:32ff:fea1:4e0f
[+] Backgrounding route monitor
所以需要选择“仅本地链接”关闭IPv6的DNS解析即可
2022.01.16 更新:Wireguard in DSM7
根据Github上的说明,直接在DSM7中编译,只是网络不是很好,经常timeout,多尝试几次,或换时间段尝试即可。编译过程中遇到几个问题,可以参考这里。我把编译好的Wireguard放在这里,同型号918+/DSM7.0的可以不用再编译直接使用,如果担心安全的,可以直接自行编译,也很简单:
如果使用github的文件编译DSM7.2会有报错,下面这个网站里面有很多编译好的spk文件(不同型号的),可以直接使用,或者根据作者提供的docker image自行编译: https://www.blackvoid.club/wireguard-spk-for-your-synology-nas/ :
安装完spk后不要自启动,进入shell,第一次手动开启Wireguard “sudo /var/packages/WireGuard/scripts/start” 后,就有wg的相关命令了。注意wireguard目录是需要手动创建的,然后按上面方式配置key和conf,然后打开即可;最后打开程序自启动,防止下次NAS重启导致Wireguard无法自启动:
root@frank-server:/etc/wireguard# wg-quick up wg0
Warning: `/etc/wireguard/wg0.conf' is world accessible
[#] ip link add wg0 type wireguard
[#] wg setconf wg0 /dev/fd/63
[#] ip -4 address add 192.168.2.1/32 dev wg0
[#] ip link set mtu 1300 up dev wg0
[#] ip -4 route add 192.168.2.2/32 dev wg0
[#] iptables -A FORWARD -i wg0 -j ACCEPT; iptables -t nat -A POSTROUTING -o ovs_eth0 -j MASQUERADE
root@frank-server:/etc/wireguard# wg-autostart enable wg0
wg-autostart wg0 has been enabled successfully
root@frank-server:/etc/wireguard# ip route
......
192.168.2.2 dev wg0  scope link
在macOS上拨号成功后,就可以看到相似的路由产生了:
% netstat -rn |grep link#28 |grep 192.168
192.168.1          link#28            UCS             utun0
192.168.1.1        link#28            UHWIi           utun0
Reference
How to Install/Config Wireguard in Synology Server?