K8s – Manual Deployment
终于尝试手动部署K8s了,在此感谢朋友分享的”老男孩“教学视频??。以及朋友分享的实验环境(基于EVE-NG);持续大半年的拉锯战,总算完成了基础组件的全部部署 ^_^
更新说明:
- 2022-01-17:更新拓扑信息;
- 2022-01-19:添加基础配置;
- 2022-01-23:添加证书配置及Bind9部署;
- 2022-01-25:添加Docker及私有仓库Harbor相关部署配置;
- 2022-07到08两个月时间:完成etdc,apiserver,kube-controller-manager,kube-scheduler,kubelet和kube-proxy的部署;
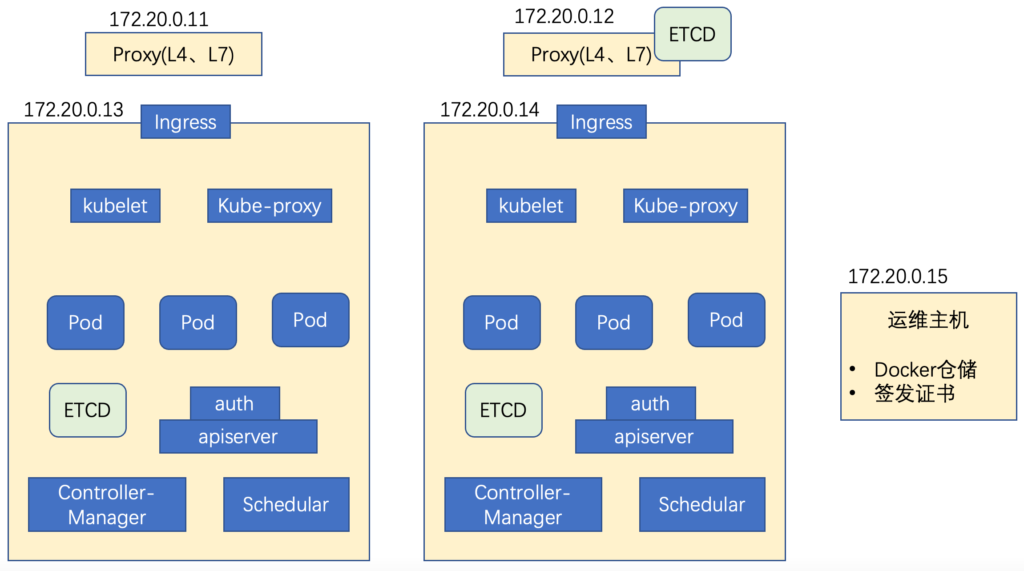
Topology
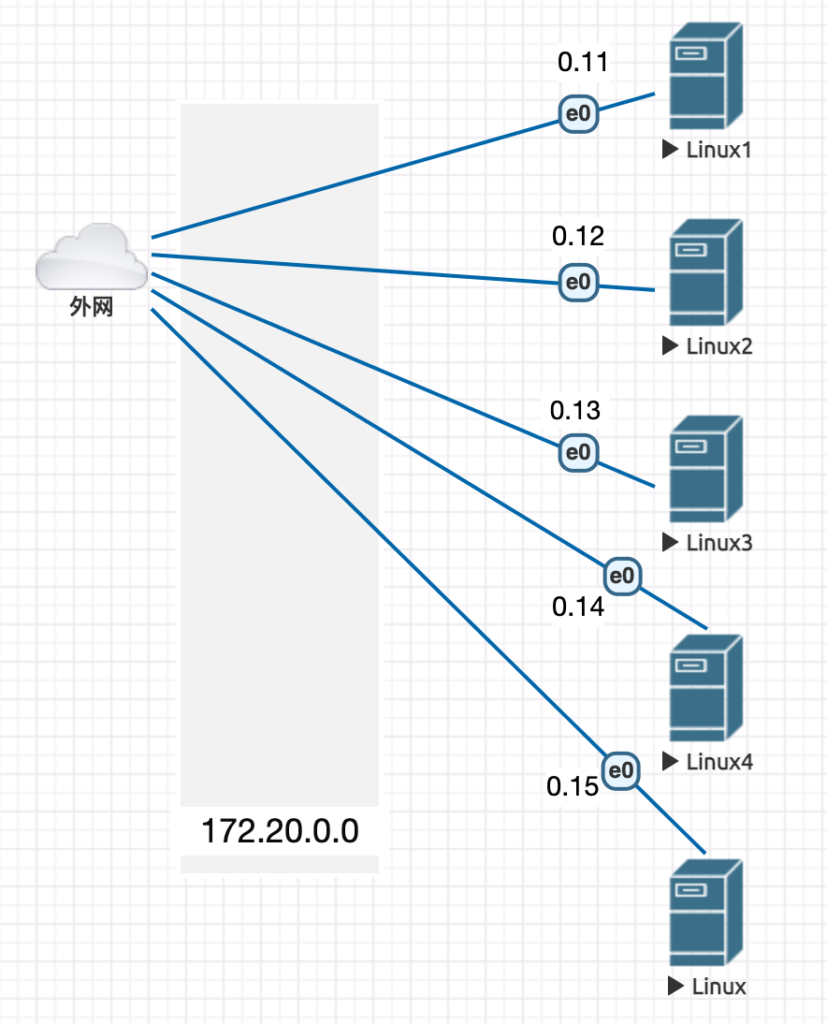
基础配置
端口配置
只展示frank0-11,其他Server等同;
root@frank0-11:~# more /etc/netplan/00-installer-config.yaml
# This is the network config written by 'subiquity'
network:
  ethernets:
    ens3:
      dhcp4: false
      addresses: [172.20.0.11/24]
      gateway4: 172.20.0.1
      nameservers:
        addresses: [114.114.114.114]
  version: 2
root@frank0-12:~# netplan apply
修改本地更新源
只展示frank0-11,其他Server等同;阿里源没有20.10的,20.04的focal源也可以用,在vim可以用下面方法直接替换:
root@frank0-11:~# cp /etc/apt/sources.list /etc/apt/sources.list.bak
root@frank0-11:~# lsb_release -a
root@frank0-11:~# vim /etc/apt/sources.list
:%s#http://cn.archive.ubuntu.com/ubuntu#http://mirrors.aliyun.com/ubuntu/#g
:%s#groovy#focal#g
root@frank0-11:~# apt update
组件版本信息
| 组件 | 命令 | 版本 |
| bind9 | # named -v | 9.16.1-Ubuntu (Stable Release) |
| cfssl | # cfssl version | 1.2.0 |
| docker | # docker -v | 20.10.8, build 3967b7d |
| docker-compose | # docker-compose -v | 1.25.0 |
| harbor | – | 1.10.10 |
| nginx | # nginx -v | nginx/1.18.0 (Ubuntu) |
配置Bind9
Bind9是一个开源的DNS,为什么要专门搭建一个DNS Server,而不是直接在host里写呢?这是由于K8s后面的互访都是通过域名调用的(docker之间),这些没法在host里写,所以需要一个专门的DNS Server,这个DNS Server将部署在frank0-11上,具体部署步骤如下,更详细的DNS信息,可以参考下面两篇文章:
版本信息
安装Bind9
默认带的bind9根要安装的有冲突,所以先移除,再安装:
root@frank0-11:~# apt remove bind9-libs
root@frank0-11:~# apt install bind9*
配置全局配置文件
从主配置文件中可以看到DNS主要有3个需要配置的地方:
root@frank0-11:~# more /etc/bind/named.conf

include "/etc/bind/named.conf.options";          //全局配置文件
include "/etc/bind/named.conf.local";            //区域配置文件
include "/etc/bind/named.conf.default-zones";    //设置zone
配置全局配置文件,注意这里有些配置跟CentOS可能会有些不同,例如目录:
root@frank0-11:~# more /etc/bind/named.conf.options
options {
        listen-on port 53 {172.20.0.11; };
        directory       "/var/cache/bind";
        allow-query     { any; };
        forwarders      { 114.114.114.114; };
        recursion       yes;
        dnssec-validation no;
};
配置区域配置文件
在这里定义两个domain,一个是主机域 host.com,另一个是业务域 frank.com:
root@frank0-11:~# more /etc/bind/named.conf.local

zone "host.com" {
        type master;
        file "/etc/bind/db.host.com";
        allow-update { 172.20.0.11; };
};

zone "frank.com" {
        type master;
        file "/etc/bind/db.frank.com";
        allow-update { 172.20.0.11; };
};
下面是主机域配置文件:
root@frank0-11:~# more /etc/bind/db.host.com
;
; BIND data file for local loopback interface
;
$ORIGIN host.com.
$TTL    600
@       IN      SOA     dns.host.com.   dnsadmin.host.com. (
                        2022010308      ; Serial
                        10800           ; Refresh
                        900             ; Retry
                        604800          ; Expire
                        86400           ; Negative Cache TTL
                        )
                        NS      dns.host.com.
$TTL    60 ; 1 minute
dns             A       172.20.0.11
frank0-11       A       172.20.0.11
frank0-12       A       172.20.0.12
frank0-13       A       172.20.0.13
frank0-14       A       172.20.0.14
frank0-15       A       172.20.0.15
下面是业务域配置文件:
root@frank0-11:~# more db.frank.com
more: cannot open db.frank.com: No such file or directory
root@frank0-11:~# more /etc/bind/db.frank.com
;
; BIND data file for local loopback interface
;
$ORIGIN frank.com.
$TTL    600
@       IN      SOA     dns.frank.com.  dnsadmin.frank.com. (
                        2022011701      ; Serial
                        10800           ; Refresh
                        900             ; Retry
                        604800          ; Expire
                        86400           ; Negative Cache TTL
                        )
                        NS      dns.frank.com.
$TTL    60 ; 1 minute
dns             A       172.20.0.11
test            A       172.20.0.11
验证配置文件是否正确:
root@frank0-11:/etc/bind# named-checkzone frank.com /etc/bind/db.frank.com
zone frank.com/IN: loaded serial 2021123001
OK
root@frank0-11:/etc/bind#
root@frank0-11:/etc/bind# named-checkzone host.com /etc/bind/host.com
zone host.com/IN: loaded serial 2021123001
OK
重启bind9后生效,注意我这里没有特意配置rndc(如key啥的),这个组件的作用是更新DNS配置不需要重启,但需要变更配置文件中的序列号。由于实验环境,每次该配置后直接重启就ok了,重启后可以通过下面验证:
root@frank0-11:~# systemctl restart bind9
root@frank0-11:~#
root@frank0-11:~# dig -t A test.frank.com @172.20.0.11 +short
172.20.0.11
root@frank0-11:~# dig -t A frank0-15.host.com @172.20.0.11 +short
172.20.0.15注意如果此时用nslookup,会发现根据hostname找不到对应的IP,必须写全域名(FQDN)(注意:在测试前,需要把本机域名改成自身IP,而不是114,直接改“00-installer-config.yaml”即可),如下:
root@frank0-11:~# nslookup test
Server:         127.0.0.53
Address:        127.0.0.53#53

** server can't find test: SERVFAIL

root@frank0-11:~# nslookup frank0-15
Server:         127.0.0.53
Address:        127.0.0.53#53

** server can't find frank0-15: SERVFAIL

root@frank0-11:~# nslookup test.frank.com
Server:         127.0.0.53
Address:        127.0.0.53#53

Non-authoritative answer:
Name:   test.frank.com
Address: 172.20.0.11

root@frank0-11:~# nslookup frank0-15.host.com
Server:         127.0.0.53
Address:        127.0.0.53#53

Non-authoritative answer:
Name:   frank0-15.host.com
Address: 172.20.0.15
这是因为需要先设置Search Domain才可以省略domain信息,而且Search Domain只能设置1个,如果设置2个,那么先解析的就成为默认的Search Domain,另一个就没法解析了,如下所示,注意常规情况下Search Domain只设置主机域:
root@frank0-11:~# more /etc/resolv.conf

nameserver 127.0.0.53
options edns0 trust-ad
search host.com
root@frank0-11:~#
root@frank0-11:~# nslookup frank0-15
Server:         127.0.0.53
Address:        127.0.0.53#53

Non-authoritative answer:
Name:   frank0-15.host.com
Address: 172.20.0.15不过Ubuntu改resolv.conf无法持续保持,一会就会变回去,需要在配置IP的地方强行加Search Domain,如下:
root@frank0-11:/home/lab# more /etc/netplan/00-installer-config.yaml
......
      gateway4: 172.20.0.1
      nameservers:
        addresses: [172.20.0.11]
        search: [host.com]
  version: 2
修改其他主机的DNS
配置12,13,14,15主机的DNS,并指向11;至于为什么在nslookup中显示的Server不是11而是本地,查了下好像ubuntu中就是会指向本地缓存,而不是上游的DNS Server,所以以”systemd-resolve –status“为主;
root@frank0-13:~# more /etc/netplan/00-installer-config.yaml
# This is the network config written by 'subiquity'
network:
  ethernets:
    ens3:
      dhcp4: false
      addresses: [172.20.0.13/24]
      #- 100.64.0.36/24
      gateway4: 172.20.0.1
      nameservers:
        addresses: [172.20.0.11]
        search: [host.com]
  version: 2
root@frank0-13:~# netplan apply
root@frank0-13:~# systemd-resolve --status |grep Server
         DNS Servers: 172.20.0.11
root@frank0-13:~# nslookup harbor.frank.com
Server:         127.0.0.53
Address:        127.0.0.53#53

Non-authoritative answer:
Name:   harbor.frank.com
Address: 172.20.0.15
配置证书
版本信息
运维主机安装证书工具
国内网络环境不好,多试几次就可以了:
root@frank0-15:~# wget https://pkg.cfssl.org/R1.2/cfssl_linux-amd64 -O /usr/bin/cfssl
root@frank0-15:~# wget https://pkg.cfssl.org/R1.2/cfssljson_linux-amd64 -O /usr/bin/cfssl-json
root@frank0-15:~# wget https://pkg.cfssl.org/R1.2/cfssl-certinfo_linux-amd64 -O /usr/bin/cfssl-certinfo
root@frank0-15:~# chmod +x /usr/bin/cfssl*
root@frank0-15:~# which cfssl
/usr/bin/cfssl
root@frank0-15:~# which cfssl-json
/usr/bin/cfssl-json
root@frank0-15:~# which cfssl-certinfo
/usr/bin/cfssl-certinfo创建CA证书请求(CSR)的Jason文件
这里的证书主要指HTTPS证书,对于做网站的博主来说,会常听到的免费签发HTTPS证书,那么这种免费的,收费的和自签发根证书之间有什么区别呢?我简单做了下对比,这样比较容易理解;更详细的信息可以自行搜索:
| 免费证书 | 收费证书 | 自签发根证书 | |
| 申请方式 | 域名/IP/服务器对应即可向第三方机构申请免费证书,自动审批 | 需要申请人或机构提交相关证明,人工审核 | 自由签发,不需要任何审批 |
| 有效时长 | 3个月 – 1年 | 1年 | 自定义 |
| 网站可信 | 无 | 有 | 无 |
| 数据传输保护 | 有 | 有 | 有 |
PS:真正使用ca-csr.json时,要删掉注释内容,否则会报错;
root@frank0-15:/opt# cd certs/
root@frank0-15:/opt/certs# more ca-csr.json
{
        "CN":   "Frank",                   #机构名称
        "hosts": [
        ],
        "key": {
                "algo": "rsa",
                "size": 2048
        },
        "name": [
                {
                        "C": "CN",         #国家
                        "ST": "ShangHai",  #州
                        "L": "ShangHai",   #城市
                        "O": "FZ",         #组织
                        "OU": "arch"       #部门
                }
        ],
        "ca": {
                "expiry": "8000h"          #有效时间,自签证书可以随便写,自签根证书是无法信任的,但在内网使用主要用于加密传输;
        }
}
签根证书
ps:PEM(Privacy Enhanced Mail),通常用于数字证书认证机构(Certificate Authorities,CA),扩展名为.pem, .crt, .cer, 和 .key,内容为Base64编码的ASCII码文件;
root@frank0-15:/opt/certs# cfssl -h
Usage:
Available commands:
        genkey
        ocspserve
        certinfo
        gencert
        ocspsign
        selfsign
        print-defaults
        bundle
        sign
        ocsprefresh
        info
        revoke
        serve
        version
        gencrl
        ocspdump
        scan
Top-level flags:
  -allow_verification_with_non_compliant_keys
        Allow a SignatureVerifier to use keys which are technically non-compliant with RFC6962.
  -loglevel int
        Log level (0 = DEBUG, 5 = FATAL) (default 1)
root@frank0-15:/opt/certs#
root@frank0-15:/opt/certs#
root@frank0-15:/opt/certs# cfssl-json -h
Usage of cfssl-json:
  -bare
        \the response from CFSSL is not wrapped in the API standard response
  -f string
        JSON input (default "-")
  -stdout
        output the response instead of saving to a file
root@frank0-15:/opt/certs#
root@frank0-15:/opt/certs# cfssl gencert -initca ca-csr.json | cfssl-json -bare ca   #如果不加cfssl-json,那么无法生成文件格式的证书和私钥
2021/12/25 12:13:09 [INFO] generating a new CA key and certificate from CSR
2021/12/25 12:13:09 [INFO] generate received request
2021/12/25 12:13:09 [INFO] received CSR
2021/12/25 12:13:09 [INFO] generating key: rsa-2048
2021/12/25 12:13:10 [INFO] encoded CSR
2021/12/25 12:13:10 [INFO] signed certificate with serial number 604479646102437002690754421478010540266616363407
root@frank0-15:/opt/certs#
root@frank0-15:/opt/certs#
root@frank0-15:/opt/certs# ls -l
total 16
-rw-r--r-- 1 root root  891 Dec 25 12:13 ca.csr
-rw-r--r-- 1 root root  226 Dec 25 12:07 ca-csr.json
-rw------- 1 root root 1679 Dec 25 12:13 ca-key.pem  #根证书私钥
-rw-r--r-- 1 root root 1139 Dec 25 12:13 ca.pem      #根证书
查看证书
root@f0-15:/opt/certs# more ca.pem
-----BEGIN CERTIFICATE-----
MIIDFDCCAfygAwIBAgIUfGX9y6kcCTVw9PkheelmsdVsSLMwDQYJKoZIhvcNAQEL
BQAwEDEOMAwGA1UEAxMFRnJhbmswHhcNMjIwODA4MTEzNjAwWhcNNDIwODAzMTEz
NjAwWjAQMQ4wDAYDVQQDEwVGcmFuazCCASIwDQYJKoZIhvcNAQEBBQADggEPADCC
AQoCggEBAJlaqau0JJJ/d9MVYsrsFugnYf8lM2DSZx/H/8OP51P1PBc5vu9LFW/C
YSIBenLAyVty18xXnVnI8sbgAworim9KwFlHzDW8bBGUZH08HbgX2Vto4VtbtimR
qHiolN4F+urYVRRZRhbpLMGU8Ou+wz6TiNLt8RjrTLOV3fyy06JsR//MyE/aZf8S
2ORutwrgyzWDqWkpDz2DHZVKuCsDULbznQ3PzyArHGGZYdFACRNZXUssrW1RIvdb
aNB5nAwwnBazyc/ukJW85rvQ0pAI6Qp+5uJy1QZUhwPTwb0wXjIoxSrBRokYvfue
waPLGb7u6Ia9OJEb4nQdaEU3qtcXbCUCAwEAAaNmMGQwDgYDVR0PAQH/BAQDAgEG
MBIGA1UdEwEB/wQIMAYBAf8CAQIwHQYDVR0OBBYEFK1FABQZt3VB7ZwiWA4woNKs
MXAUMB8GA1UdIwQYMBaAFK1FABQZt3VB7ZwiWA4woNKsMXAUMA0GCSqGSIb3DQEB
CwUAA4IBAQAZCr1svn4wv56mY22SKBD/JIxvR2W9Hs50hY7tcNyBVYFX6WHry9Pf
NNqvKhAYmPLJUXIXRM+F1GlzKeNW1LK+MoMGFmic7OMwoxjvpxCJye+35EUX8bL7
bwhREmiJ9+cjSL5i73kxuzurDolu971u6XNvpI8zOLocat+yXQE6ajlBW91WzfhQ
vdUbuloCpB4rCq8FqvTeL6WKms0rnEaBtFyDlVT2qeRsKDaHX2cyVEPqzRubz99C
SJP/M43cmPWvxFuLrRTc4cyoX38e0/zxJd89xhDNfDEIS9Pp+g6LnjAu/++xiDas
KFPO/nPKwTGMK67B6mMITI64zyw75ym5
-----END CERTIFICATE-----可以通过cfssl-certinfo 查看证书的内容:
root@f0-15:/opt/certs# cfssl-certinfo -cert ca.pem
{
  "subject": {
    "common_name": "Frank",
    "names": [
      "Frank"
    ]
  },
  "issuer": {
    "common_name": "Frank",
    "names": [
      "Frank"
    ]
  },
  "serial_number": "710189339557654016610541906606250548290116143283",
  "not_before": "2022-08-08T11:36:00Z",
  "not_after": "2042-08-03T11:36:00Z",
  "sigalg": "SHA256WithRSA",
  "authority_key_id": "AD:45:0:14:19:B7:75:41:ED:9C:22:58:E:30:A0:D2:AC:31:70:14",
  "subject_key_id": "AD:45:0:14:19:B7:75:41:ED:9C:22:58:E:30:A0:D2:AC:31:70:14",
  "pem": "-----BEGIN CERTIFICATE-----\nMIIDFDCCAfygAwIBAgIUfGX9y6kcCTVw9PkheelmsdVsSLMwDQYJKoZIhvcNAQEL\nBQAwEDEOMAwGA1UEAxMFRnJhbmswHhcNMjIwODA4MTEzNjAwWhcNNDIwODAzMTEz\nNjAwWjAQMQ4wDAYDVQQDEwVGcmFuazCCASIwDQYJKoZIhvcNAQEBBQADggEPADCC\nAQoCggEBAJlaqau0JJJ/d9MVYsrsFugnYf8lM2DSZx/H/8OP51P1PBc5vu9LFW/C\nYSIBenLAyVty18xXnVnI8sbgAworim9KwFlHzDW8bBGUZH08HbgX2Vto4VtbtimR\nqHiolN4F+urYVRRZRhbpLMGU8Ou+wz6TiNLt8RjrTLOV3fyy06JsR//MyE/aZf8S\n2ORutwrgyzWDqWkpDz2DHZVKuCsDULbznQ3PzyArHGGZYdFACRNZXUssrW1RIvdb\naNB5nAwwnBazyc/ukJW85rvQ0pAI6Qp+5uJy1QZUhwPTwb0wXjIoxSrBRokYvfue\nwaPLGb7u6Ia9OJEb4nQdaEU3qtcXbCUCAwEAAaNmMGQwDgYDVR0PAQH/BAQDAgEG\nMBIGA1UdEwEB/wQIMAYBAf8CAQIwHQYDVR0OBBYEFK1FABQZt3VB7ZwiWA4woNKs\nMXAUMB8GA1UdIwQYMBaAFK1FABQZt3VB7ZwiWA4woNKsMXAUMA0GCSqGSIb3DQEB\nCwUAA4IBAQAZCr1svn4wv56mY22SKBD/JIxvR2W9Hs50hY7tcNyBVYFX6WHry9Pf\nNNqvKhAYmPLJUXIXRM+F1GlzKeNW1LK+MoMGFmic7OMwoxjvpxCJye+35EUX8bL7\nbwhREmiJ9+cjSL5i73kxuzurDolu971u6XNvpI8zOLocat+yXQE6ajlBW91WzfhQ\nvdUbuloCpB4rCq8FqvTeL6WKms0rnEaBtFyDlVT2qeRsKDaHX2cyVEPqzRubz99C\nSJP/M43cmPWvxFuLrRTc4cyoX38e0/zxJd89xhDNfDEIS9Pp+g6LnjAu/++xiDas\nKFPO/nPKwTGMK67B6mMITI64zyw75ym5\n-----END CERTIFICATE-----\n"
}
Docker安装部署
在13,14,15上安装Docker。具体方法参考官网,不同版本方法可能会有差异,所以不列出了,直接参考官网最准确:https://docs.docker.com/engine/install/ubuntu/,只展示在13上安装和配置的方法,14和15相同;
版本信息
配置daemon.jason
具体信息可以参考 ”dockerd -h“ 或者这篇文章:docker daemon.json文件配置;
另外对于overlay2的存储驱动,可以参考这里:docker镜像(一)overlayfs;简而言之就是分层存储内容,然后merge到一起统一展示,这样有助于记录回滚,同Git很类似;另外注意daemon.json中不能有注释(不论是中文还是英文),否则启动不了!下面注释只为了个人查阅方便;
对于为什么要改变docker的cgroup driver,可以参考这篇文章:linux(centos8):配置docker的cgroup driver为systemd
root@frank0-13:~# mkdir -p /data/docker
root@frank0-13:~# more /etc/docker/daemon.json
{
        "graph": "/data/docker",   #废弃了
        "data-root":"/data/docker",  #Docker运行时使用的根路径
        "storage-driver": "overlay2",
        "insecure-registries": ["registry.access.redhat.com", "quay.io", "harbor.frank.com"], #配置docker的私库地址
        "registry-mirrors": ["https://docker.mirrors.ustc.edu.cn/"], #镜像加速的地址
        "bip": "172.1.13.1/24", #指定docker0的IP
        "exec-opts": ["native.cgroupdriver=systemd"],  #kubenate建议使用systemd来限制,所以改驱动
        "live-restore": true
}
root@frank0-13:~# systemctl start docker
root@frank0-13:~# systemctl enable docker
root@frank0-13:~# docker info |grep -E "Cgroup Driver| Docker Root Dir|registry"
 Cgroup Driver: systemd
 Docker Root Dir: /data/docker
  registry.access.redhat.com
root@frank0-13:~# ifconfig docker0|grep inet
        inet 172.1.13.1  netmask 255.255.255.0  broadcast 172.1.13.255
Docker私有库安装部署
私有库采用的是harbor,vmware开源的软件,用的比较多,目前两个主版本1.x和2.x,我用了1.x的版本;详细信息可以参考这篇文章:Docker之分布式仓库Harbor部署 ;
版本信息
安装Harbor并部署
root@frank0-15:~# apt install docker-compose
root@frank0-15:~# mkdir /opt/src
root@frank0-15:~# cd /opt/src/
root@frank0-15:/opt/src# wget https://github.com/goharbor/harbor/releases/download/v1.10.10/harbor-offline-installer-v1.10.10.tgz
root@frank0-15:/opt/src# tar -xvf harbor-offline-installer-v1.10.10.tgz -C /opt/
root@frank0-15:/opt/src# cd ..
root@frank0-15:/opt# mv harbor/ harbor-v1.10.10
root@frank0-15:/opt# ln -s /opt/harbor-v1.10.10/ /opt/harbor
root@frank0-15:/opt# ls -l
total 16
drwxr-xr-x 2 root root 4096 Dec 25 12:13 certs
drwx--x--x 4 root root 4096 Dec 27 02:19 containerd
lrwxrwxrwx 1 root root   21 Jan 25 06:09 harbor -> /opt/harbor-v1.10.10/
drwxr-xr-x 2 root root 4096 Jan 25 06:07 harbor-v1.10.10
drwxr-xr-x 2 root root 4096 Jan 25 06:07 src
root@frank0-15:/opt# cd harbor
root@frank0-15:/opt/harbor# ls -l
total 597992
-rw-r--r-- 1 root root      3398 Jan 12 04:08 common.sh
-rw-r--r-- 1 root root 612306524 Jan 12 04:09 harbor.v1.10.10.tar.gz
-rw-r--r-- 1 root root      5882 Jan 12 04:08 harbor.yml
-rwxr-xr-x 1 root root      2284 Jan 12 04:08 install.sh
-rw-r--r-- 1 root root     11347 Jan 12 04:08 LICENSE
-rwxr-xr-x 1 root root      1750 Jan 12 04:08 prepare
root@frank0-15:/opt/harbor# mkdir -p /data/harbor/logs
root@frank0-15:/opt/harbor# cp harbor.yml harbor.yml.bak
root@frank0-15:/opt/harbor# diff harbor.yml harbor.yml.bak
5c5
< hostname: harbor.frank.com
---
> hostname: reg.mydomain.com
10c10
<   port: 800
---
>   port: 80
13c13
< #https:
---
> https:
15c15
<   #  port: 443
---
>   port: 443
17,18c17,18
<   #  certificate: /your/certificate/path
<   # private_key: /your/private/key/path
---
>   certificate: /your/certificate/path
>   private_key: /your/private/key/path
27c27
< harbor_admin_password: 12345678
---
> harbor_admin_password: Harbor12345
40c40
< data_volume: /data/harbor
---
> data_volume: /data
77c77
<   level: debug
---
>   level: info
87c87
<     location: /data/harbor/logs
---
>     location: /var/log/harbor
root@frank0-15:/opt/harbor# ./install.sh
[Step 0]: checking if docker is installed ...
Note: docker version: 20.10.8
[Step 1]: checking docker-compose is installed ...
Note: docker-compose version: 1.25.0
[Step 2]: loading Harbor images ...
Loaded image: goharbor/harbor-portal:v1.10.10
Loaded image: goharbor/registry-photon:v1.10.10
Loaded image: goharbor/clair-adapter-photon:v1.10.10
Loaded image: goharbor/chartmuseum-photon:v1.10.10
Loaded image: goharbor/notary-signer-photon:v1.10.10
Loaded image: goharbor/prepare:v1.10.10
Loaded image: goharbor/harbor-core:v1.10.10
Loaded image: goharbor/harbor-registryctl:v1.10.10
Loaded image: goharbor/redis-photon:v1.10.10
Loaded image: goharbor/harbor-log:v1.10.10
Loaded image: goharbor/harbor-db:v1.10.10
Loaded image: goharbor/harbor-jobservice:v1.10.10
Loaded image: goharbor/notary-server-photon:v1.10.10
Loaded image: goharbor/nginx-photon:v1.10.10
Loaded image: goharbor/clair-photon:v1.10.10
[Step 3]: preparing environment ...
[Step 4]: preparing harbor configs ...
prepare base dir is set to /opt/harbor-v1.10.10
/usr/src/app/utils/configs.py:100: YAMLLoadWarning: calling yaml.load() without Loader=... is deprecated, as the default Loader is unsafe. Please read https://msg.pyyaml.org/load for full details.
configs = yaml.load(f)
WARNING:root:WARNING: HTTP protocol is insecure. Harbor will deprecate http protocol in the future. Please make sure to upgrade to https
/usr/src/app/utils/configs.py:90: YAMLLoadWarning: calling yaml.load() without Loader=... is deprecated, as the default Loader is unsafe. Please read https://msg.pyyaml.org/load for full details.
versions = yaml.load(f)
Generated configuration file: /config/log/logrotate.conf
Generated configuration file: /config/log/rsyslog_docker.conf
Generated configuration file: /config/nginx/nginx.conf
Generated configuration file: /config/core/env
Generated configuration file: /config/core/app.conf
Generated configuration file: /config/registry/config.yml
Generated configuration file: /config/registryctl/env
Generated configuration file: /config/db/env
Generated configuration file: /config/jobservice/env
Generated configuration file: /config/jobservice/config.yml
Generated and saved secret to file: /secret/keys/secretkey
Generated certificate, key file: /secret/core/private_key.pem, cert file: /secret/registry/root.crt
Generated configuration file: /compose_location/docker-compose.yml
Clean up the input dir
[Step 5]: starting Harbor ...
Creating network "harbor-v11010_harbor" with the default driver
Creating harbor-log ... done
Creating harbor-portal ... done
Creating redis ... done
Creating registryctl ... done
Creating registry ... done
Creating harbor-db ... done
Creating harbor-core ... done
Creating nginx ... done
Creating harbor-jobservice ... done
✔ ----Harbor has been installed and started successfully.----root@frank0-15:/opt/harbor# docker-compose ps
Name Command State Ports
----------------------------------------------------------------------------------------------------------
harbor-core /harbor/harbor_core Up (healthy)
harbor-db /docker-entrypoint.sh Up (healthy) 5432/tcp
harbor-jobservice /harbor/harbor_jobservice ... Up (healthy)
harbor-log /bin/sh -c /usr/local/bin/ ... Up (healthy) 127.0.0.1:1514->10514/tcp
harbor-portal nginx -g daemon off; Up (healthy) 8080/tcp
nginx nginx -g daemon off; Up (healthy) 0.0.0.0:800->8080/tcp,:::800->8080/tcp
redis redis-server /etc/redis.conf Up (healthy) 6379/tcp
registry /home/harbor/entrypoint.sh Up (healthy) 5000/tcp
registryctl /home/harbor/start.sh Up (healthy) 安装Nginx反向代理Harbor
注意:在新版本的nginx中默认建议在/etc/nginx/sites-enable/default中配置80的代理,为了可以自由的为不同服务设置不同的80代理以及配置文件,建议注释掉“sites-enabled”,可以参考这边文章:
root@frank0-15:~# apt install nginx -y
root@frank0-15:~# more /etc/nginx/nginx.conf |grep -E "64|include"
include /etc/nginx/modules-enabled/*.conf;
        server_names_hash_bucket_size 64;
        include /etc/nginx/mime.types;
        include /etc/nginx/conf.d/*.conf;
        # include /etc/nginx/sites-enabled/*;
root@frank0-15:~# more /etc/nginx/conf.d/harbor.frank.com.conf
server {
listen 80;
server_name harbor.frank.com;
client_max_body_size 1000m;
location / {
proxy_pass http://127.0.0.1:800;
}
}
root@frank0-15:~# nginx -t
nginx: the configuration file /etc/nginx/nginx.conf syntax is ok
nginx: configuration file /etc/nginx/nginx.conf test is successful
root@frank0-15:~# systemctl enable nginx
Synchronizing state of nginx.service with SysV service script with /lib/systemd/systemd-sysv-install.
Executing: /lib/systemd/systemd-sysv-install enable nginx
root@frank0-15:~# systemctl restart nginx在DNS的业务域内增加解析
root@frank0-11:~# more /etc/bind/db.frank.com |grep harbor
harbor          A       172.20.0.15
root@frank0-11:~# dig -t A harbor.frank.com @172.20.0.11 +short
172.20.0.15
去15上验证下:
root@frank0-15:~# curl harbor.od.com
curl: (6) Could not resolve host: harbor.od.com
root@frank0-15:~# curl harbor.frank.com
<!doctype html>
<html>

<head>
    <meta charset="utf-8">
    <title>Harbor</title>
    <base href="/">
    <meta name="viewport" content="width=device-width, initial-scale=1">
    <link rel="icon" type="image/x-icon" href="favicon.ico?v=2">
<link rel="stylesheet" href="styles.701dc5ee3007bd83bfa4.css"></head>

<body>
    <harbor-app>
        <div class="spinner spinner-lg app-loading">
            Loading...
        </div>
    </harbor-app>
<script src="runtime.9ad22a88fcc70a015907.js" defer></script><script src="polyfills-es5.d01e8ad6bc0c07b49ab6.js" nomodule defer></script><script src="scripts.7fa3fa51e1a86dfba2c8.js" defer></script><script src="main.dc691566affd40507d3b.js" defer></script></body>
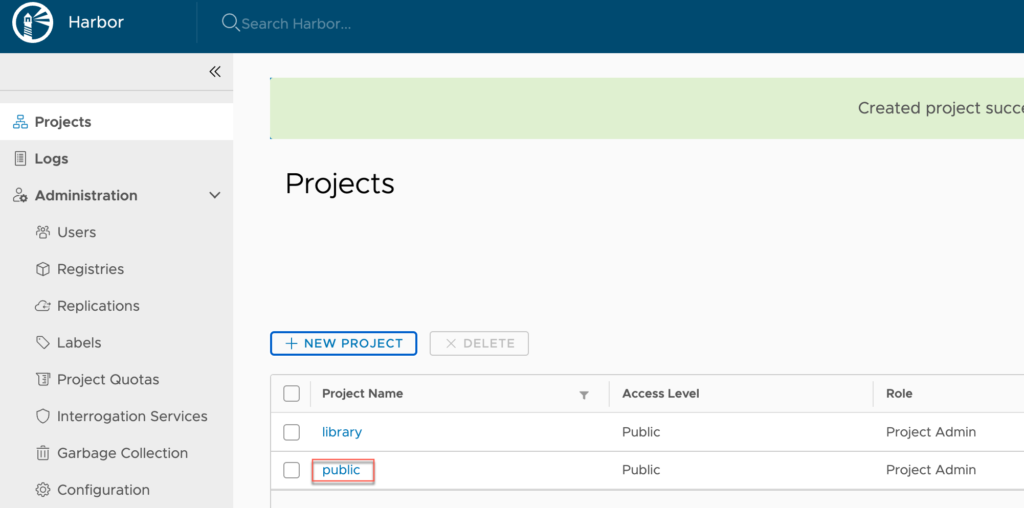
在harbor上新建一个public的project:
从docker hub上下载Image并push到harbor上
在pull前如果想确认image的版本信息,可以参考我另一篇总结;
root@frank0-15:/opt/harbor# docker pull nginx:1.9.8
1.9.8: Pulling from library/nginx
Image docker.io/library/nginx:1.9.8 uses outdated schema1 manifest format. Please upgrade to a schema2 image for better future compatibility. More information at https://docs.docker.com/registry/spec/deprecated-schema-v1/
d4bce7fd68df: Pull complete
a3ed95caeb02: Pull complete
573113c4751a: Pull complete
31917632be33: Pull complete
b4f281573cac: Pull complete
3a650fa8762e: Pull complete
e2f06f61b5b6: Pull complete
Digest: sha256:5d3b56065cf133f8968a557bf49c639320b2fc4c57c635b5707978fb6b738e1f
Status: Downloaded newer image for nginx:1.9.8
docker.io/library/nginx:1.9.8
root@frank0-15:/opt/harbor# docker images |grep 1.9.8
nginx                           1.9.8      602a1c175cff   6 years ago   134MB
root@frank0-15:/opt/harbor# docker tag 602a1c175cff harbor.frank.com/public/nginx:v1.9.8
root@frank0-15:/opt/harbor# docker images |grep 1.9.8
nginx                           1.9.8      602a1c175cff   6 years ago   134MB
harbor.frank.com/public/nginx   v1.9.8     602a1c175cff   6 years ago   134MB
root@frank0-15:/opt/harbor# docker login harbor.frank.com
Username: admin
Password:
WARNING! Your password will be stored unencrypted in /root/.docker/config.json.
Configure a credential helper to remove this warning. See
https://docs.docker.com/engine/reference/commandline/login/#credentials-store

Login Succeeded
root@frank0-15:/opt/harbor# docker push harbor.frank.com/public/nginx:v1.9.8
The push refers to repository [harbor.frank.com/public/nginx]
5f70bf18a086: Pushed
83ee3f858827: Pushed
63af2286bcc7: Pushed
6e052756d5ce: Pushed
ebfc3a74f160: Pushed
031458dc7254: Pushed
12e469267d21: Pushed
v1.9.8: digest: sha256:2dea8e6cdf1629c45b9d8f6d92850ff18459beb6771c80282f76568b58deba72 size: 2805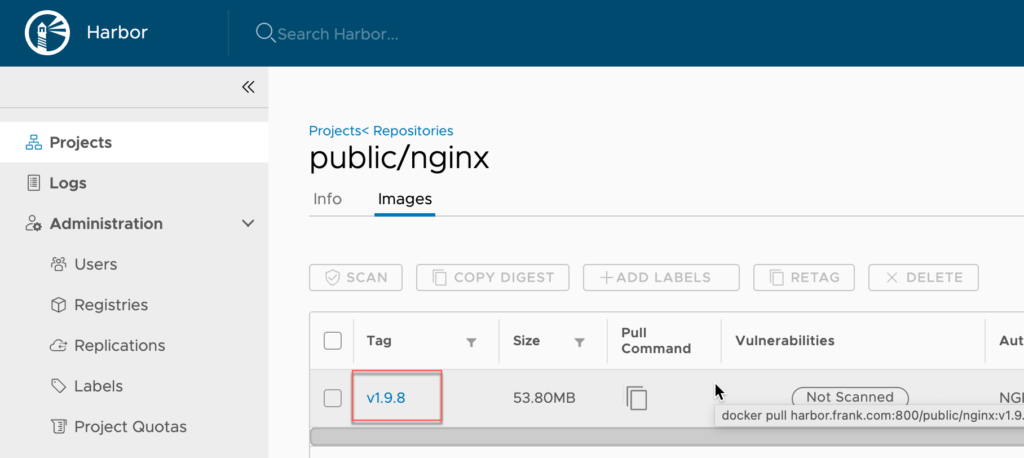
部署etcd集群
在运维主机上签证书
为程序签证书,需要用到最开始生成的根证书,具体看这里;
首先创建 ca-config.json ,设置证书时间,以及每个profile的证书信息:
root@frank0-15:/opt/certs# more ca-config.json
{
    "signing": {
        "default": {
            "expiry": "175200h"
        },
        "profiles": {
            "server": {
                "expiry": "175200h",
                "usages": [
                    "signing",
                    "key encipherment",
                    "server auth"
                ]
            },
            "client": {
                "expiry": "175200h",
                "usages": [
                    "signing",
                    "key encipherment",
                    "client auth"
                ]
            },
            "peer": {
                "expiry": "175200h",
                "usages": [
                    "signing",
                    "key encipherment",
                    "server auth",
                    "client auth"
                ]
            }
        }
    }
}
配置签证书时etcd相关的信息:
root@frank0-15:/opt/certs# more etcd-peer-csr.json
{
    "CN": "k8s-etcd",
    "hosts": [
        "172.20.0.11",
        "172.20.0.12",
        "172.20.0.13",
        "172.20.0.14"
    ],
    "key": {
        "algo": "rsa",
        "size": 2048
    },
    "names": [
        {
        "C": "CN",
        "ST": "ShangHai",
        "L": "ShangHai",
        "O": "FZ",
        "OU": "arch"
        }
    ]
}
用命令及根证书为etcd签证书:
这里有一个不太理解的地方,profile指定了3个,分别是server,client和peer,但生成证书时只用到了peer,那么这个名称其实没有实际意义,只是一个标识?真正有意义的是每个profile里的认证方式,如“server auth”,“client auth”;
root@frank0-15:/opt/certs# cfssl gencert -ca=ca.pem -ca-key=ca-key.pem -config=ca-config.json -profile=peer etcd-peer-csr.json |cfssl-json -bare etcd-peer
2022/07/24 08:37:24 [INFO] generate received request
2022/07/24 08:37:24 [INFO] received CSR
2022/07/24 08:37:24 [INFO] generating key: rsa-2048
2022/07/24 08:37:24 [INFO] encoded CSR
2022/07/24 08:37:24 [INFO] signed certificate with serial number 729307743535706793169096275004063978628649346810
2022/07/24 08:37:24 [WARNING] This certificate lacks a "hosts" field. This makes it unsuitable for
websites. For more information see the Baseline Requirements for the Issuance and Management
of Publicly-Trusted Certificates, v.1.1.6, from the CA/Browser Forum (https://cabforum.org);
specifically, section 10.2.3 ("Information Requirements").
root@frank0-15:/opt/certs# ll |grep pem
-rw------- 1 root root 1679 Dec 25  2021 ca-key.pem
-rw-r--r-- 1 root root 1139 Dec 25  2021 ca.pem
-rw------- 1 root root 1679 Jul 24 08:37 etcd-peer-key.pem
-rw-r--r-- 1 root root 1330 Jul 24 08:37 etcd-peer.pem
至于-ca,-ca-key,profile具体指什么,可以-h查看,如下:
root@frank0-15:/home/lab# cfssl gencert -h
cfssl gencert -- generate a new key and signed certificate
Usage of gencert:
Generate a new key and cert from CSR:
cfssl gencert -initca CSRJSON
cfssl gencert -ca cert -ca-key key [-config config] [-profile profile] [-hostname hostname] CSRJSON
cfssl gencert -remote remote_host [-config config] [-profile profile] [-label label] [-hostname hostname] CSRJSON
Re-generate a CA cert with the CA key and CSR:
cfssl gencert -initca -ca-key key CSRJSON
Re-generate a CA cert with the CA key and certificate:
cfssl gencert -renewca -ca cert -ca-key key
Arguments:
CSRJSON: JSON file containing the request, use '-' for reading JSON from stdin
Flags:
-initca=false: initialise new CA
-remote="": remote CFSSL server
-ca="": CA used to sign the new certificate
-ca-key="": CA private key
-config="": path to configuration file
-hostname="": Hostname for the cert, could be a comma-separated hostname list
-profile="": signing profile to use
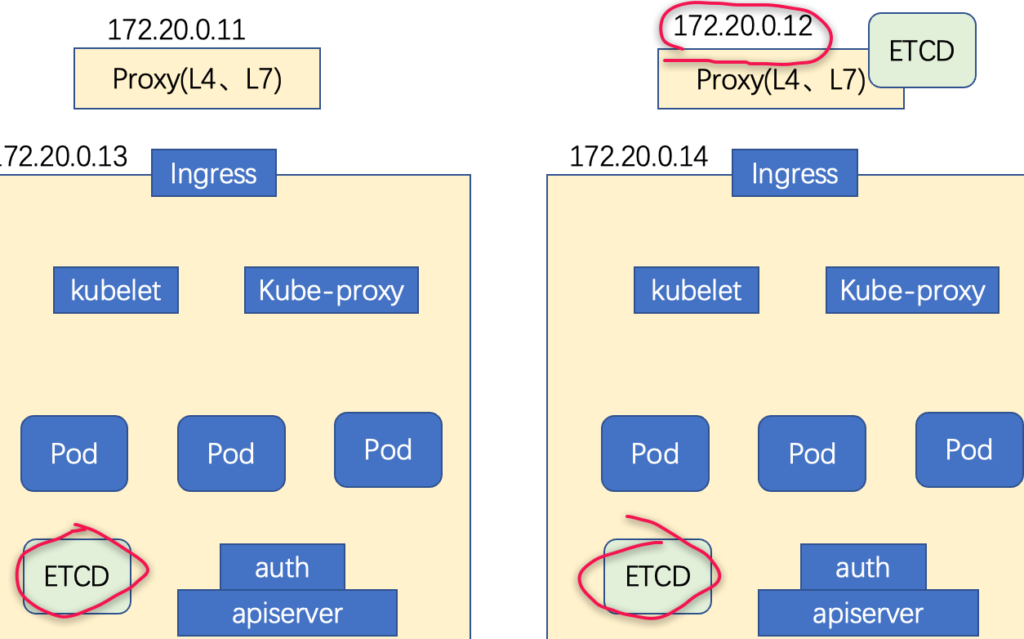
-label="": key label to use in remote CFSSL server部署etcd
etcd集群根据它的高可用机制,建议部署奇数个;
如图所示,在12,13和14上部署etcd集群,11也可以作为备份填进去,在这里只展示13的etcd安装步骤,其他几个类同;
创建etcd的用户名:
其中-s是指定用户登录后所使用的shell,/sbin/nologin的意思是不适用该账号登录系统,-M不创建家目录
root@frank0-13:/home/lab# useradd -s /sbin/nologin -M etcd
root@frank0-13:/home/lab# id etcd
uid=1001(etcd) gid=1001(etcd) groups=1001(etcd)
从github下载etcd 3.1.20,link在这里,按照说明下载即可,只是国内网络不是很稳定,要多试几次,实在不行就用别的方法吧:
root@frank0-13:/home/lab# ETCD_VER=v3.1.20
root@frank0-13:/home/lab# DOWNLOAD_URL=https://github.com/coreos/etcd/releases/download
root@frank0-13:/home/lab# curl -L ${DOWNLOAD_URL}/${ETCD_VER}/etcd-${ETCD_VER}-linux-amd64.tar.gz -o ./etcd-${ETCD_VER}-linux-amd64.tar.gz
  % Total    % Received % Xferd  Average Speed   Time    Time     Time  Current
                                 Dload  Upload   Total   Spent    Left  Speed
  0     0    0     0    0     0      0      0 --:--:-- --:--:-- --:--:--     0
  0     0    0     0    0     0      0      0 --:--:-- --:--:-- --:--:--     0
100 9619k  100 9619k    0     0  21024      0  0:07:48  0:07:48 --:--:--  2812
root@frank0-13:/home/lab# ls
etcd-v3.1.20-linux-amd64.tar.gz
root@frank0-13:/home/lab# tar xfv etcd-v3.1.20-linux-amd64.tar.gz -C /opt/
root@frank0-13:/home/lab# cd /opt/
root@frank0-13:/opt# mv etcd-v3.1.20-linux-amd64 etcd-v3.1.20
root@frank0-13:/opt# ls
containerd  etcd-v3.1.20
创建软连接,以后更新etcd的版本后,只要更新下软连接即可:
root@frank0-13:/opt# ln -s /opt/etcd-v3.1.20 /opt/etcd
root@frank0-13:/opt# ls -l
total 8
drwx--x--x 4 root   root  4096 Dec 27  2021 containerd
lrwxrwxrwx 1 root   root    17 Jul 25 03:11 etcd -> /opt/etcd-v3.1.20
drwxr-xr-x 3 478493 89939 4096 Oct 10  2018 etcd-v3.1.20
创建目录,拷贝证书和秘钥,拷贝过程不在这里描述
root@frank0-13:/opt# mkdir -p /opt/etcd/certs /data/etcd /data/logs/etcd-server
root@frank0-13:/opt# cd etcd/certs/
root@frank0-13:/opt/etcd/certs# ll
total 20
drwxr-xr-x 2 root   root  4096 Jul 25 03:37 ./
drwxr-xr-x 4 478493 89939 4096 Jul 25 03:14 ../
-rw-r--r-- 1 root   root  1139 Jul 25 03:22 ca.pem
-rw------- 1 root   root  1679 Jul 25 03:22 etcd-peer-key.pem
-rw-r--r-- 1 root   root  1330 Jul 25 03:22 etcd-peer.pem
更改新建目录的归属为etcd,查看目录下的pem也已经更改:
root@frank0-13:/opt/etcd/certs# chown -R etcd.etcd /opt/etcd/certs /data/etcd /data/logs/etcd-server
root@frank0-13:/opt/etcd/certs# ll
total 20
drwxr-xr-x 2 etcd   etcd  4096 Jul 25 03:37 ./
drwxr-xr-x 4 478493 89939 4096 Jul 25 03:14 ../
-rw-r--r-- 1 etcd   etcd  1139 Jul 25 03:22 ca.pem
-rw------- 1 etcd   etcd  1679 Jul 25 03:22 etcd-peer-key.pem
-rw-r--r-- 1 etcd etcd 1330 Jul 25 03:22 etcd-peer.pem先设置etcd的启动脚本,然后通过supervisor来进行后台管理(注意ubuntu跟centos中的supervisor不太一样,这里只列出ubuntu的用法):
- 在“/etc/supervisor/conf.d”中建立etcd-server.conf文件,里面填好etcd相关的sh位置,以及进程管理的相关配置;
- sh脚本中必须包含“#!/bin/sh”,否则supervisor启动时会报“couldn’t exec /opt/etcd/etcd-server-startup.sh: ENOEXEC”;
- 使用supervisorctl进行update配置文件,以及查看监控进程的信息;
- 第一次成功执行时可能会报“etcdmain: error listing data dir: /data/etcd/etcd-server”,因为里面生成的member文件夹是root的,重新改下归属即可“chown -R etcd:etcd /data/etcd/”;
root@frank0-13:/opt/etcd# more etcd-server-startup.sh
#!/bin/sh
./etcd --name etcd-server-0-13 \
       --data-dir /data/etcd/etcd-server \
       --listen-peer-urls https://172.20.0.13:2380 \
       --listen-client-urls https://172.20.0.13:2379,http://127.0.0.1:2379 \
       --quota-backend-bytes 8000000000 \
       --initial-advertise-peer-urls https://172.20.0.13:2380 \
       --advertise-client-urls https://172.20.0.13:2379,http://127.0.0.1:2379 \
       --initial-cluster  etcd-server-0-13=https://172.20.0.13:2380,etcd-server-0-14=https://172.20.0.14:2380,etcd-server-0-12=https://172.20.0.12:2380 \
       --ca-file ./certs/ca.pem \
       --cert-file ./certs/etcd-peer.pem \
       --key-file ./certs/etcd-peer-key.pem \
       --client-cert-auth  \
       --trusted-ca-file ./certs/ca.pem \
       --peer-ca-file ./certs/ca.pem \
       --peer-cert-file ./certs/etcd-peer.pem \
       --peer-key-file ./certs/etcd-peer-key.pem \
       --peer-client-cert-auth \
       --peer-trusted-ca-file ./certs/ca.pem \
       --log-output stdout
root@frank0-13:/opt/etcd#
root@frank0-13:/opt/etcd# chmod +x etcd-server-startup.sh
root@frank0-13:/opt/etcd# chown -R etcd.etcd etcd-server-startup.sh
root@frank0-13:/opt/etcd# apt install supervisor -y
root@frank0-13:/opt/etcd# systemctl start supervisor
root@frank0-13:/opt/etcd# systemctl enable supervisor
root@frank0-13:/etc/supervisor/conf.d# more etcd-server.conf
[program:etcd-server-0-13]
command=/opt/etcd/etcd-server-startup.sh ; the program (relative uses PATH, can take args)
numprocs=1 ; number of processes copies to start (def 1)
directory=/opt/etcd ; directory to cwd to before exec (def no cwd)
autostart=true ; start at supervisord start (default: true)
autorestart=true ; retstart at unexpected quit (default: true)
startsecs=30 ; number of secs prog must stay running (def. 1)
startretries=3 ; max # of serial start failures (default 3)
exitcodes=0,2 ; 'expected' exit codes for process (default 0,2)
stopsignal=QUIT ; signal used to kill process (default TERM)
stopwaitsecs=10 ; max num secs to wait b4 SIGKILL (default 10)
user=etcd ; setuid to this UNIX account to run the program
redirect_stderr=true ; redirect proc stderr to stdout (default false)
stdout_logfile=/data/logs/etcd-server/etcd.stdout.log ; stdout log path, NONE for none; default AUTO
stdout_logfile_maxbytes=64MB ; max # logfile bytes b4 rotation (default 50MB)
stdout_logfile_backups=4 ; # of stdout logfile backups (default 10)
stdout_capture_maxbytes=1MB ; number of bytes in 'capturemode' (default 0)
stdout_events_enabled=false ; emit events on stdout writes (default false)
root@frank0-13:/etc/supervisor/conf.d#
root@frank0-13:/etc/supervisor/conf.d# supervisorctl update
etcd-server-0-13: added process group
root@frank0-13:/etc/supervisor/conf.d# supervisorctl start all
etcd-server-0-13: started
root@frank0-13:/etc/supervisor/conf.d# supervisorctl status
etcd-server-0-13 RUNNING pid 8076, uptime 0:10:19在另外2台设备上部署完etcd后,查看所以3台设备etcd的状态
root@frank0-12:/data/etcd# netstat -luntp|grep etcd
tcp        0      0 172.20.0.12:2379        0.0.0.0:*               LISTEN      6277/./etcd
tcp        0      0 127.0.0.1:2379          0.0.0.0:*               LISTEN      6277/./etcd
tcp        0      0 172.20.0.12:2380        0.0.0.0:*               LISTEN      6277/./etcd
root@frank0-13:/data/etcd# netstat -luntp|grep etcd
tcp 0 0 172.20.0.13:2379 0.0.0.0:* LISTEN 8077/./etcd
tcp 0 0 127.0.0.1:2379 0.0.0.0:* LISTEN 8077/./etcd
tcp 0 0 172.20.0.13:2380 0.0.0.0:* LISTEN 8077/./etcd root@frank0-14:/data/etcd# netstat -luntp|grep etcd
tcp 0 0 172.20.0.14:2379 0.0.0.0:* LISTEN 6536/./etcd
tcp 0 0 127.0.0.1:2379 0.0.0.0:* LISTEN 6536/./etcd
tcp 0 0 172.20.0.14:2380 0.0.0.0:* LISTEN 6536/./etcd root@frank0-13:/opt/etcd# ./etcdctl cluster-health
member 498804779e79db6e is healthy: got healthy result from http://127.0.0.1:2379
member 50f9f81807d702de is healthy: got healthy result from http://127.0.0.1:2379
member f454af1a92390b2e is healthy: got healthy result from http://127.0.0.1:2379
cluster is healthy
root@frank0-13:/opt/etcd# ./etcdctl member list
498804779e79db6e: name=etcd-server-0-13 peerURLs=https://172.20.0.13:2380 clientURLs=http://127.0.0.1:2379,https://172.20.0.13:2379 isLeader=true
50f9f81807d702de: name=etcd-server-0-12 peerURLs=https://172.20.0.12:2380 clientURLs=http://127.0.0.1:2379,https://172.20.0.12:2379 isLeader=false
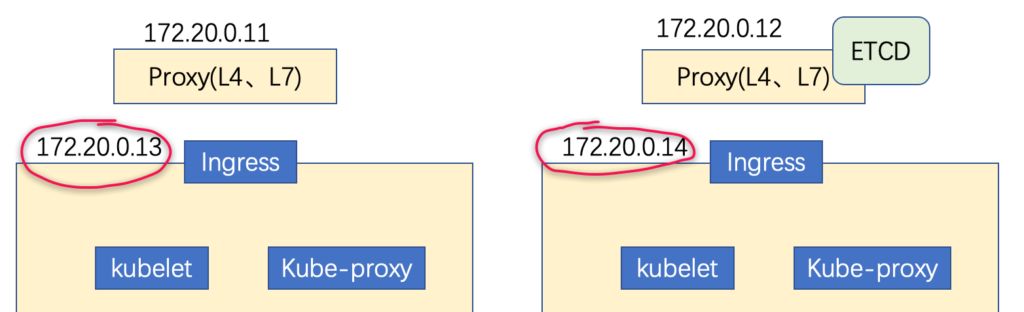
f454af1a92390b2e: name=etcd-server-0-14 peerURLs=https://172.20.0.14:2380 clientURLs=http://127.0.0.1:2379,https://172.20.0.14:2379 isLeader=false部署 apiserver
Apiserver,controller-manager和scheduler作为主控节点的组件,建议部署在一个主机上,可利用127.0.0.1:8080进行通信,否则需要签发证书,用https进行通信;
如下图所示,在13和14上部署apiserver:
签发apiserver Client证书-frank0-15
主要用于apiserver作为客户端同服务端的etcd进行通信的验证
root@frank0-15:/opt/certs# more client-csr.json
{
    "CN": "k8s-node",
    "hosts": [
    ],
    "key": {
        "algo": "rsa",
        "size": 2048
    },
    "names": [
        {
            "C": "CN",
            "ST": "ShangHai",
            "L": "ShangHai",
            "O": "FZ",
            "OU": "arch"
        }
    ]
}
root@frank0-15:/opt/certs# cfssl gencert -ca=ca.pem -ca-key=ca-key.pem -config=ca-config.json -profile=client client-csr.json |cfssl-json -bare client
2022/07/26 14:09:47 [INFO] generate received request
2022/07/26 14:09:47 [INFO] received CSR
2022/07/26 14:09:47 [INFO] generating key: rsa-2048
2022/07/26 14:09:47 [INFO] encoded CSR
2022/07/26 14:09:47 [INFO] signed certificate with serial number 271966513219881674792039038053586795874664491130
2022/07/26 14:09:47 [WARNING] This certificate lacks a "hosts" field. This makes it unsuitable for
websites. For more information see the Baseline Requirements for the Issuance and Management
of Publicly-Trusted Certificates, v.1.1.6, from the CA/Browser Forum (https://cabforum.org);
specifically, section 10.2.3 ("Information Requirements").
root@frank0-15:/opt/certs#
root@frank0-15:/opt/certs# ll
total 60
drwxr-xr-x 2 root root 4096 Jul 26 14:09 ./
drwxr-xr-x 6 root root 4096 Jul 26 14:03 ../
-rw-r--r-- 1 root root 840 Jul 24 08:25 ca-config.json
-rw-r--r-- 1 root root 891 Dec 25 2021 ca.csr
-rw-r--r-- 1 root root 226 Dec 25 2021 ca-csr.json
-rw------- 1 root root 1679 Dec 25 2021 ca-key.pem
-rw-r--r-- 1 root root 1139 Dec 25 2021 ca.pem
-rw-r--r-- 1 root root 997 Jul 26 14:09 client.csr
-rw-r--r-- 1 root root 283 Jul 26 14:06 client-csr.json
-rw------- 1 root root 1679 Jul 26 14:09 client-key.pem
-rw-r--r-- 1 root root 1265 Jul 26 14:09 client.pem
-rw-r--r-- 1 root root 1066 Jul 24 08:37 etcd-peer.csr
-rw-r--r-- 1 root root 354 Jul 24 08:31 etcd-peer-csr.json
-rw------- 1 root root 1679 Jul 24 08:37 etcd-peer-key.pem
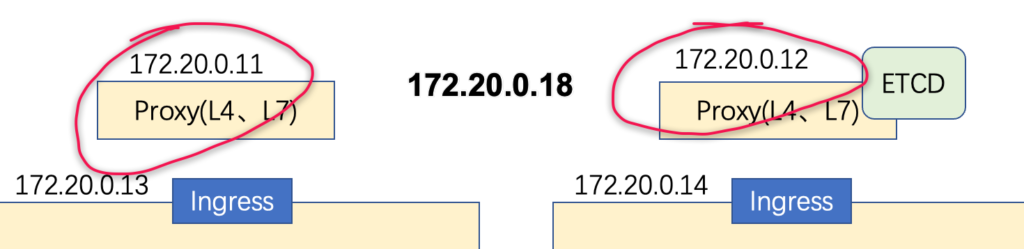
-rw-r--r-- 1 root root 1330 Jul 24 08:37 etcd-peer.pem签发apiserver Server证书-frank0-15
172.20.0.18是代理服务器上的VIP地址;
root@frank0-15:/opt/certs# more apiserver-csr.json
{
    "CN": "k8s-apiserver",
    "hosts": [
        "127.0.0.1",
        "10.254.0.1",
        "kubernetes.default",
        "kubernetes.default.svc",
        "kubernetes.default.svc.cluster",
        "kubernetes.default.svc.cluster.local",
        "172.20.0.12"
        "172.20.0.13",
        "172.20.0.14",
        "172.20.0.18"
    ],
    "key": {
        "algo": "rsa",
        "size": 2048
    },
    "names": [
        {
            "C": "CN",
            "ST": "ShangHai",
            "L": "ShangHai",
            "O": "FZ",
            "OU": "arch"
        }
    ]
}
root@frank0-15:/opt/certs# cfssl gencert -ca=ca.pem -ca-key=ca-key.pem -config=ca-config.json -profile=server apiserver-csr.json |cfssl-json -bare apiserver
2022/07/26 14:22:32 [INFO] generate received request
2022/07/26 14:22:32 [INFO] received CSR
2022/07/26 14:22:32 [INFO] generating key: rsa-2048
2022/07/26 14:22:33 [INFO] encoded CSR
2022/07/26 14:22:33 [INFO] signed certificate with serial number 538419072605688735436698527829949423960790878321
2022/07/26 14:22:33 [WARNING] This certificate lacks a "hosts" field. This makes it unsuitable for
websites. For more information see the Baseline Requirements for the Issuance and Management
of Publicly-Trusted Certificates, v.1.1.6, from the CA/Browser Forum (https://cabforum.org);
specifically, section 10.2.3 ("Information Requirements").
root@frank0-15:/opt/certs# ll
total 76
drwxr-xr-x 2 root root 4096 Jul 26 14:22 ./
drwxr-xr-x 6 root root 4096 Jul 26 14:03 ../
-rw-r--r-- 1 root root 1245 Jul 26 14:22 apiserver.csr
-rw-r--r-- 1 root root 553 Jul 26 14:21 apiserver-csr.json
-rw------- 1 root root 1675 Jul 26 14:22 apiserver-key.pem
-rw-r--r-- 1 root root 1493 Jul 26 14:22 apiserver.pem
-rw-r--r-- 1 root root 840 Jul 24 08:25 ca-config.json
-rw-r--r-- 1 root root 891 Dec 25 2021 ca.csr
-rw-r--r-- 1 root root 226 Dec 25 2021 ca-csr.json
-rw------- 1 root root 1679 Dec 25 2021 ca-key.pem
-rw-r--r-- 1 root root 1139 Dec 25 2021 ca.pem
-rw-r--r-- 1 root root 997 Jul 26 14:09 client.csr
-rw-r--r-- 1 root root 283 Jul 26 14:06 client-csr.json
-rw------- 1 root root 1679 Jul 26 14:09 client-key.pem
-rw-r--r-- 1 root root 1265 Jul 26 14:09 client.pem
-rw-r--r-- 1 root root 1066 Jul 24 08:37 etcd-peer.csr
-rw-r--r-- 1 root root 354 Jul 24 08:31 etcd-peer-csr.json
-rw------- 1 root root 1679 Jul 24 08:37 etcd-peer-key.pem
-rw-r--r-- 1 root root 1330 Jul 24 08:37 etcd-peer.pem下载并解压k8s组件
apiserver是k8s中的其中一个服务,所以我们需要安装k8s组件,k8s可以从github上直接下载,选择Server Binaries,但需要科学上网(不理解为啥这东西也要被x);
root@frank0-13:/opt/src# tar xvf kubernetes-server-linux-amd64-v1.15.2.tar.gz -C /opt
root@frank0-13:/opt/src# cd /opt/
root@frank0-13:/opt# mv kubernetes kubernetes-v1.15.2
root@frank0-13:/opt# ln -s /opt/kubernetes-v1.15.2 /opt/kubernetes
root@frank0-13:/opt# ll
total 24
drwxrwxrwx  6 root   root  4096 Jul 26 13:51 ./
drwxr-xr-x 21 root   root  4096 Jan 24  2022 ../
drwx--x--x  4 root   root  4096 Dec 27  2021 containerd/
lrwxrwxrwx  1 root   root    17 Jul 25 03:11 etcd -> /opt/etcd-v3.1.20/
drwxr-xr-x  4 478493 89939 4096 Jul 25 05:45 etcd-v3.1.20/
lrwxrwxrwx  1 root   root    23 Jul 26 13:51 kubernetes -> /opt/kubernetes-v1.15.2/
drwxr-xr-x  4 root   root  4096 Aug  5  2019 kubernetes-v1.15.2/
drwxrwxr-x  2 lab    lab   4096 Jul 25 12:03 src/
手动删掉没有用的tar文件,剩下的都是执行文件,如下:
root@frank0-13:/opt/kubernetes/server/bin# ll
total 884648
drwxr-xr-x 2 root root      4096 Jul 26 13:53 ./
drwxr-xr-x 3 root root      4096 Aug  5  2019 ../
-rwxr-xr-x 1 root root  43534816 Aug  5  2019 apiextensions-apiserver*
-rwxr-xr-x 1 root root 100548640 Aug  5  2019 cloud-controller-manager*
-rwxr-xr-x 1 root root 200648416 Aug  5  2019 hyperkube*
-rwxr-xr-x 1 root root  40182208 Aug  5  2019 kubeadm*
-rwxr-xr-x 1 root root 164501920 Aug  5  2019 kube-apiserver*
-rwxr-xr-x 1 root root 116397088 Aug  5  2019 kube-controller-manager*
-rwxr-xr-x 1 root root  42985504 Aug  5  2019 kubectl*
-rwxr-xr-x 1 root root 119616640 Aug  5  2019 kubelet*
-rwxr-xr-x 1 root root  36987488 Aug  5  2019 kube-proxy*
-rwxr-xr-x 1 root root  38786144 Aug  5  2019 kube-scheduler*
-rwxr-xr-x 1 root root   1648224 Aug  5  2019 mounter*
拷贝证书-frank0-13
root@frank0-13:/opt/kubernetes/server/bin# mkdir certs
root@frank0-13:/opt/kubernetes/server/bin# cd certs
root@frank0-13:/opt/kubernetes/server/bin/certs# scp root@frank0-15:/opt/certs/ca.pem .
root@frank0-13:/opt/kubernetes/server/bin/certs# scp root@frank0-15:/opt/certs/ca-key.pem .
root@frank0-13:/opt/kubernetes/server/bin/certs# scp root@frank0-15:/opt/certs/client.pem .
root@frank0-13:/opt/kubernetes/server/bin/certs# scp root@frank0-15:/opt/certs/client-key.pem .
root@frank0-13:/opt/kubernetes/server/bin/certs# scp root@frank0-15:/opt/certs/apiserver.pem .
root@frank0-13:/opt/kubernetes/server/bin/certs# scp root@frank0-15:/opt/certs/apiserver-key.pem .
root@frank0-13:/opt/kubernetes/server/bin/certs# ll
total 32
drwxr-xr-x 2 root root 4096 Jul 28 02:12 ./
drwxr-xr-x 3 root root 4096 Jul 28 02:04 ../
-rw------- 1 root root 1675 Jul 28 02:12 apiserver-key.pem
-rw-r--r-- 1 root root 1493 Jul 28 02:12 apiserver.pem
-rw------- 1 root root 1679 Jul 28 02:11 ca-key.pem
-rw-r--r-- 1 root root 1139 Jul 28 02:06 ca.pem
-rw------- 1 root root 1679 Jul 28 02:11 client-key.pem
-rw-r--r-- 1 root root 1265 Jul 28 02:11 client.pem
apiserver配置文件
资源配置清单
暂时不确定这是做啥的?
root@frank0-13:/opt/kubernetes/server/bin# mkdir conf
root@frank0-13:/opt/kubernetes/server/bin# cd conf
root@frank0-13:/opt/kubernetes/server/bin/conf# more audit.yaml
apiVersion: audit.k8s.io/v1beta1 # This is required.
kind: Policy
# Don't generate audit events for all requests in RequestReceived stage.
omitStages:
  - "RequestReceived"
rules:
  # Log pod changes at RequestResponse level
  - level: RequestResponse
    resources:
    - group: ""
      # Resource "pods" doesn't match requests to any subresource of pods,
      # which is consistent with the RBAC policy.
      resources: ["pods"]
  # Log "pods/log", "pods/status" at Metadata level
  - level: Metadata
    resources:
    - group: ""
      resources: ["pods/log", "pods/status"]

  # Don't log requests to a configmap called "controller-leader"
  - level: None
    resources:
    - group: ""
      resources: ["configmaps"]
      resourceNames: ["controller-leader"]

  # Don't log watch requests by the "system:kube-proxy" on endpoints or services
  - level: None
    users: ["system:kube-proxy"]
    verbs: ["watch"]
    resources:
    - group: "" # core API group
      resources: ["endpoints", "services"]

  # Don't log authenticated requests to certain non-resource URL paths.
  - level: None
    userGroups: ["system:authenticated"]
    nonResourceURLs:
    - "/api*" # Wildcard matching.
    - "/version"

  # Log the request body of configmap changes in kube-system.
  - level: Request
    resources:
    - group: "" # core API group
      resources: ["configmaps"]
    # This rule only applies to resources in the "kube-system" namespace.
    # The empty string "" can be used to select non-namespaced resources.
    namespaces: ["kube-system"]

  # Log configmap and secret changes in all other namespaces at the Metadata level.
  - level: Metadata
    resources:
    - group: "" # core API group
      resources: ["secrets", "configmaps"]

  # Log all other resources in core and extensions at the Request level.
  - level: Request
    resources:
    - group: "" # core API group
    - group: "extensions" # Version of group should NOT be included.

  # A catch-all rule to log all other requests at the Metadata level.
  - level: Metadata
    # Long-running requests like watches that fall under this rule will not
    # generate an audit event in RequestReceived.
    omitStages:
      - "RequestReceived"
apiserver启动脚本
注意:
- 启动脚本中如果在”\“后加注释,可能会出现该注释的下一行会报错:”line x: –xxxx: command not found“;
- 如果长指令误黏贴成了换行,那么也会”command not found“;
root@frank0-13:/opt/kubernetes/server/bin# chmod +x kube-apiserver.sh
root@frank0-13:/opt/kubernetes/server/bin# more kube-apiserver.sh
#!/bin/bash
./kube-apiserver \
  --apiserver-count 2 \
  --audit-log-path /data/logs/kubernetes/kube-apiserver/audit-log \
  --audit-policy-file ./conf/audit.yaml \
  --authorization-mode RBAC \
  --client-ca-file ./certs/ca.pem \
  --requestheader-client-ca-file ./certs/ca.pem \
  --enable-admission-plugins NamespaceLifecycle,LimitRanger,ServiceAccount,DefaultStorageClass,DefaultTolerationSeconds,MutatingAdmissionWebhook,ValidatingAdmissionWebhook,ResourceQuota \
  --etcd-cafile ./certs/ca.pem \
  --etcd-certfile ./certs/client.pem \
  --etcd-keyfile ./certs/client-key.pem \
  --etcd-servers https://172.20.0.12:2379,https://172.20.0.13:2379,https://172.20.0.14:2379 \
  --service-account-key-file ./certs/ca-key.pem \
  --service-cluster-ip-range 10.254.0.0/16 \
  --service-node-port-range 3000-29999 \
  --target-ram-mb=1024 \
  --kubelet-client-certificate ./certs/client.pem \
  --kubelet-client-key ./certs/client-key.pem \
  --log-dir  /data/logs/kubernetes/kube-apiserver \
  --tls-cert-file ./certs/apiserver.pem \
  --tls-private-key-file ./certs/apiserver-key.pem \
  --v 2
托管给supervisor并启动
root@frank0-13:/opt/kubernetes/server/bin# mkdir -p /data/logs/kubernetes/kube-apiserver
root@frank0-13:/opt/kubernetes/server/bin# supervisorctl update
kube-apiserver-0-13: added process group
root@frank0-13:/opt/kubernetes/server/bin# supervisorctl start kube-apiserver-0-13
kube-apiserver-0-13: started
root@frank0-13:/opt/kubernetes/server/bin# supervisorctl status
etcd-server-0-13                 RUNNING   pid 8076, uptime 3 days, 0:30:20
kube-apiserver-0-13              RUNNING   pid 12536, uptime 0:01:39
root@frank0-13:/etc/supervisor/conf.d# more kube-apiserver.conf
[program:kube-apiserver-0-13]
command=/opt/kubernetes/server/bin/kube-apiserver.sh            ; the program (relative uses PATH, can take args)
numprocs=1                                                      ; number of processes copies to start (def 1)
directory=/opt/kubernetes/server/bin                            ; directory to cwd to before exec (def no cwd)
autostart=true                                                  ; start at supervisord start (default: true)
autorestart=true                                                ; retstart at unexpected quit (default: true)
startsecs=30                                                    ; number of secs prog must stay running (def. 1)
startretries=3                                                  ; max # of serial start failures (default 3)
exitcodes=0,2                                                   ; 'expected' exit codes for process (default 0,2)
stopsignal=QUIT                                                 ; signal used to kill process (default TERM)
stopwaitsecs=10                                                 ; max num secs to wait b4 SIGKILL (default 10)
user=root                                                       ; setuid to this UNIX account to run the program
redirect_stderr=true                                            ; redirect proc stderr to stdout (default false)
stdout_logfile=/data/logs/kubernetes/kube-apiserver/apiserver.stdout.log        ; stderr log path, NONE for none; default AUTO
stdout_logfile_maxbytes=64MB                                    ; max # logfile bytes b4 rotation (default 50MB)
stdout_logfile_backups=4                                        ; # of stdout logfile backups (default 10)
stdout_capture_maxbytes=1MB                                     ; number of bytes in 'capturemode' (default 0)
stdout_events_enabled=false                                     ; emit events on stdout writes (default false)
查看apiserver监听的端口信息
root@frank0-13:~# netstat -luntp |grep kube-api
tcp        0      0 127.0.0.1:8080          0.0.0.0:*               LISTEN      12537/./kube-apiser
tcp6       0      0 :::6443                 :::*                    LISTEN      12537/./kube-apiser

root@frank0-14:~# netstat -luntp |grep kube-api
tcp        0      0 127.0.0.1:8080          0.0.0.0:*               LISTEN      9998/./kube-apiserv
tcp6       0      0 :::6443                 :::*                    LISTEN      9998/./kube-apiserv
root@frank0-13:/opt/kubernetes/server/bin/certs# curl --cacert /opt/kubernetes/server/bin/certs/ca.pem --cert /opt/kubernetes/server/bin/certs/client.pem --key /opt/kubernetes/server/bin/certs/client-key.pem https://127.0.0.1:6443/healthz
okroot@frank0-14:/opt/kubernetes/server/bin# curl --cacert /opt/kubernetes/server/bin/certs/ca.pem --cert /opt/kubernetes/server/bin/certs/client.pem --key /opt/kubernetes/server/bin/certs/client-key.pem https://127.0.0.1:6443/healthz
ok部署 L4反向代理
其实个人感觉Nginx+Keepalived在这里就是一个简易的LB,只是这个LB没有负载均衡的作用,只是通过Keepalived来控制VIP在一台设备上,而不像LB集群在多台服务器承载流量;LB常用的技术有LVS,Katran等;
安装Nginx以及配置
当访问代理服务器的7777端口后,会重定向到两个apiserver的监听端口6443上;
root@frank0-11:~# apt install nginx
root@frank0-11:~# more /etc/nginx/nginx.conf
#}
......
stream {
    upstream kube-apiserver {
        server 172.20.0.13:6443     max_fails=3 fail_timeout=30s;
        server 172.20.0.14:6443     max_fails=3 fail_timeout=30s;
    }
    server {
        listen 7777;
        proxy_connect_timeout 2s;
        proxy_timeout 900s;
        proxy_pass kube-apiserver;
    }
}

root@frank0-11:~#nginx -t
nginx: the configuration file /etc/nginx/nginx.conf syntax is ok
nginx: configuration file /etc/nginx/nginx.conf test is successful
root@frank0-11:~# systemctl start nginx
root@frank0-11:~# systemctl enable nginx
安装keepalived以及配置
keepalived类似vrrp的简易程序,向外暴露一个VIP地址,为了提供冗余性,通过脚本check_port.sh来监控7777端口是否打开,如果没有发现该端口,那么返回信息,让keepalived减少Weight,以让VIP飘到另一台代理服务器上;
root@frank0-11:~# apt install keepalived -y
root@frank0-11:~# chmod +x /etc/keepalived/check_port.sh
root@frank0-11:~# more /etc/keepalived/check_port.sh
#!/bin/bash
CHK_PORT=$1
if [ -n "$CHK_PORT" ];then
        PORT_PROCESS=`ss -lnt|grep $CHK_PORT|wc -l`
        if [ $PORT_PROCESS -eq 0 ];then
                echo "Port $CHK_PORT Is Not Used,End."
                exit 1
        fi
else
        echo "Check Port Cant Be Empty!"
fi
主keepalived配置-frank0-11:
root@frank0-11:~# more /etc/keepalived/keepalived.conf
global_defs {
   router_id 172.20.0.11

}

vrrp_script chk_nginx {
    script "/etc/keepalived/check_port.sh 7777"
    interval 2
    weight -20
}

vrrp_instance VI_1 {
    state MASTER
    interface ens3
    virtual_router_id 251
    priority 100
    advert_int 1
    mcast_src_ip 172.20.0.11
    nopreempt

    authentication {
        auth_type PASS
        auth_pass 11111111
    }
    track_script {
         chk_nginx
    }
    virtual_ipaddress {
        172.20.0.18
    }
}
root@frank0-11:~# systemctl start keepalived
root@frank0-11:~# systemctl enable keepalived备keepalived配置-frank0-12,其他配置类似,就不重复贴了:
root@frank0-12:~# more /etc/keepalived/keepalived.conf
global_defs {
        router_id 172.20.0.12
        script_user root
        enable_script_security
}
vrrp_script chk_nginx {
        script "/etc/keepalived/check_port.sh 7777"
        interval 2
        weight -20
}
vrrp_instance VI_1 {
        state BACKUP
        interface ens3
        virtual_router_id 251
        mcast_src_ip 172.20.0.12
        priority 90
        advert_int 1
        authentication {
                auth_type PASS
                auth_pass 11111111
        }
        track_script {
                chk_nginx
        }
        virtual_ipaddress {
                172.20.0.18
        }
}
确认状态
ps:ifconfig ens3 是查看不到多个IP地址的,需要用ip addr来查看;另外VIP只会在主服务器上:
root@frank0-11:~# netstat -luntp | grep 7777
tcp        0      0 0.0.0.0:7777            0.0.0.0:*               LISTEN      8825/nginx: master
root@frank0-11:~# ss -lnt|grep 7777|wc -l
1
root@frank0-11:~# ip addr show ens3
2: ens3: <BROADCAST,MULTICAST,UP,LOWER_UP> mtu 1500 qdisc fq_codel state UP group default qlen 1000
    link/ether 00:50:02:00:01:00 brd ff:ff:ff:ff:ff:ff
    altname enp0s3
    inet 172.20.0.11/24 brd 172.20.0.255 scope global ens3
       valid_lft forever preferred_lft forever
    inet 172.20.0.18/32 scope global ens3
       valid_lft forever preferred_lft forever
    inet6 fe80::250:2ff:fe00:100/64 scope link
       valid_lft forever preferred_lft forever
root@frank0-12:~# netstat -luntp | grep 7777
tcp 0 0 0.0.0.0:7777 0.0.0.0:* LISTEN 11466/nginx: master
root@frank0-12:~# ss -lnt|grep 7777|wc -l
1
root@frank0-12:~# ip addr show ens3
2: ens3: <BROADCAST,MULTICAST,UP,LOWER_UP> mtu 1500 qdisc fq_codel state UP group default qlen 1000
link/ether 00:50:02:00:02:00 brd ff:ff:ff:ff:ff:ff
altname enp0s3
inet 172.20.0.12/24 brd 172.20.0.255 scope global ens3
valid_lft forever preferred_lft forever
inet6 fe80::250:2ff:fe00:200/64 scope link
valid_lft forever preferred_lft forever部署控制器和调度器
部署kube-controller-manager
设置kube-controller-manager的启动脚本,并通过supervisor进行管理,另外需要注意以下参数的含义:
- –cluster-cidr 表示pod节点的ip地址段,kube-controller-manager.sh启动文件与kube-proxy.sh启动文件两个要配置成一样;
- –master 表示跟kube-apiserver内部的通讯地址,本机通信,因此用的是http,所以不用签证书;
- –service-cluster-ip-range 表示apiserver服务器的ip地址段,需要跟kube-apiserver启动文件的service-cluster-ip-range 参数配置成一致;
root@frank0-13:~# chmod +x /opt/kubernetes/server/bin/kube-controller-manager.sh
root@frank0-13:~# mkdir -p /data/logs/kubernetes/kube-controller-manager
root@frank0-13:~# more /opt/kubernetes/server/bin/kube-controller-manager.sh
#!/bin/sh
./kube-controller-manager \
  --cluster-cidr 172.7.0.0/16 \
  --leader-elect true \
  --log-dir /data/logs/kubernetes/kube-controller-manager \
  --master http://127.0.0.1:8080 \
  --service-account-private-key-file ./certs/ca-key.pem \
  --service-cluster-ip-range 10.254.0.0/16 \
  --root-ca-file ./certs/ca.pem \
  --v 2
root@frank0-13:~# more /etc/supervisor/conf.d/kube-conntroller-manager.conf
[program:kube-controller-manager-0-13]
command=/opt/kubernetes/server/bin/kube-controller-manager.sh ; the program (relative uses PATH, can take args)
numprocs=1 ; number of processes copies to start (def 1)
directory=/opt/kubernetes/server/bin ; directory to cwd to before exec (def no cwd)
autostart=true ; start at supervisord start (default: true)
autorestart=true ; retstart at unexpected quit (default: true)
startsecs=30 ; number of secs prog must stay running (def. 1)
startretries=3 ; max # of serial start failures (default 3)
exitcodes=0,2 ; 'expected' exit codes for process (default 0,2)
stopsignal=QUIT ; signal used to kill process (default TERM)
stopwaitsecs=10 ; max num secs to wait b4 SIGKILL (default 10)
user=root ; setuid to this UNIX account to run the program
redirect_stderr=true ; redirect proc stderr to stdout (default false)
stdout_logfile=/data/logs/kubernetes/kube-controller-manager/controller.stdout.log ; stderr log path, NONE for none; default AUTO
stdout_logfile_maxbytes=64MB ; max # logfile bytes b4 rotation (default 50MB)
stdout_logfile_backups=4 ; # of stdout logfile backups (default 10)
stdout_capture_maxbytes=1MB ; number of bytes in 'capturemode' (default 0)
stdout_events_enabled=false ; emit events on stdout writes (default false)root@frank0-13:~# supervisorctl update
kube-controller-manager-0-13: added process group部署kube-scheduler
设置kube-scheduler的启动脚本,并通过supervisor进行管理:
root@frank0-13:~# chmod +x /opt/kubernetes/server/bin/kube-scheduler.sh
root@frank0-13:~# mkdir -p /data/logs/kubernetes/kube-scheduler
root@frank0-13:~# more /opt/kubernetes/server/bin/kube-scheduler.sh
#!/bin/sh
./kube-scheduler \
  --leader-elect  \
  --log-dir /data/logs/kubernetes/kube-scheduler \
  --master http://127.0.0.1:8080 \
  --v 2
root@frank0-13:~# more /etc/supervisor/conf.d/kube-scheduler.conf
[program:kube-scheduler-0-13]
command=/opt/kubernetes/server/bin/kube-scheduler.sh ; the program (relative uses PATH, can take args)
numprocs=1 ; number of processes copies to start (def 1)
directory=/opt/kubernetes/server/bin ; directory to cwd to before exec (def no cwd)
autostart=true ; start at supervisord start (default: true)
autorestart=true ; retstart at unexpected quit (default: true)
startsecs=30 ; number of secs prog must stay running (def. 1)
startretries=3 ; max # of serial start failures (default 3)
exitcodes=0,2 ; 'expected' exit codes for process (default 0,2)
stopsignal=QUIT ; signal used to kill process (default TERM)
stopwaitsecs=10 ; max num secs to wait b4 SIGKILL (default 10)
user=root ; setuid to this UNIX account to run the program
redirect_stderr=true ; redirect proc stderr to stdout (default false)
stdout_logfile=/data/logs/kubernetes/kube-scheduler/scheduler.stdout.log ; stderr log path, NONE for none; default AUTO
stdout_logfile_maxbytes=64MB ; max # logfile bytes b4 rotation (default 50MB)
stdout_logfile_backups=4 ; # of stdout logfile backups (default 10)
stdout_capture_maxbytes=1MB ; number of bytes in 'capturemode' (default 0)
stdout_events_enabled=false ; emit events on stdout writes (default false)root@frank0-13:~# supervisorctl update
kube-scheduler-0-13: added process group查看状态
root@frank0-13:~# ln -s /opt/kubernetes/server/bin/kubectl /usr/bin/kubectl
root@frank0-13:~# supervisorctl status
etcd-server-0-13                 RUNNING   pid 8076, uptime 3 days, 21:35:28
kube-apiserver-0-13              RUNNING   pid 12536, uptime 21:06:47
kube-controller-manager-0-13     RUNNING   pid 14305, uptime 0:04:24
kube-scheduler-0-13              RUNNING   pid 14238, uptime 0:31:23
root@frank0-13:~# kubectl get cs
NAME                 STATUS    MESSAGE              ERROR
controller-manager   Healthy   ok
scheduler            Healthy   ok
etcd-1               Healthy   {"health": "true"}
etcd-0               Healthy   {"health": "true"}
部署kubelet
跟容器引擎进行通信,建立或销毁容器的组件;
签发kubelet证书
root@frank0-15:/opt/certs# more kubelet-csr.json
{
    "CN": "k8s-kubelet",
    "hosts": [
    "127.0.0.1",
    "172.20.0.11",
    "172.20.0.12",
    "172.20.0.13",
    "172.20.0.14",
    "172.20.0.15",
    "172.20.0.18"
    ],
    "key": {
        "algo": "rsa",
        "size": 2048
    },
    "names": [
        {
            "C": "CN",
            "ST": "ShangHai",
            "L": "ShangHai",
            "O": "FZ",
            "OU": "arch"
        }
    ]
}
root@frank0-15:/opt/certs# cfssl gencert -ca=ca.pem -ca-key=ca-key.pem -config=ca-config.json -profile=server kubelet-csr.json | cfssl-json -bare kubelet
2022/07/29 08:43:14 [INFO] generate received request
2022/07/29 08:43:14 [INFO] received CSR
2022/07/29 08:43:14 [INFO] generating key: rsa-2048
2022/07/29 08:43:14 [INFO] encoded CSR
2022/07/29 08:43:14 [INFO] signed certificate with serial number 154797204747939751654749351231982863346339555219
2022/07/29 08:43:14 [WARNING] This certificate lacks a "hosts" field. This makes it unsuitable for
websites. For more information see the Baseline Requirements for the Issuance and Management
of Publicly-Trusted Certificates, v.1.1.6, from the CA/Browser Forum (https://cabforum.org);
specifically, section 10.2.3 ("Information Requirements").
root@frank0-15:/opt/certs# ll |grep kubelet
-rw-r--r-- 1 root root 1094 Jul 29 08:43 kubelet.csr
-rw-r--r-- 1 root root 416 Jul 29 08:42 kubelet-csr.json
-rw------- 1 root root 1675 Jul 29 08:43 kubelet-key.pem
-rw-r--r-- 1 root root 1342 Jul 29 08:43 kubelet.pemroot@frank0-13:/opt/kubernetes/server/bin/certs# scp root@frank0-15:/opt/certs/kubelet.pem .
root@frank0-13:/opt/kubernetes/server/bin/certs# scp root@frank0-15:/opt/certs/kubelet-key.pem .
root@frank0-13:/opt/kubernetes/server/bin/certs# ll |grep kubelet
-rw------- 1 root root 1675 Jul 29 09:08 kubelet-key.pem
-rw-r--r-- 1 root root 1342 Jul 29 09:08 kubelet.pem创建kubelet配置文件
ps:配置文件做完后,可以拷贝到frank0-14上直接用,因为这个只是配置文件;
set-cluster
让kubectl访问apiserver时,直接去调用vip的地址,vip会去关联apiserver,这样提供了冗余性,而不是访问自己的apiserver或对端的apiserver;在这里可以看到kubectl直接把ca证书放进配置文件了:
root@frank0-13:/opt/kubernetes/server/bin/conf# kubectl config set-cluster myk8s \
>     --certificate-authority=/opt/kubernetes/server/bin/certs/ca.pem \
>     --embed-certs=true \
>     --server=https://172.20.0.18:7777 \
>     --kubeconfig=kubelet.kubeconfig
Cluster "myk8s" set.
root@frank0-13:/opt/kubernetes/server/bin/conf# ll
total 16
drwxr-xr-x 2 root root 4096 Jul 29 12:43 ./
drwxr-xr-x 4 root root 4096 Jul 29 03:32 ../
-rw-r--r-- 1 root root 2223 Jul 28 02:20 audit.yaml
-rw------- 1 root root 1712 Jul 29 12:43 kubelet.kubeconfig
set-credentials
设置k8s用户,并把client的证书放进配置文件,这是因为kubectl要访问apiserver,是以client角色访问的:
root@frank0-13:/opt/kubernetes/server/bin/conf# kubectl config set-credentials k8s-node \
>   --client-certificate=/opt/kubernetes/server/bin/certs/client.pem \
>   --client-key=/opt/kubernetes/server/bin/certs/client-key.pem \
>   --embed-certs=true \
>   --kubeconfig=kubelet.kubeconfig
User "k8s-node" set.
查看kubelet.kubeconfig,可以看到client证书也进去了,为了容易看,我省略了加密后的证书信息:
root@frank0-13:/opt/kubernetes/server/bin/conf# more kubelet.kubeconfig |grep certifica
    certificate-authority-data:
client-certificate-data:其实只要拿到kubelet.kubeconfig,就可以根据其中加密的证书信息反推出证书,因为加密是通过base64进行的,解密也通过base64,通过下面的方法,就得到了k8s证书:
root@f0-15:/opt/certs#echo "certificate-authority-data 加密证书信息" |base64 > qwe.pemset-context
绑定前面建立的cluster myk8s和用户k8s-node,并写入配置文件:
root@frank0-13:/opt/kubernetes/server/bin/conf# kubectl config set-context myk8s-context \
>   --cluster=myk8s \
>   --user=k8s-node \
>   --kubeconfig=kubelet.kubeconfig
Context "myk8s-context" created.
use-context
在配置文件中指明当前使用哪个context(在这个例子中,目前只设置了一个context):
root@frank0-13:/opt/kubernetes/server/bin/conf# more kubelet.kubeconfig |grep current-context
current-context: ""
root@frank0-13:/opt/kubernetes/server/bin/conf# kubectl config use-context myk8s-context --kubeconfig=kubelet.kubeconfig
Switched to context "myk8s-context".
root@frank0-13:/opt/kubernetes/server/bin/conf# more kubelet.kubeconfig |grep current-context
current-context: myk8s-context
为刚才建立的k8s-node用户授权
换句话说,就是创建一个k8s 集群资源(让集群用户k8s-node拥有集群计算能力),这个资源信息已经被写入到etcd里了,所以只需要在frank0-13上创建一次集群资源,在frank0-14上不需要再创建这个资源:
root@frank0-13:/opt/kubernetes/server/bin/conf# more k8s-node.yaml
apiVersion: rbac.authorization.k8s.io/v1
kind: ClusterRoleBinding
metadata:
name: k8s-node
roleRef:
apiGroup: rbac.authorization.k8s.io
kind: ClusterRole
name: system:node
subjects:
- apiGroup: rbac.authorization.k8s.io
kind: User
name: k8s-node
root@frank0-13:/opt/kubernetes/server/bin/conf# kubectl create -f k8s-node.yaml
clusterrolebinding.rbac.authorization.k8s.io/k8s-node created
root@frank0-13:/opt/kubernetes/server/bin/conf# kubectl get clusterrolebinding k8s-node
NAME AGE
k8s-node 2m36s
root@frank0-13:/opt/kubernetes/server/bin/conf# kubectl get clusterrolebinding k8s-node -o yaml
apiVersion: rbac.authorization.k8s.io/v1
kind: ClusterRoleBinding
metadata:
creationTimestamp: "2022-07-29T13:49:58Z"
name: k8s-node
resourceVersion: "60511"
selfLink: /apis/rbac.authorization.k8s.io/v1/clusterrolebindings/k8s-node
uid: 946b553c-c272-4723-a093-36fdf80d92a5
roleRef:
apiGroup: rbac.authorization.k8s.io
kind: ClusterRole
name: system:node
subjects:
- apiGroup: rbac.authorization.k8s.io
kind: User
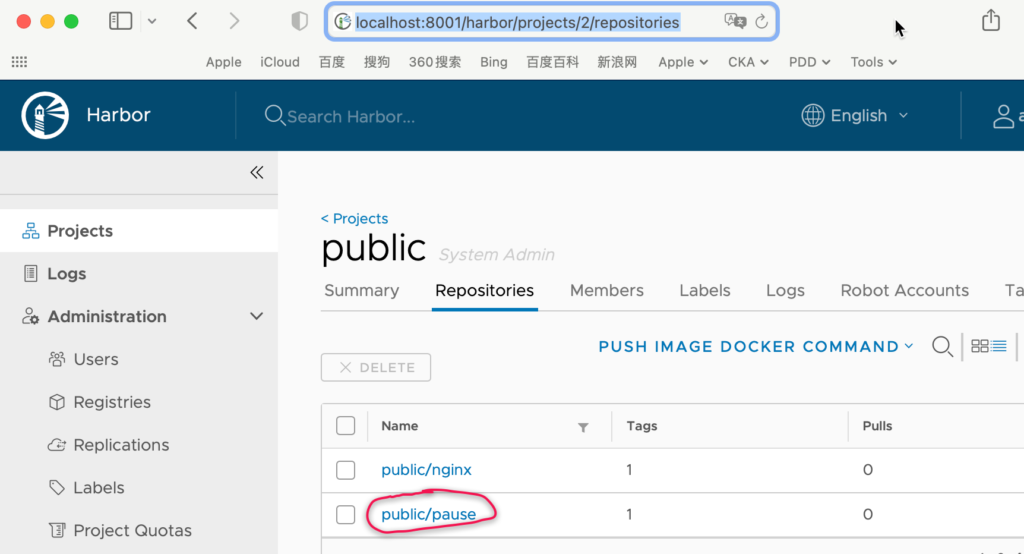
name: k8s-node把pause镜像推到harbor上
root@frank0-15:~# docker pull kubernetes/pause
Using default tag: latest
latest: Pulling from kubernetes/pause
4f4fb700ef54: Pull complete
b9c8ec465f6b: Pull complete
Digest: sha256:b31bfb4d0213f254d361e0079deaaebefa4f82ba7aa76ef82e90b4935ad5b105
Status: Downloaded newer image for kubernetes/pause:latest
docker.io/kubernetes/pause:latest
root@frank0-15:~# docker images |grep pause
kubernetes/pause                latest     f9d5de079539   8 years ago    240kB
root@frank0-15:~# docker tag f9d5de079539 harbor.frank.com/public/pause:latest
root@frank0-15:~# docker images |grep pause
kubernetes/pause                latest     f9d5de079539   8 years ago    240kB
harbor.frank.com/public/pause   latest     f9d5de079539   8 years ago    240kB
root@frank0-15:~# docker push harbor.frank.com/public/pause
Using default tag: latest
The push refers to repository [harbor.frank.com/public/pause]
5f70bf18a086: Mounted from public/nginx
e16a89738269: Pushed
latest: digest: sha256:b31bfb4d0213f254d361e0079deaaebefa4f82ba7aa76ef82e90b4935ad5b105 size: 938
root@frank0-15:~# nslookup harbor.frank.com
Server:         127.0.0.53
Address:        127.0.0.53#53

Non-authoritative answer:
Name:   harbor.frank.com
Address: 172.20.0.15
ps:为什么地址是localhost:8001?是因为我从本地打了一个ssl tunnel到达实验环境;
创建kubelet启动文件
官方建议关闭关闭swap分区,如果不设置false,那么kubelet会起不来;其实是否关闭,不是绝对的,可以根据实际情况来决定,如果内存很大,那么可以直接关闭;
root@frank0-13:/opt/kubernetes/server/bin# mkdir -p /data/logs/kubernetes/kube-kubelet /data/kubelet
root@frank0-13:/opt/kubernetes/server/bin# chmod +x /opt/kubernetes/server/bin/kubelet.sh
root@frank0-13:/opt/kubernetes/server/bin# more kubelet.sh
#!/bin/sh
./kubelet \
  --anonymous-auth=false \
  --cgroup-driver systemd \
  --cluster-dns 10.254.0.2 \
  --cluster-domain cluster.local \
  --runtime-cgroups=/systemd/system.slice \
  --kubelet-cgroups=/systemd/system.slice \
  --fail-swap-on="false" \
  --client-ca-file ./certs/ca.pem \
  --tls-cert-file ./certs/kubelet.pem \
  --tls-private-key-file ./certs/kubelet-key.pem \
  --hostname-override frank0-13.host.com \
  --kubeconfig ./conf/kubelet.kubeconfig \
  --log-dir /data/logs/kubernetes/kube-kubelet \
  --pod-infra-container-image harbor.frank.com/public/pause:latest \
--root-dir /data/kubeletps:”\“后面不要添加任何空格,如果有,启动时,就会报下一行命令不可使用,可以通过vi或vim 查看:

下面是我遇到的报错信息:
F0802 01:26:00.282932   18953 server.go:163] unknown command:
./kubelet.sh: 14: --kubeconfig: not found
Supervisor管理并启动kubelet
root@frank0-13:/opt/kubernetes/server/bin# more /etc/supervisor/conf.d/kube-kubelet.conf
[program:kube-kubelet-0-13]
command=/opt/kubernetes/server/bin/kubelet.sh     ; the program (relative uses PATH, can take args)
numprocs=1                                        ; number of processes copies to start (def 1)
directory=/opt/kubernetes/server/bin              ; directory to cwd to before exec (def no cwd)
autostart=true                                    ; start at supervisord start (default: true)
autorestart=true                                  ; retstart at unexpected quit (default: true)
startsecs=30                                      ; number of secs prog must stay running (def. 1)
startretries=3                                    ; max # of serial start failures (default 3)
exitcodes=0,2                                     ; 'expected' exit codes for process (default 0,2)
stopsignal=QUIT                                   ; signal used to kill process (default TERM)
stopwaitsecs=10                                   ; max num secs to wait b4 SIGKILL (default 10)
user=root                                         ; setuid to this UNIX account to run the program
redirect_stderr=true                              ; redirect proc stderr to stdout (default false)
stdout_logfile=/data/logs/kubernetes/kube-kubelet/kubelet.stdout.log   ; stderr log path, NONE for none; default AUTO
stdout_logfile_maxbytes=64MB                      ; max # logfile bytes b4 rotation (default 50MB)
stdout_logfile_backups=4                          ; # of stdout logfile backups (default 10)
stdout_capture_maxbytes=1MB                       ; number of bytes in 'capturemode' (default 0)
stdout_events_enabled=false                       ; emit events on stdout writes (default false)
root@frank0-13:/opt/kubernetes/server/bin# supervisorctl update
root@frank0-13:/opt/kubernetes/server/bin# kube-kubelet-0-13: added process group
root@frank0-13:/opt/kubernetes/server/bin# supervisorctl status
etcd-server-0-13 RUNNING pid 8076, uptime 7 days, 20:17:03
kube-apiserver-0-13 RUNNING pid 12536, uptime 4 days, 19:48:22
kube-controller-manager-0-13 RUNNING pid 14305, uptime 3 days, 22:45:59
kube-kubelet-0-13 RUNNING pid 28379, uptime 0:12:27
kube-scheduler-0-13 RUNNING pid 14238, uptime 3 days, 23:12:58在两台node上查看状态
frank0-14部署完后,可以看到两台均已经纳入集群中:
root@frank0-14:/opt/kubernetes/server/bin/certs# kubectl get nodes
NAME                 STATUS   ROLES    AGE    VERSION
frank0-13.host.com   Ready    <none>   77m    v1.15.2
frank0-14.host.com   Ready    <none>   117s   v1.15.2
对于roles标签,可以通过下面命令指定(在一台上设置即可,因为是写到了etcd中,另一台自动同步),这两台即做master又做node,不过这个只是标签,暂时没有实际作用:
root@frank0-13:/opt/kubernetes/server/bin# kubectl label node frank0-13.host.com node-role.kubernetes.io/master=
root@frank0-13:/opt/kubernetes/server/bin# kubectl label node frank0-13.host.com node-role.kubernetes.io/node=
root@frank0-13:/opt/kubernetes/server/bin# kubectl label node frank0-14.host.com node-role.kubernetes.io/node=
root@frank0-13:/opt/kubernetes/server/bin# kubectl label node frank0-14.host.com node-role.kubernetes.io/master=
root@frank0-13:/opt/kubernetes/server/bin# kubectl get nodes
NAME                 STATUS   ROLES         AGE    VERSION
frank0-13.host.com   Ready    master,node   81m    v1.15.2
frank0-14.host.com   Ready    master,node   6m7s   v1.15.2
部署kube-proxy
主要用于连接集群网络和POD网络;
签发kube-proxy证书
下面标记部分就是后面k8s中角色的名称,这么做可以不用做ClusterRoleBinding?目前暂时不太理解;
root@frank0-15:/opt/certs# more /opt/certs/kube-proxy-csr.json
{
    "CN": "system:kube-proxy",
    "key": {
        "algo": "rsa",
        "size": 2048
    },
    "names": [
        {
            "C": "CN",
            "ST": "ShangHai",
            "L": "ShangHai",
            "O": "FZ",
            "OU": "arch"
        }
    ]
}
root@frank0-15:/opt/certs# cfssl gencert -ca=ca.pem -ca-key=ca-key.pem -config=ca-config.json -profile=client kube-proxy-csr.json |cfssl-json -bare kube-proxy-client
2022/08/02 13:18:50 [INFO] generate received request
2022/08/02 13:18:50 [INFO] received CSR
2022/08/02 13:18:50 [INFO] generating key: rsa-2048
2022/08/02 13:18:50 [INFO] encoded CSR
2022/08/02 13:18:50 [INFO] signed certificate with serial number 551913058458704243559559416431068942049548811524
2022/08/02 13:18:50 [WARNING] This certificate lacks a "hosts" field. This makes it unsuitable for
websites. For more information see the Baseline Requirements for the Issuance and Management
of Publicly-Trusted Certificates, v.1.1.6, from the CA/Browser Forum (https://cabforum.org);
specifically, section 10.2.3 ("Information Requirements").
root@frank0-15:/opt/certs#
root@frank0-15:/opt/certs# ll |grep kube-proxy
-rw-r--r-- 1 root root 1009 Aug 2 13:18 kube-proxy-client.csr
-rw------- 1 root root 1675 Aug 2 13:18 kube-proxy-client-key.pem
-rw-r--r-- 1 root root 1277 Aug 2 13:18 kube-proxy-client.pem
-rw-r--r-- 1 root root 270 Aug 2 13:16 kube-proxy-csr.jsonroot@frank0-13:/opt/kubernetes/server/bin/certs# scp root@frank0-15:/opt/certs/kube-proxy-client-key.pem .
root@frank0-13:/opt/kubernetes/server/bin/certs# scp root@frank0-15:/opt/certs/kube-proxy-client.pem .
root@frank0-13:/opt/kubernetes/server/bin/certs# ll |grep kube-pro
-rw------- 1 root root 1675 Aug 2 13:21 kube-proxy-client-key.pem
-rw-r--r-- 1 root root 1277 Aug 2 13:21 kube-proxy-client.pem创建kube-proxyt配置文件
类似kubelet的配置文件;
set-cluster
root@frank0-13:/opt/kubernetes/server/bin/conf# kubectl config set-cluster myk8s \
>   --certificate-authority=/opt/kubernetes/server/bin/certs/ca.pem \
>   --embed-certs=true \
>   --server=https://172.20.0.18:7777 \
>   --kubeconfig=kube-proxy.kubeconfig
Cluster "myk8s" set.
root@frank0-13:/opt/kubernetes/server/bin/conf# ll |grep kube-proxy
-rw------- 1 root root 1712 Aug  3 01:03 kube-proxy.kubeconfig
set-credentials
root@frank0-13:/opt/kubernetes/server/bin/conf# kubectl config set-credentials kube-proxy \
>   --client-certificate=/opt/kubernetes/server/bin/certs/kube-proxy-client.pem \
>   --client-key=/opt/kubernetes/server/bin/certs/kube-proxy-client-key.pem \
>   --embed-certs=true \
>   --kubeconfig=kube-proxy.kubeconfig
User "kube-proxy" set.
set-context
root@frank0-13:/opt/kubernetes/server/bin/conf# kubectl config set-context myk8s-context \
>   --cluster=myk8s \
>   --user=kube-proxy \
>   --kubeconfig=kube-proxy.kubeconfig
Context "myk8s-context" created.
use-context
root@frank0-13:/opt/kubernetes/server/bin/conf# kubectl config use-context myk8s-context --kubeconfig=kube-proxy.kubeconfig
Switched to context "myk8s-context".
加载ipvs模块
ipvs是kube-proxy主要的调度流量的模式;但也有人使用iptables调度流量;
root@frank0-13:/opt/kubernetes/server/bin/conf# lsmod | grep ip_vs
root@frank0-13:/opt/kubernetes/server/bin/conf# ls /lib/modules/$(uname -r)/kernel/net/netfilter/ipvs|grep -o "^[^.]*" >> /etc/modules
root@frank0-13:/opt/kubernetes/server/bin/conf# reboot
......
root@frank0-13:~# lsmod | grep ip_vs
ip_vs_wrr              16384  0
ip_vs_wlc              16384  0
ip_vs_sh               16384  0
ip_vs_sed              16384  0
ip_vs_rr               16384  0
ip_vs_pe_sip           16384  0
nf_conntrack_sip       40960  1 ip_vs_pe_sip
ip_vs_ovf              16384  0
ip_vs_nq               16384  0
ip_vs_mh               16384  0
ip_vs_lc               16384  0
ip_vs_lblcr            16384  0
ip_vs_lblc             16384  0
ip_vs_ftp              16384  0
nf_nat                 49152  3 nft_chain_nat,xt_MASQUERADE,ip_vs_ftp
ip_vs_fo               16384  0
ip_vs_dh               16384  0
ip_vs                 159744  30 ip_vs_wlc,ip_vs_rr,ip_vs_dh,ip_vs_lblcr,ip_vs_sh,ip_vs_ovf,ip_vs_fo,ip_vs_nq,ip_vs_lblc,ip_vs_pe_sip,ip_vs_wrr,ip_vs_lc,ip_vs_mh,ip_vs_sed,ip_vs_ftp
nf_conntrack          147456  6 xt_conntrack,nf_nat,nf_conntrack_sip,nf_conntrack_netlink,xt_MASQUERADE,ip_vs
nf_defrag_ipv6         24576  2 nf_conntrack,ip_vs
libcrc32c              16384  5 nf_conntrack,nf_nat,btrfs,raid456,ip_vs
创建kube-proxy启动文件
root@frank0-13:/opt/kubernetes/server/bin# chmod +x /opt/kubernetes/server/bin/kube-proxy.sh
root@frank0-13:/opt/kubernetes/server/bin# more /opt/kubernetes/server/bin/kube-proxy.sh
#!/bin/sh
./kube-proxy \
  --cluster-cidr 172.7.0.0/16 \
  --hostname-override frank0-13.host.com \
  --proxy-mode=ipvs \
  --ipvs-scheduler=nq \
  --kubeconfig ./conf/kube-proxy.kubeconfig
Supervisor管理并启动kube-proxy
root@frank0-13:/opt/kubernetes/server/bin# mkdir -p /data/logs/kubernetes/kube-proxy
root@frank0-13:/opt/kubernetes/server/bin# more /etc/supervisor/conf.d/kube-proxy.conf
[program:kube-proxy-0-13]
command=/opt/kubernetes/server/bin/kube-proxy.sh                     ; the program (relative uses PATH, can take args)
numprocs=1                                                           ; number of processes copies to start (def 1)
directory=/opt/kubernetes/server/bin                                 ; directory to cwd to before exec (def no cwd)
autostart=true                                                       ; start at supervisord start (default: true)
autorestart=true                                                     ; retstart at unexpected quit (default: true)
startsecs=30                                                         ; number of secs prog must stay running (def. 1)
startretries=3                                                       ; max # of serial start failures (default 3)
exitcodes=0,2                                                        ; 'expected' exit codes for process (default 0,2)
stopsignal=QUIT                                                      ; signal used to kill process (default TERM)
stopwaitsecs=10                                                      ; max num secs to wait b4 SIGKILL (default 10)
user=root                                                            ; setuid to this UNIX account to run the program
redirect_stderr=true                                                 ; redirect proc stderr to stdout (default false)
stdout_logfile=/data/logs/kubernetes/kube-proxy/proxy.stdout.log     ; stderr log path, NONE for none; default AUTO
stdout_logfile_maxbytes=64MB                                         ; max # logfile bytes b4 rotation (default 50MB)
stdout_logfile_backups=4                                             ; # of stdout logfile backups (default 10)
stdout_capture_maxbytes=1MB                                          ; number of bytes in 'capturemode' (default 0)
stdout_events_enabled=false                                          ; emit events on stdout writes (default false)
root@frank0-13:/opt/kubernetes/server/bin#
root@frank0-13:/opt/kubernetes/server/bin# supervisorctl update
kube-proxy-0-13: added process group
root@frank0-13:/opt/kubernetes/server/bin# supervisorctl status
etcd-server-0-13                 RUNNING   pid 732, uptime 0:14:22
kube-apiserver-0-13              RUNNING   pid 734, uptime 0:14:22
kube-controller-manager-0-13     RUNNING   pid 735, uptime 0:14:22
kube-kubelet-0-13                RUNNING   pid 736, uptime 0:14:22
kube-proxy-0-13                  RUNNING   pid 4207, uptime 0:01:21
kube-scheduler-0-13              RUNNING   pid 737, uptime 0:14:22
root@frank0-13:/opt/kubernetes/server/bin# netstat -luntp |grep kube-proxy
tcp        0      0 127.0.0.1:10249         0.0.0.0:*               LISTEN      4208/./kube-proxy
tcp6       0      0 :::10256                :::*                    LISTEN      4208/./kube-proxy
在两台node上查看状态
安装ipvmadm来查看ipvs的使用状态,但是为什么看不到任何反代的信息??
root@frank0-13:/opt/kubernetes/server/bin# apt install ipvsadm
root@frank0-13:/opt/kubernetes/server/bin# ipvsadm -Ln
IP Virtual Server version 1.2.1 (size=4096)
Prot LocalAddress:Port Scheduler Flags
  -> RemoteAddress:Port           Forward Weight ActiveConn InActConn
查看kube-proxy启动log信息,发现了问题,因为找不到ipset:
root@frank0-13:/opt/kubernetes/server/bin# more /data/logs/kubernetes/kube-proxy/proxy.stdout.log
W0803 01:32:58.490725    4208 server.go:216] WARNING: all flags other than --config, --write-config-to, and --cleanup are deprecated. Please begin using a config file ASAP.
E0803 01:32:58.535709    4208 server_others.go:259] can't determine whether to use ipvs proxy, error: error getting ipset version, error: executable file not found in $PATH
I0803 01:32:58.584093    4208 server_others.go:143] Using iptables Proxier.
安装重启kube-proxy后,状态正常,下面是13和14都部署完后的信息:
root@frank0-13:/opt/kubernetes/server/bin# ipvsadm -Ln
IP Virtual Server version 1.2.1 (size=4096)
Prot LocalAddress:Port Scheduler Flags
  -> RemoteAddress:Port           Forward Weight ActiveConn InActConn
TCP  10.254.0.1:443 nq
  -> 172.20.0.13:6443             Masq    1      0          0
  -> 172.20.0.14:6443             Masq    1      0          0
root@frank0-14:/opt/kubernetes/server/bin# ipvsadm -Ln
IP Virtual Server version 1.2.1 (size=4096)
Prot LocalAddress:Port Scheduler Flags
-> RemoteAddress:Port Forward Weight ActiveConn InActConn
TCP 10.254.0.1:443 nq
-> 172.20.0.13:6443 Masq 1 0 0
-> 172.20.0.14:6443 Masq 1 0 0 验证集群
创建一个nginx的pod
root@frank0-13:~# more nginx-ds.yaml
apiVersion: extensions/v1beta1
kind: DaemonSet
metadata:
  name: nginx-ds
spec:
  template:
    metadata:
      labels:
        app: nginx-ds
    spec:
      containers:
      - name: my-nginx
        image: harbor.frank.com/public/nginx:v1.9.8
        ports:
        - containerPort: 80
root@frank0-13:~# kubectl create -f nginx-ds.yaml
daemonset.extensions/nginx-ds created
root@frank0-13:~# kubectl get pods
NAME             READY   STATUS              RESTARTS   AGE
nginx-ds-494s5   0/1     ContainerCreating   0          20s
nginx-ds-kgtzq   0/1     ContainerCreating   0          20s
root@frank0-13:~# kubectl get pods -o wide
NAME             READY   STATUS    RESTARTS   AGE   IP           NODE                 NOMINATED NODE   READINESS GATES
nginx-ds-494s5   1/1     Running   0          96s   172.1.14.2   frank0-14.host.com   <none>           <none>
nginx-ds-kgtzq   1/1     Running   0          96s   172.1.13.2   frank0-13.host.com   <none>           <none>
验证POD的状态
ps:此时只能在本node上curl这个POD,不能在frank0-13上curl 172.1.14.2,跨node通信,需要k8s的网络组件:Calico或者Flannel;
root@frank0-13:~# kubectl get cs
NAME                 STATUS    MESSAGE              ERROR
scheduler            Healthy   ok
controller-manager   Healthy   ok
etcd-1               Healthy   {"health": "true"}
etcd-0               Healthy   {"health": "true"}
root@frank0-13:~#
root@frank0-13:~#
root@frank0-13:~# kubectl get node
NAME                 STATUS   ROLES         AGE   VERSION
frank0-13.host.com   Ready    master,node   25h   v1.15.2
frank0-14.host.com   Ready    master,node   24h   v1.15.2
root@frank0-13:~#
root@frank0-13:~# kubectl get pods
NAME             READY   STATUS    RESTARTS   AGE
nginx-ds-494s5   1/1     Running   0          8m29s
nginx-ds-kgtzq   1/1     Running   0          8m29s
故障排查
但根据“kubectl get cs”返回的信息,少了一个etcd,经过排查,发现etcd集群有问题:
root@frank0-13:/opt/etcd# ./etcdctl cluster-health
failed to check the health of member 498804779e79db6e on http://172.20.0.13:2379: Get http://172.20.0.13:2379/health: malformed HTTP response "\x15\x03\x01\x00\x02\x02"
failed to check the health of member 498804779e79db6e on https://172.20.0.13:2379: Get https://172.20.0.13:2379/health: x509: certificate signed by unknown authority
member 498804779e79db6e is unreachable: [http://172.20.0.13:2379 https://172.20.0.13:2379] are all unreachable
failed to check the health of member 50f9f81807d702de on http://172.20.0.12:2379: Get http://172.20.0.12:2379/health: malformed HTTP response "\x15\x03\x01\x00\x02\x02"
failed to check the health of member 50f9f81807d702de on https://172.20.0.12:2379: Get https://172.20.0.12:2379/health: x509: certificate signed by unknown authority
member 50f9f81807d702de is unreachable: [http://172.20.0.12:2379 https://172.20.0.12:2379] are all unreachable
failed to check the health of member f454af1a92390b2e on http://172.20.0.14:2379: Get http://172.20.0.14:2379/health: malformed HTTP response "\x15\x03\x01\x00\x02\x02"
failed to check the health of member f454af1a92390b2e on https://172.20.0.14:2379: Get https://172.20.0.14:2379/health: x509: certificate signed by unknown authority
member f454af1a92390b2e is unreachable: [http://172.20.0.14:2379 https://172.20.0.14:2379] are all unreachable
cluster is unhealthy确认配置后发现一个参数配置错误,应该是127.0.0.1,最开始贴的配置已经改正,改正重启后,集群状态恢复正常,apiserver重启后,get cs也出现了3个etcd:
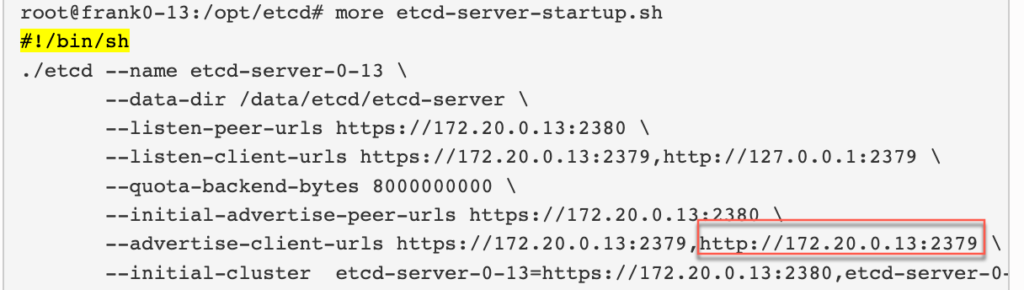
root@frank0-14:/opt/kubernetes/server/bin# kubectl get cs
NAME                 STATUS    MESSAGE              ERROR
scheduler            Healthy   ok
controller-manager   Healthy   ok
etcd-1               Healthy   {"health": "true"}
etcd-2               Healthy   {"health": "true"}
etcd-0               Healthy   {"health": "true"}
2022-08-24更新:集群升级/降级
这里只介绍过程,就不贴详细步骤和命令了,目前感觉这种升级方式可以有助于理解,但生产升级感觉还是用kubeadm会更好,后面有新体验在更新。
- 可以先在f0-11/12上注释nginx的l4和l7的负载均衡IP(需要升级的);
- 通过“kubectl delete node f0-13.host.com”删除需要升级的node,schedule会通过api server自动把该node上的资源调度到另一个node上;
- 验证coredns,以及业务是否正常;
- 在升级节点上,删掉kubernetes的软连接;
- 下载kubernetes新的2进制安装包,解压到临时文件夹,并移动/opt + 重命名(/opt/kubernetes-vx.xx.x);
- 把老版本的certs,conf文件夹,以及*.sh拷贝到新的2进制包中;
- 重新创建软连接,并通过supervisorctl restart所有组件,至此node恢复,并加入集群;
- 恢复f0-11/12上nginx l4,l7负载均衡的配置;
- 验证schedule把资源分担到该升级后的node上,一切正常,说明升级成功;
- 再用同样的方式,升级其他node;