Install EVE-NG in ESXI
PS:如果可以,还是建议使用物理机安装EVE NG,另外PNET也是一个不错的选择,算是另一个纯免费的开源软件,跟EVE NG用的一样的核心文件,但不像EVE NG高级功能需要收费,PNET纯免费;
安装EVE NG
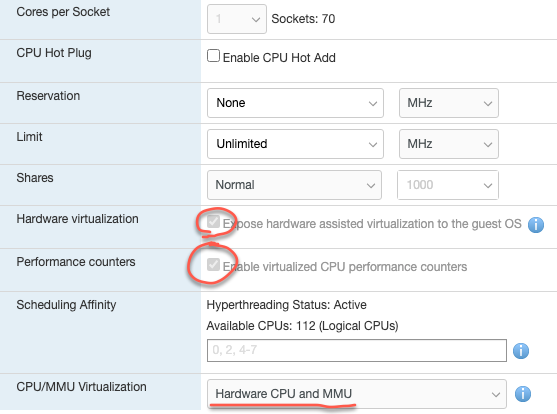
直接从官网选择OVF的Image下载,通过ESXI新建虚拟机时,拖拽OVF和VMDK两个文件进去;安装完后配置CPU/Memory/硬盘等,并且在CPU中打开嵌套虚拟化的设置;
配置EVE NG
安装完后,进去按照提示配置,完成配置启动后发现没有IP,怀疑是我的服务器不能访问外网的原因,因此手动配置IP以及调整SSH的端口:
root@eve-ng:~# lsb_release -a
No LSB modules are available.
Distributor ID: Ubuntu
Description:    Ubuntu 16.04.7 LTS
Release:        16.04
Codename:       xenial

root@eve-ng:~# dpkg -l eve-ng
Desired=Unknown/Install/Remove/Purge/Hold
| Status=Not/Inst/Conf-files/Unpacked/halF-conf/Half-inst/trig-aWait/Trig-pend
|/ Err?=(none)/Reinst-required (Status,Err: uppercase=bad)
||/ Name                    Version          Architecture     Description
+++-=======================-================-================-===================================================
ii  eve-ng                  2.0.3-112        amd64            A new generation software for networking labs.
root@eve-ng:~# more /etc/network/interfaces
......
# The primary network interface
iface eth0 inet manual
auto pnet0
iface pnet0 inet static
bridge_ports eth0
bridge_stp off
address 172.16.211.154
netmask 255.255.255.0
gateway 172.16.211.1更新SSH端口后重启进程
root@eve-ng:~# /etc/init.d/ssh restart备份文件
我之所以重新安装,就是因为改了一些参数导致点击创建node没任何反应,感觉EVE 还是很脆弱的,所以重新安装后第一件事就是先备份文件;备份操作可以参考这里:How to backup content of EVE-NG
/opt/unetlab/addons/
/opt/unetlab/tmp/
/opt/unetlab/labs/
/opt/unetlab/evedb.gz
/opt/unetlab/html/templates/
/opt/unetlab/html/images/
/opt/unetlab/html/includes/config.yml
/opt/unetlab/html/includes/custom_templates.yml
添加定制Image-qcow2
建议参考“EVE-Comm-Book-1.11-2021.pdf”中的12.3,讲的很详细,可以去官网查阅:
https://www.eve-ng.net/index.php/documentation/community-cookbook/
添加定制Image-ISO
建议参考官网的文章,如下:
https://www.eve-ng.net/index.php/documentation/howtos/howto-create-own-windows-host-on-the-eve/
保存现有Image变动的配置
当对Linux Server做了很多变动后(如地址分配,软件安装,调试等),重启这个节点,变动不会消失;但如果想在其他拓扑中调用这个image,所有变动都被初始化了,那么是否有方法把变动的配置提交给原始镜像,下次再调用时就不用再次重复配置了呢?答案当然是“有的”;
其实很简单,默认EVE会把image放在一个特定目录下 “/opt/unetlab/addons/qemu/xxxx/”,当lab启动后,会从这里拷贝image到临时目录,例如“/opt/unetlab/tmp/1/76a357d5-7484-41a2-856c-a0bcfe66fac0/29”,此时对image的操作,配置变更,都只会改变这个临时文件,即使设备重启,这些配置仍然会保留,除非wipe了设备,相当于格式化,重新拷贝一个新的image,所有配置就会没了,那么如何把改变的配置提交给原始的image?其实一条命令即可,注意执行commit需要先把设备关闭:
root@eve-ng:/opt/unetlab/tmp/1/76a357d5-7484-41a2-856c-a0bcfe66fac0/29# qemu-img info hda.qcow2
image: hda.qcow2
file format: qcow2
virtual size: 100G (107374182400 bytes)
disk size: 4.2G
cluster_size: 65536
backing file: /opt/unetlab/addons/qemu/linux-centos7/hda.qcow2
Format specific information:
    compat: 1.1
    lazy refcounts: false
    refcount bits: 16
    corrupt: false
root@eve-ng:/opt/unetlab/tmp/1/76a357d5-7484-41a2-856c-a0bcfe66fac0/29# qemu-img commit hda.qcow2
Image committed.
root@eve-ng:/opt/unetlab/tmp/1/76a357d5-7484-41a2-856c-a0bcfe66fac0/29# qemu-img info hda.qcow2
image: hda.qcow2
file format: qcow2
virtual size: 100G (107374182400 bytes)
disk size: 260K
cluster_size: 65536
backing file: /opt/unetlab/addons/qemu/linux-centos7/hda.qcow2
Format specific information:
    compat: 1.1
    lazy refcounts: false
    refcount bits: 16
    corrupt: false
root@eve-ng:/opt/unetlab/tmp/1/76a357d5-7484-41a2-856c-a0bcfe66fac0/29# ls -l
total 264
-rw-rw-r-- 1 root unl 262144 Aug 10 23:01 hda.qcow2
-rw-rw-r-- 1 root unl 122 Aug 10 22:59 wrapper.txt2022-06-13更新:扩容原有qcow2的硬盘/sda
对于LVM的扩容,之前总结过,可以参考这篇文章:How to resize LVM on Centos7/Ubuntu14.04 。由于公司版本的Linux默认没有使用LVM,直接使用物理介质,那么物理介质如何扩容呢?网上查了下,感觉比较麻烦,因为默认是没办法直接对正在使用的分区进行扩容或缩容的,需要通过宿主机挂在这个虚拟盘,然后通过分区工具融合,就如同你拿U盘安装了一个winpe,然后用这个U盘启动,然后通过U盘中的分区管理工具对原有磁盘进行操作,可以参考这篇文章:How to resize a qcow2 disk image on Linux
经过与同事讨论,发现一种很容易的方法:改写分区表,然后根据分区表再更新磁盘空间,这种操作同样可以做到无损扩容,下面是操作部署:
qcow2现有虚拟磁盘大小
root@eve-ng:/opt/unetlab/tmp/3/f547b082-a364-4737-bbd9-898793f6f066/5# qemu-img info hda.qcow2
image: hda.qcow2
file format: qcow2
virtual size: 20G (21474836480 bytes)
disk size: 47M
cluster_size: 65536
backing file: /opt/unetlab/addons/qemu/linux-pke-bm-4-19-95-17-20210630/hda.qcow2
Format specific information:
    compat: 1.1
    lazy refcounts: false
    refcount bits: 16
    corrupt: false
虚拟机现有分区信息
[root@server3] ~$ df -h
Filesystem      Size  Used Avail Use% Mounted on
devtmpfs        7.7G     0  7.7G   0% /dev
tmpfs           7.8G     0  7.8G   0% /dev/shm
tmpfs           7.8G  584K  7.8G   1% /run
tmpfs           7.8G     0  7.8G   0% /sys/fs/cgroup
/dev/sda2        15G  7.7G  7.4G  52% /
tmpfs           1.6G     0  1.6G   0% /run/user/0
增加qcow2的虚拟硬盘大小
root@eve-ng:/opt/unetlab/tmp/3/f547b082-a364-4737-bbd9-898793f6f066/5# qemu-img resize hda.qcow2 +300G
Image resized.
root@eve-ng:/opt/unetlab/tmp/3/f547b082-a364-4737-bbd9-898793f6f066/5# qemu-img info hda.qcow2
image: hda.qcow2
file format: qcow2
virtual size: 320G (343597383680 bytes)
disk size: 47M
cluster_size: 65536
backing file: /opt/unetlab/addons/qemu/linux-pke-bm-4-19-95-17-20210630/hda.qcow2
Format specific information:
    compat: 1.1
    lazy refcounts: false
    refcount bits: 16
    corrupt: false
查看扩容后的分区信息
看上去应该是因为sda1采用的是GPT(对硬盘大小无限制),导致fdisk(只支持2TB以下的硬盘分区)查看不聊sda2,通过parted 修复下,fdisk就可以查阅这部分分区了:
[root@server3] ~$ lsblk
NAME   MAJ:MIN RM  SIZE RO TYPE MOUNTPOINT
sr0     11:0    1 1024M  0 rom
fd0      2:0    1    4K  0 disk
sda      8:0    0  220G  0 disk
├─sda2   8:2    0   15G  0 part /
└─sda1   8:1    0    2M  0 part
[root@server3] ~$ fdisk /dev/sda
Welcome to fdisk (util-linux 2.23.2).
Changes will remain in memory only, until you decide to write them.
Be careful before using the write command.
Command (m for help): p
Disk /dev/sda: 236.2 GB, 236223201280 bytes, 461373440 sectors
Units = sectors of 1 * 512 = 512 bytes
Sector size (logical/physical): 512 bytes / 512 bytes
I/O size (minimum/optimal): 512 bytes / 512 bytes
Disk label type: dos
Disk identifier: 0x00000000
Device Boot Start End Blocks Id System
/dev/sda1 * 1 41943039 20971519+ ee GPT[root@server3] ~$ parted -l /dev/sad
Error: The backup GPT table is not at the end of the disk, as it should be.
This might mean that another operating system believes the disk is smaller.
Fix, by moving the backup to the end (and removing the old backup)?
Fix/Ignore/Cancel? Fix
Warning: Not all of the space available to /dev/sda appears to be used, you can fix the GPT to use all of the space (an extra 419430400 blocks) or continue with the current setting?
Fix/Ignore? Fix
Model: ATA QEMU HARDDISK (scsi)
Disk /dev/sda: 236GB
Sector size (logical/physical): 512B/512B
Partition Table: gpt
Disk Flags: pmbr_boot
Number Start End Size File system Name Flags
1 1049kB 3146kB 2097kB bios_grub
2 3146kB 16.1GB 16.1GB xfs "root"[root@server3] ~$ fdisk -l
WARNING: fdisk GPT support is currently new, and therefore in an experimental phase. Use at your own discretion.
Disk /dev/sda: 236.2 GB, 236223201280 bytes, 461373440 sectors
Units = sectors of 1 * 512 = 512 bytes
Sector size (logical/physical): 512 bytes / 512 bytes
I/O size (minimum/optimal): 512 bytes / 512 bytes
Disk label type: gpt
Disk identifier: D5B2A65C-111A-4BC0-ABFD-DAEFFA154434
# Start End Size Type Name
1 2048 6143 2M BIOS boot
2 6144 31457280 15G Linux filesyste "root"删除现有分区表
分区表只会记录着硬盘的寻址地址和格式,跟真实内容分开,所以我们可以用“sgdisk”删除分区表,再增加一个新的分区表,让这个分区表的Start和End包含了扩容的那部分空间即可,重启生效:
[root@server3] ~$ /usr/sbin/sgdisk --set-alignment=1 --delete=2 --new=2:6144:0 --change-name=2:\"root\" --typecode=2:8300 /dev/sda
Setting name!
partNum is 1
REALLY setting name!
Warning: The kernel is still using the old partition table.
The new table will be used at the next reboot.
The operation has completed successfully.
[root@server3] ~$ fdisk -l
WARNING: fdisk GPT support is currently new, and therefore in an experimental phase. Use at your own discretion.
Disk /dev/sda: 236.2 GB, 236223201280 bytes, 461373440 sectors
Units = sectors of 1 * 512 = 512 bytes
Sector size (logical/physical): 512 bytes / 512 bytes
I/O size (minimum/optimal): 512 bytes / 512 bytes
Disk label type: gpt
Disk identifier: D5B2A65C-111A-4BC0-ABFD-DAEFFA154434
# Start End Size Type Name
1 2048 6143 2M BIOS boot
2 6144 461373406 220G Linux filesyste "root"
[root@server3] ~$ reboot扩容硬盘空间
通过“lsblk”可以看到硬盘已经扩容了,但“df -H”看不出来,使用“xfs_growfs”进行扩容;
PS:使用“xfs_growfs”命令增加 XFS 文件系统的大小,必须挂载 XFS 文件系统,并且底层设备上必须有可用空间,另外只能扩,不能缩;
[root@server3] ~$ lsblk
NAME   MAJ:MIN RM  SIZE RO TYPE MOUNTPOINT
sr0     11:0    1 1024M  0 rom
fd0      2:0    1    4K  0 disk
sda      8:0    0  220G  0 disk
├─sda2   8:2    0  220G  0 part /
└─sda1   8:1    0    2M  0 part
[root@server3] ~$ df -H
Filesystem      Size  Used Avail Use% Mounted on
devtmpfs        4.1G     0  4.1G   0% /dev
tmpfs           4.1G     0  4.1G   0% /dev/shm
tmpfs           4.1G  635k  4.1G   1% /run
tmpfs           4.1G     0  4.1G   0% /sys/fs/cgroup
/dev/sda2        17G   15G  1.5G  91% /
tmpfs           810M     0  810M   0% /run/user/0
[root@server3] ~$ xfs_growfs /dev/sda2
meta-data=/dev/sda2              isize=512    agcount=15, agsize=262144 blks
         =                       sectsz=512   attr=2, projid32bit=1
         =                       crc=1        finobt=0 spinodes=0
data     =                       bsize=4096   blocks=3931392, imaxpct=25
         =                       sunit=0      swidth=0 blks
naming   =version 2              bsize=4096   ascii-ci=0 ftype=1
log      =internal               bsize=4096   blocks=2560, version=2
         =                       sectsz=512   sunit=0 blks, lazy-count=1
realtime =none                   extsz=4096   blocks=0, rtextents=0
data blocks changed from 3931392 to 57670907
[root@server3] ~$
[root@server3] ~$ df -H
Filesystem      Size  Used Avail Use% Mounted on
devtmpfs        4.1G     0  4.1G   0% /dev
tmpfs           4.1G     0  4.1G   0% /dev/shm
tmpfs           4.1G  635k  4.1G   1% /run
tmpfs           4.1G     0  4.1G   0% /sys/fs/cgroup
/dev/sda2       237G   15G  222G   7% /
tmpfs 810M 0 810M 0% /run/user/02024-01-21更新:扩容原有qcow2的硬盘/vda
编译vSonic,发现60g空间不够了。。。需要扩容,按照之前的经验扩大了硬盘,然后需要更新分区表,但由于是vda的,所以操作方式有些差异,这篇文章讲的非常好,建议参考;
下面是扩容后的sectors不正确:
root@ubuntu:~# sgdisk /dev/vda --print
Disk /dev/vda: 335544320 sectors, 160.0 GiB
Sector size (logical/physical): 512/512 bytes
Disk identifier (GUID): FBE1AFF6-9171-49BF-BD98-721AE45A829B
Partition table holds up to 128 entries
Main partition table begins at sector 2 and ends at sector 33
First usable sector is 34, last usable sector is 335544286
Partitions will be aligned on 2048-sector boundaries
Total free space is 209719229 sectors (100.0 GiB)

Number  Start (sector)    End (sector)  Size       Code  Name
   1            2048            4095   1024.0 KiB  EF02
   2            4096         4198399   2.0 GiB     8300
   3         4198400       125827071   58.0 GiB    8300
显示分区3的信息:
root@ubuntu:~# sgdisk /dev/vda --info=3
Partition GUID code: 0FC63DAF-8483-4772-8E79-3D69D8477DE4 (Linux filesystem)
Partition unique GUID: B5430DDC-7DAC-42B5-9ED4-1562B44D2828
First sector: 4198400 (at 2.0 GiB)
Last sector: 125827071 (at 60.0 GiB)
Partition size: 121628672 sectors (58.0 GiB)
Attribute flags: 0000000000000000
Partition name: ''通过下面命令进行分区表备份,如果更改出问题,可以通过这个命令进行恢复“sgdisk /dev/vda –load-backup=/root/gpt.backup”:
root@ubuntu:~# sgdisk /dev/vda --backup=/root/gpt.backup
The operation has completed successfully.
下面是更改操作:
root@ubuntu:~# sgdisk /dev/vda --delete=3
Warning: The kernel is still using the old partition table.
The new table will be used at the next reboot or after you
run partprobe(8) or kpartx(8)
The operation has completed successfully.
root@ubuntu:~# sgdisk /dev/vda --new=3:4198400:0
Warning: The kernel is still using the old partition table.
The new table will be used at the next reboot or after you
run partprobe(8) or kpartx(8)
The operation has completed successfully.
root@ubuntu:~# sgdisk /dev/vda --change-name=3:''
Setting name!
partNum is 2
Warning: The kernel is still using the old partition table.
The new table will be used at the next reboot or after you
run partprobe(8) or kpartx(8)
The operation has completed successfully.
root@ubuntu:~# sgdisk /dev/vda --typecode=3:8300
Warning: The kernel is still using the old partition table.
The new table will be used at the next reboot or after you
run partprobe(8) or kpartx(8)
The operation has completed successfully.
root@ubuntu:~# sgdisk /dev/vda --partition-guid=3:B5430DDC-7DAC-42B5-9ED4-1562B44D2828
Warning: The kernel is still using the old partition table.
The new table will be used at the next reboot or after you
run partprobe(8) or kpartx(8)
The operation has completed successfully.
上面操作完后,可以再次显示分区3的信息,对比下是否OK, 并通过verify命令进行验证:
root@ubuntu:~# sgdisk /dev/vda --info=3
Partition GUID code: 0FC63DAF-8483-4772-8E79-3D69D8477DE4 (Linux filesystem)
Partition unique GUID: B5430DDC-7DAC-42B5-9ED4-1562B44D2828
First sector: 4198400 (at 2.0 GiB)
Last sector: 335544286 (at 160.0 GiB)
Partition size: 331345887 sectors (158.0 GiB)
Attribute flags: 0000000000000000
Partition name: ''
root@ubuntu:~# sgdisk /dev/vda --verify

No problems found. 2014 free sectors (1007.0 KiB) available in 1
segments, the largest of which is 2014 (1007.0 KiB) in size.
root@ubuntu:~# reboot
重启后,可以看到PV没有更新
root@ubuntu:~# pvdisplay
  --- Physical volume ---
  PV Name               /dev/vda3
  VG Name               ubuntu-vg
  PV Size               <58.00 GiB / not usable 0
  Allocatable           yes (but full)
  PE Size               4.00 MiB
  Total PE              14847
  Free PE               0
  Allocated PE          14847
  PV UUID               IouLka-75gj-voCy-RKBt-DQ9b-PymQ-Cwro5H
需要resize下pv才能激活:
root@ubuntu:~# pvresize /dev/vda3
  Physical volume "/dev/vda3" changed
  1 physical volume(s) resized or updated / 0 physical volume(s) not resized
root@ubuntu:~# pvdisplay
  --- Physical volume ---
  PV Name               /dev/vda3
  VG Name               ubuntu-vg
  PV Size               <158.00 GiB / not usable 16.50 KiB
  Allocatable           yes
  PE Size               4.00 MiB
  Total PE              40447
  Free PE               25600
  Allocated PE          14847
  PV UUID               IouLka-75gj-voCy-RKBt-DQ9b-PymQ-Cwro5H
2022-11-21更新:Find Vnnl Port in EVE NG Terminal
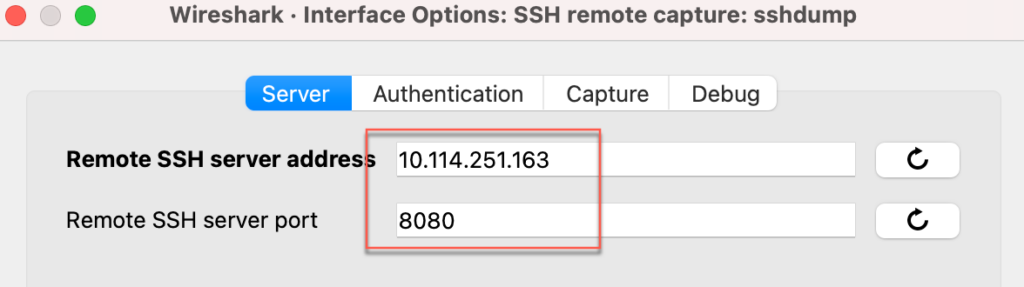
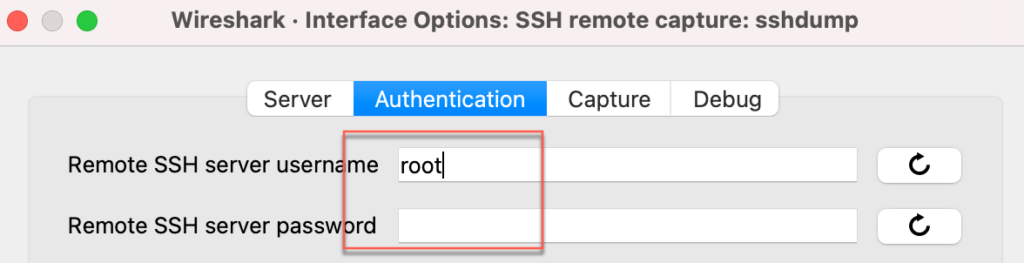
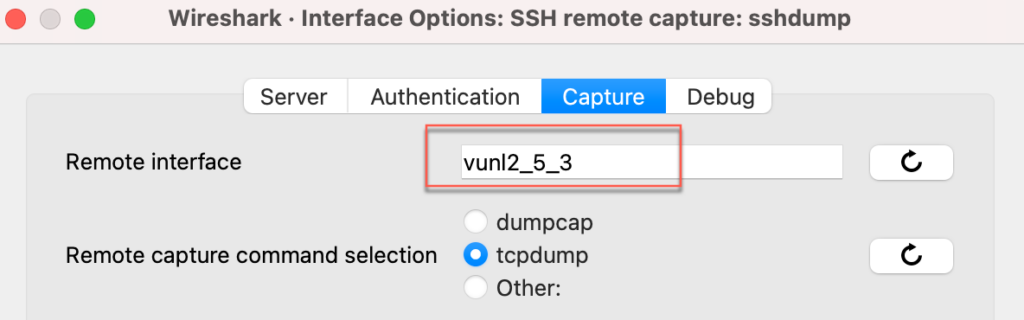
通过图形界面找到要抓包的vunl 端口,然后通过wireshark的sshtcpdump来抓相应端口的报文,如下:
但以上操作前提是在GUI界面找到vunl的端口,如果出于某种原因,没法上GUI,只能terminal到虚机中,要怎么从虚机的mac地址找到对应的vunl端口,然后直接用tcpdump呢?
Switch#sh int gi0/0
GigabitEthernet0/0 is up, line protocol is up (connected)
  Hardware is iGbE, address is 5002.0018.0000 (bia 5002.0018.0000)
[root@server ~]# ifconfig eth4
eth4: flags=4098<BROADCAST,MULTICAST> mtu 1500
ether 00:50:02:00:15:04 txqueuelen 1000 (Ethernet)在找这个命令之前,先了解下在EVE NG中两台虚机是通过什么方式互联的,下面是虚机的互联和mac情况:
VM Linux(00:50:02:00:15:04)-------------(5002.0018.0000)VM Switch但实际中间还有其他端口让两个虚机互联,那就是bridge端口和vunl端口,如下:
[VM Linux(00:50:02:00:15:04)]-vunl2_21_4-----vnet2_38-----vunl2_24_0-[(5002.0018.0000)VM Switch]root@eve-ng:~# brctl show vnet2_38
bridge name bridge id STP enabled interfaces
vnet2_38 8000.5aa59222e8fd no vunl2_21_4
vunl2_24_0
root@eve-ng:~# ifconfig vunl2_24_0
vunl2_24_0 Link encap:Ethernet HWaddr 5a:a5:92:22:e8:fd
UP BROADCAST RUNNING MULTICAST MTU:9000 Metric:1
RX packets:27297 errors:0 dropped:0 overruns:0 frame:0
TX packets:477 errors:0 dropped:0 overruns:0 carrier:0
collisions:0 txqueuelen:1000
RX bytes:2037583 (2.0 MB) TX bytes:78230 (78.2 KB)
root@eve-ng:~# ifconfig vunl2_21_4
vunl2_21_4 Link encap:Ethernet HWaddr 8e:20:06:fa:26:8c
UP BROADCAST RUNNING MULTICAST MTU:9000 Metric:1
RX packets:491 errors:0 dropped:0 overruns:0 frame:0
TX packets:27304 errors:0 dropped:0 overruns:0 carrier:0
collisions:0 txqueuelen:1000
RX bytes:80410 (80.4 KB) TX bytes:2038003 (2.0 MB)
root@eve-ng:~# bridge fdb | grep -i vunl2_24_0
5a:a5:92:22:e8:fd dev vunl2_24_0 vlan 1 master vnet2_38 permanent
5a:a5:92:22:e8:fd dev vunl2_24_0 master vnet2_38 permanent
01:00:5e:00:00:01 dev vunl2_24_0 self permanent那回到最初始的问题,我们要如何根据虚拟机里的mac找到对应的vunl端口呢?可以通过下面命令即可找到对应的vunl2_21_4:
root@eve-ng:~# ps -ef|grep qemu |grep 00:50:02:00:15:04
root     13719     1  0 Nov21 ?        00:00:00 /opt/unetlab/wrappers/qemu_wrapper -T 2 -D 21 -t server -F /opt/qemu-2.12.0/bin/qemu-system-x86_64 -d 0 -x -- -device virtio-net-pci,netdev=net0,mac=00:50:02:00:15:00 -netdev tap,id=net0,ifname=vunl2_21_0,script=no -device virtio-net-pci,netdev=net1,mac=00:50:02:00:15:01 -netdev tap,id=net1,ifname=vunl2_21_1,script=no -device virtio-net-pci,netdev=net2,mac=00:50:02:00:15:02 -netdev tap,id=net2,ifname=vunl2_21_2,script=no -device virtio-net-pci,netdev=net3,mac=00:50:02:00:15:03 -netdev tap,id=net3,ifname=vunl2_21_3,script=no -device virtio-net-pci,netdev=net4,mac=00:50:02:00:15:04 -netdev tap,id=net4,ifname=vunl2_21_4,script=no -smp 4 -m 8192 -name server -uuid 16eac0a6-3e7e-4fbe-988e-98fe99da73b8 -vnc :27145 -hda hda.qcow2 -machine type=pc,accel=kvm -vga virtio -usbdevice tablet -boot order=cd
root     13720 13719  0 Nov21 ?        00:00:00 /opt/unetlab/wrappers/qemu_wrapper -T 2 -D 21 -t server -F /opt/qemu-2.12.0/bin/qemu-system-x86_64 -d 0 -x -- -device virtio-net-pci,netdev=net0,mac=00:50:02:00:15:00 -netdev tap,id=net0,ifname=vunl2_21_0,script=no -device virtio-net-pci,netdev=net1,mac=00:50:02:00:15:01 -netdev tap,id=net1,ifname=vunl2_21_1,script=no -device virtio-net-pci,netdev=net2,mac=00:50:02:00:15:02 -netdev tap,id=net2,ifname=vunl2_21_2,script=no -device virtio-net-pci,netdev=net3,mac=00:50:02:00:15:03 -netdev tap,id=net3,ifname=vunl2_21_3,script=no -device virtio-net-pci,netdev=net4,mac=00:50:02:00:15:04 -netdev tap,id=net4,ifname=vunl2_21_4,script=no -smp 4 -m 8192 -name server -uuid 16eac0a6-3e7e-4fbe-988e-98fe99da73b8 -vnc :27145 -hda hda.qcow2 -machine type=pc,accel=kvm -vga virtio -usbdevice tablet -boot order=cd
root     13721 13720  0 Nov21 ?        00:00:00 sh -c TAG=T2D21- /opt/qemu-2.12.0/bin/qemu-system-x86_64 -device virtio-net-pci,netdev=net0,mac=00:50:02:00:15:00 -netdev tap,id=net0,ifname=vunl2_21_0,script=no -device virtio-net-pci,netdev=net1,mac=00:50:02:00:15:01 -netdev tap,id=net1,ifname=vunl2_21_1,script=no -device virtio-net-pci,netdev=net2,mac=00:50:02:00:15:02 -netdev tap,id=net2,ifname=vunl2_21_2,script=no -device virtio-net-pci,netdev=net3,mac=00:50:02:00:15:03 -netdev tap,id=net3,ifname=vunl2_21_3,script=no -device virtio-net-pci,netdev=net4,mac=00:50:02:00:15:04 -netdev tap,id=net4,ifname=vunl2_21_4,script=no -smp 4 -m 8192 -name server -uuid 16eac0a6-3e7e-4fbe-988e-98fe99da73b8 -vnc :27145 -hda hda.qcow2 -machine type=pc,accel=kvm -vga virtio -usbdevice tablet -boot order=cd
root     13722 13721 17 Nov21 ?        02:36:09 /opt/qemu-2.12.0/bin/qemu-system-x86_64 -device virtio-net-pci,netdev=net0,mac=00:50:02:00:15:00 -netdev tap,id=net0,ifname=vunl2_21_0,script=no -device virtio-net-pci,netdev=net1,mac=00:50:02:00:15:01 -netdev tap,id=net1,ifname=vunl2_21_1,script=no -device virtio-net-pci,netdev=net2,mac=00:50:02:00:15:02 -netdev tap,id=net2,ifname=vunl2_21_2,script=no -device virtio-net-pci,netdev=net3,mac=00:50:02:00:15:03 -netdev tap,id=net3,ifname=vunl2_21_3,script=no -device virtio-net-pci,netdev=net4,mac=00:50:02:00:15:04 -netdev tap,id=net4,ifname=vunl2_21_4,script=no -smp 4 -m 8192 -name server -uuid 16eac0a6-3e7e-4fbe-988e-98fe99da73b8 -vnc :27145 -hda hda.qcow2 -machine type=pc,accel=kvm -vga virtio -usbdevice tablet -boot order=cd
然后就可以在EVE上直接tcpdump这个接口了:
root@eve-ng:~# tcpdump -i vunl2_21_42023-06-20更新:更改CPU的Flag
同事需要使用EVE NG仿真的Linux部署测试软件,但发现Server中的CPU不支持AVX指令集导致测试软件无法安装,开始以为kernel比较老,但后来发现是因为默认EVE NG的Qemu没有开启对AVX指令集的支持,需要单独开启,开发方法就是在启动参数上加上-cpu host,这样虚拟机就支持host主机所支持的所有指令集了,如下,更详细的内容,可以参考这篇文章:
