使用ChatGPT协助写测试脚本?!
背景
之前一直看到有人谈论用Chatgpt编程序,设计产品,做游戏,反正很神就是了。在我使用过程中,并没有感觉那么神,也许是提示字给的不标准吧。最近正好有个机会,需要搞一个All2all的测试脚本,可自动化提供大规模All2All的测试任务。因此就测试了下GPT的能力。
目前用的是最新版本GPT4o(自行花了20美金),整体使用下来,GPT确实可以协助编程,只是沟通起来比较费劲和费时间……如果真正要搞一个项目,就不太现实了。估计还要再迭代几轮吧。即使是最牛的GPT4o,在沟通交互中,仍然会有以下问题:
- 强调过的内容,可能要重复说3-4遍,GPT才真的听进去了,但过了几轮后可能就又忘记了,比如”不着急出优化代码,先讨论问题“;
- 为了提升效率,对于一些小优化,其实可以提供代码片段,但GPT有时候提供的片段跟代码本身没有强联系;
- 为了排障,在脚本中增加了一些提示信息(增加执行log)。后面随着不断迭代优化,就会发现有些功能消失了。这种现象很明显,很可能会遇到之前解决过的问题再次出现……
脚本流程
选择编程语言
开始使用Python(paramiko + 多线程),但测试过程中发现Python的并行并不是很好(并行不是按照预想的执行,也可能这块代码写的不好)。因此后来就转成Go了,在老东家,很多程序也都是用go写的。之前朋友也一直说go的效率高。Go的初始环境搭建,可以参考之前的总结:Go初体验。下面是AI给出的Go和Python对比的结论,也可参考:
- 语言层面的并发原生支持
- Go有goroutine和channel的概念,实现了轻量级的并发,开销小
- Python的线程受GIL(全局解释器锁)影响,多线程无法真正利用多核优势
- 更高效的执行性能
- Go是编译型语言,执行期性能优于Python这种解释型语言
- Go底层使用了一些底层技术如LLVM,使其执行效率更高
- 更简单的部署
- Go编译后生成单个静态可执行文件,部署更简单
- Python需要依赖解释器环境,部署相对复杂
- 更小的内存占用
- Go程序典型的内存占用比Python程序小得多
- 对于高并发服务,内存占用少意味着可支持更高并发
流程拆解
要想让GPT帮你编程,首要的任务就是把程序的正确逻辑告诉GPT,这个前题是你要知道你想实现什么。比如我们现在要做All2all的测试,那么就需要了解不同设备情况下,all2all需要多少个通信,需要哪些参数,这些参数的规律是什么?
首先看下Server测(10.1.1.7)的命令:
ib_write_bw -q 1 -x 3 --tclass 34 -p 10001 -d mlx5_0 --report_gbits --run_infinitely下面是Client测(10.1.1.8)的命令:
ib_write_bw -q 1 -x 3 --tclass 34 -p 10001 -F 10.1.1.7 -d mlx5_1 --report_gbits -N --run_infinitely下面是逻辑分析:
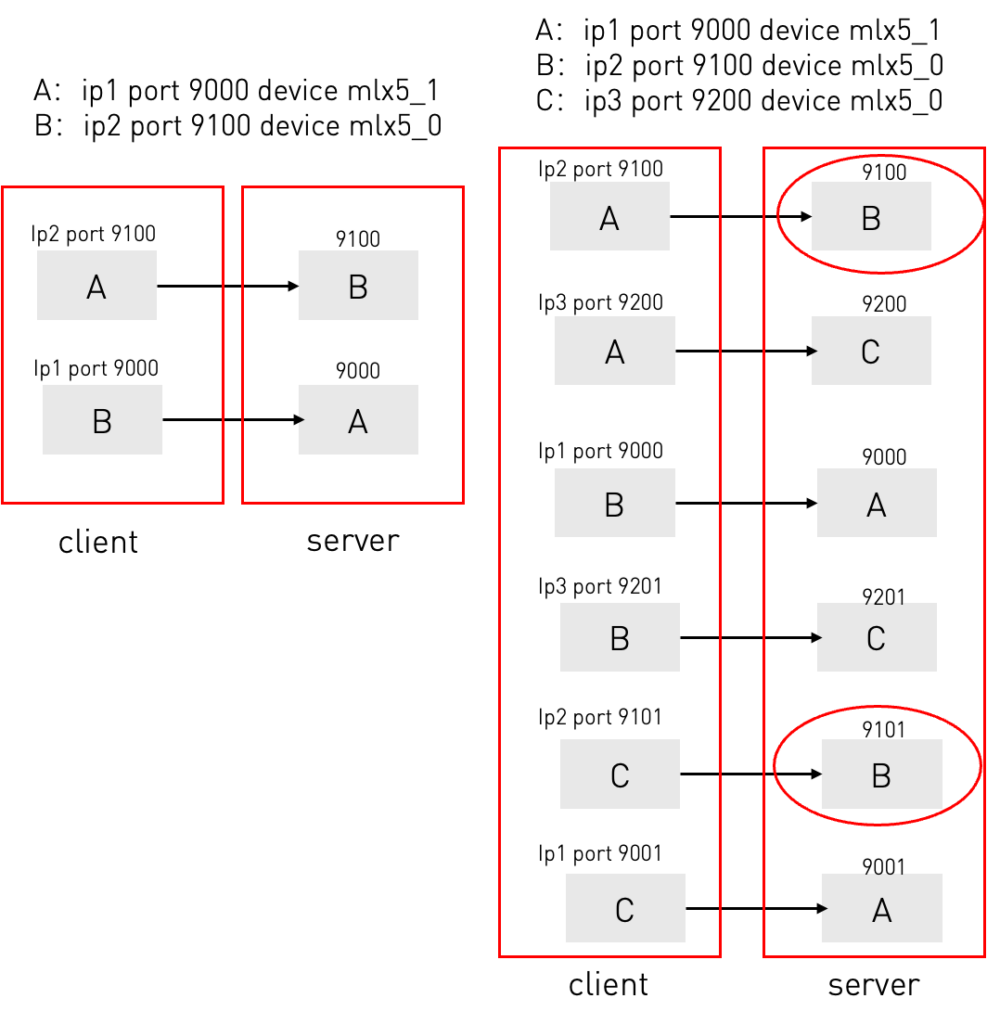
- ALL2ALL的通信公式是N*(N-1)。比如2个设备,需要2个Session;3个设备,则需要6个Session;
- Server根据端口(1001)和Device(mlx5_0)来开服务,端口遵循N-1。比如3个设备,每台设备需要开2个端口作为服务;而Device则是本地的概念,跟Server绑定。当然1台Server会插多口网卡,那么可以把其当成多台设备,用 IP + Device 标识来表示一个设备;
- 登录设备信息可以放到Credentials.txt中,格式如下:
- 10.1.1.7,22,xxx,xxx,10100,mlx5_1
- 10.1.1.8,22,xxx,xxx,10200,mlx5_0
- 10.1.1.9,22,xx,xxx,10300,mlx5_0
- 对于all2all,拿1.9来举例,并把[10.1.1.9 mlx5_0]:[10400 10401]]存入临时文件:
- 1.9开2个服务:
- ib_write_bw -q 1 -x 3 –tclass 34 -p 10300 -d mlx5_0 –report_gbits –run_infinitely
- ib_write_bw -q 1 -x 3 –tclass 34 -p 10301 -d mlx5_0 –report_gbits –run_infinitely
- 1.7和1.8分别访问这两个端口,拿1.7举例,逻辑是登录到1.7上,根据Server生成的临时文件中找到1.9开的端口,从而生成命令,这里的-p是1.9的,-d是1.7的。1.7登录完后,从临时文件中删除相关port的记录,保证1.8生成命令时保证不会重复:
- b_write_bw -q 1 -x 3 –tclass 34 -p 10300 -F 10.1.1.9 -d mlx5_1 –report_gbits -N –run_infinitely
- 1.9开2个服务:
- 开始并行处理大量SSH Session时,经常出现错误,或者密码问题登,所以Server的程序里增加了delay,让其所有并发在1s内发出去,但后来发现挪到与测试服务器一个局域网环境下再执行就没问题了,所以有类似情况的,可以直接本地测试,这段代码就没有注释掉,Client的这部分delay注释掉了;
- 在Client执行命令时,为了防止SSH登录时间不均衡导致后续执行命令产生差异,所以直接等到所有Session都建立完后,再并行执行命令;
- 其他就是方便汇总信息的优化了:
- 增加执行log,感知程序执行的过程;
- 程序会在每个SSH session中,把输出的信息通过管道写入临时文件(带有时间戳),文件名添加一个随机数,防止一台设备多个session文件名冲突的问题,然后通过scp把改文件拷贝到本地,然后把这些文件汇总,由于有写入时间戳,所以重组信息不会影响脚本的准确度;
- 为了方便汇总分析,Client生成2个文件,1个是full,一个是summary,summary的信息可以直接粘入excel进行快速分析;
- 经过测试,发现 run_infinitely 比-D 30的结果要差,暂不确定为什么,目前的版本中用的是-D 30;
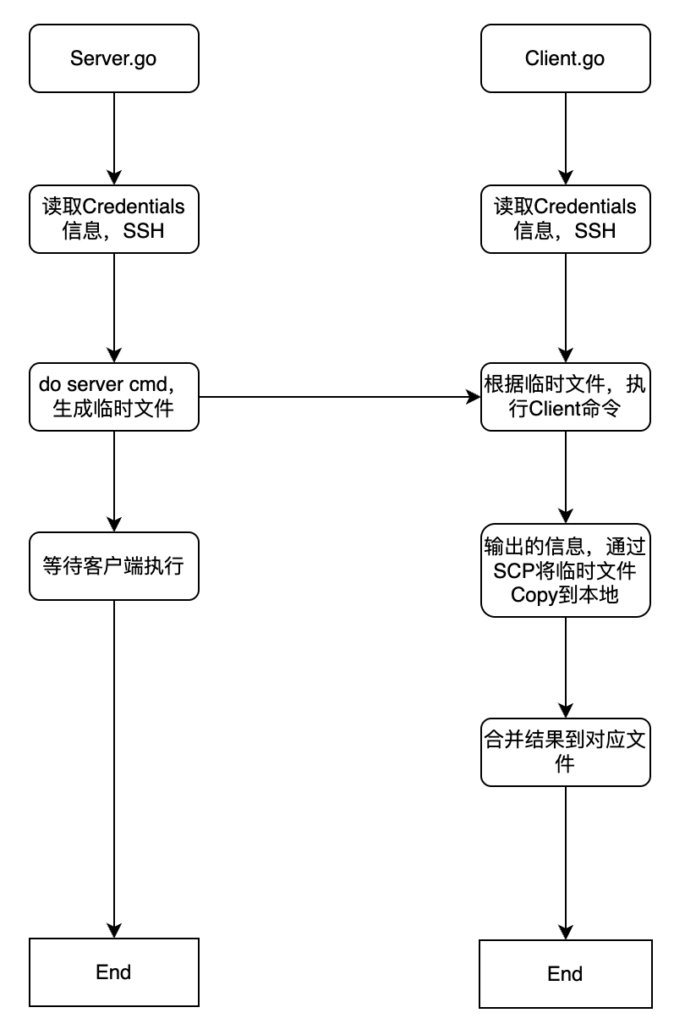
开始考虑一个脚本搞定,但发现实现Server和Client两种行为会比较复杂,考虑的因素较多,以及需要尽快完成脚本。就把程序拆成了两个文件,一个开服务,另一个开客户端。这样也比较好控制,下面是两个程序的简易流程图:
服务器提高并行性能
Server需要打开SSH的并发限制:
@ubuntu:~$ more /etc/security/limits.conf |grep nofile
#        - nofile - max number of open file descriptors
* soft nofile 10240
* hard nofile 10240

@ubuntu:~$ more /etc/ssh/sshd_config |grep Max
#MaxAuthTries 6
MaxSessions 100
#ClientAliveCountMax 3
MaxStartups 100:30:100  <<<
程序Demo
本程序支持N台设备的ALL2ALL RDMA测试,demo中只展示3台设备的,N台设备都是一样的操作;
程序目录
可以把下面的zip打开,里面有4个文件,2个是go源码,另外2个已经编译成的x86可执行文件,直接把两个x86的文件挪到一个目录下即可,另外建立Credentials文件,其中xxx代表SSH的用户名和密码:
@tme:~/frank$ chmod +x client_x86_0614
@tme:~/frank$ chmod +x server_x86_0614
@tme:~/frank$ tree
.
├── client_x86_0614
├── credentials.txt
└── server_x86_0614

0 directories, 3 files
@tme:~/frank$ more credentials.txt
10.1.1.7,22,xxx,xxx,10100,mlx5_1
10.1.1.8,22,xxx,xxx,10200,mlx5_0
10.1.1.9,22,xxx,xxx,10300,mlx5_0
清除残留进程
之所以没把这个功能做到脚本中,就是担心环境中还有其他同事在做测试,所以把这个挪出来,作为手动执行。操作很简单,用CRT打开所有3台设备,然后同时在3台设备上执行明确确认是否有残留的ibwrite命令,如果有,那么执行第二条命令,清干净:
ps -ef|grep write
pkill -f 'ib_write_bw -q 1 -x 3 --tclass 34'
执行程序
先执行Server的程序:
@tme:~/frank$ ./server_x86_0614
2024/06/14 15:48:58 2024-06-14 15:48:58.696715 - Connecting to 10.1.1.9:22
2024/06/14 15:48:59 2024-06-14 15:48:59.023746 - Successfully connected to 10.1.1.9:22
2024/06/14 15:48:59 2024-06-14 15:48:59.023793 - Executing command on 10.1.1.9:22: nohup ib_write_bw -q 1 -x 3 --tclass 34 -p 10300 -d mlx5_0 --report_gbits --run_infinitely > /dev/null 2>&1 &
2024/06/14 15:48:59 2024-06-14 15:48:59.055203 - Connecting to 10.1.1.8:22
2024/06/14 15:48:59 2024-06-14 15:48:59.296134 - Command executed successfully on 10.1.1.9:22
2024/06/14 15:48:59 2024-06-14 15:48:59.296160 - Server command executed on 10.1.1.9:22, waiting for 600 seconds before closing the connection
2024/06/14 15:48:59 2024-06-14 15:48:59.488245 - Connecting to 10.1.1.8:22
2024/06/14 15:48:59 2024-06-14 15:48:59.643962 - Successfully connected to 10.1.1.8:22
2024/06/14 15:48:59 2024-06-14 15:48:59.644022 - Executing command on 10.1.1.8:22: nohup ib_write_bw -q 1 -x 3 --tclass 34 -p 10200 -d mlx5_0 --report_gbits --run_infinitely > /dev/null 2>&1 &
2024/06/14 15:48:59 2024-06-14 15:48:59.821489 - Connecting to 10.1.1.9:22
2024/06/14 15:48:59 2024-06-14 15:48:59.958027 - Connecting to 10.1.1.7:22
2024/06/14 15:49:00 2024-06-14 15:49:00.039467 - Successfully connected to 10.1.1.8:22
2024/06/14 15:49:00 2024-06-14 15:49:00.039503 - Executing command on 10.1.1.8:22: nohup ib_write_bw -q 1 -x 3 --tclass 34 -p 10201 -d mlx5_0 --report_gbits --run_infinitely > /dev/null 2>&1 &
2024/06/14 15:49:00 2024-06-14 15:49:00.098354 - Successfully connected to 10.1.1.9:22
2024/06/14 15:49:00 2024-06-14 15:49:00.098392 - Executing command on 10.1.1.9:22: nohup ib_write_bw -q 1 -x 3 --tclass 34 -p 10301 -d mlx5_0 --report_gbits --run_infinitely > /dev/null 2>&1 &
2024/06/14 15:49:00 2024-06-14 15:49:00.208508 - Command executed successfully on 10.1.1.8:22
2024/06/14 15:49:00 2024-06-14 15:49:00.208535 - Server command executed on 10.1.1.8:22, waiting for 600 seconds before closing the connection
2024/06/14 15:49:00 2024-06-14 15:49:00.267713 - Successfully connected to 10.1.1.7:22
2024/06/14 15:49:00 2024-06-14 15:49:00.267750 - Executing command on 10.1.1.7:22: nohup ib_write_bw -q 1 -x 3 --tclass 34 -p 10100 -d mlx5_1 --report_gbits --run_infinitely > /dev/null 2>&1 &
2024/06/14 15:49:00 2024-06-14 15:49:00.339490 - Command executed successfully on 10.1.1.9:22
2024/06/14 15:49:00 2024-06-14 15:49:00.339516 - Server command executed on 10.1.1.9:22, waiting for 600 seconds before closing the connection
2024/06/14 15:49:00 2024-06-14 15:49:00.455580 - Connecting to 10.1.1.7:22
2024/06/14 15:49:00 2024-06-14 15:49:00.515994 - Command executed successfully on 10.1.1.7:22
2024/06/14 15:49:00 2024-06-14 15:49:00.516012 - Server command executed on 10.1.1.7:22, waiting for 600 seconds before closing the connection
2024/06/14 15:49:00 2024-06-14 15:49:00.612359 - Command executed successfully on 10.1.1.8:22
2024/06/14 15:49:00 2024-06-14 15:49:00.612384 - Server command executed on 10.1.1.8:22, waiting for 600 seconds before closing the connection
2024/06/14 15:49:00 2024-06-14 15:49:00.703630 - Successfully connected to 10.1.1.7:22
2024/06/14 15:49:00 2024-06-14 15:49:00.703659 - Executing command on 10.1.1.7:22: nohup ib_write_bw -q 1 -x 3 --tclass 34 -p 10101 -d mlx5_1 --report_gbits --run_infinitely > /dev/null 2>&1 &
2024/06/14 15:49:00 2024-06-14 15:49:00.963965 - Command executed successfully on 10.1.1.7:22
2024/06/14 15:49:00 2024-06-14 15:49:00.963986 - Server command executed on 10.1.1.7:22, waiting for 600 seconds before closing the connection
再执行Client程序:
@tme:~/frank$ ./client_x86_0614
2024/06/14 15:49:45 All ports: map[10.1.1.7,mlx5_1:[10100 10101] 10.1.1.8,mlx5_0:[10200 10201] 10.1.1.9,mlx5_0:[10300 10301]]
2024/06/14 15:49:45 2024-06-14 15:49:45.886462 - Connecting to 10.1.1.7:22
2024/06/14 15:49:45 2024-06-14 15:49:45.936908 - Connecting to 10.1.1.7:22
2024/06/14 15:49:45 2024-06-14 15:49:45.987525 - Connecting to 10.1.1.8:22
2024/06/14 15:49:46 2024-06-14 15:49:46.038038 - Connecting to 10.1.1.8:22
2024/06/14 15:49:46 2024-06-14 15:49:46.088827 - Connecting to 10.1.1.9:22
2024/06/14 15:49:46 2024-06-14 15:49:46.139452 - Connecting to 10.1.1.9:22
2024/06/14 15:49:46 2024-06-14 15:49:46.168095 - Executing command on 10.1.1.7:22: ib_write_bw -q 1 -x 3 --tclass 34 -p 10200 -F 10.1.1.8 -d mlx5_1 --report_gbits -N --run_infinitely
2024/06/14 15:49:46 2024-06-14 15:49:46.188192 - Executing command on 10.1.1.7:22: ib_write_bw -q 1 -x 3 --tclass 34 -p 10300 -F 10.1.1.9 -d mlx5_1 --report_gbits -N --run_infinitely
2024/06/14 15:49:46 2024-06-14 15:49:46.387981 - Executing command on 10.1.1.9:22: ib_write_bw -q 1 -x 3 --tclass 34 -p 10101 -F 10.1.1.7 -d mlx5_0 --report_gbits -N --run_infinitely
2024/06/14 15:49:46 2024-06-14 15:49:46.419413 - Executing command on 10.1.1.9:22: ib_write_bw -q 1 -x 3 --tclass 34 -p 10201 -F 10.1.1.8 -d mlx5_0 --report_gbits -N --run_infinitely
2024/06/14 15:49:46 Command started on 10.1.1.7:22
2024/06/14 15:49:46 Command started on 10.1.1.7:22
2024/06/14 15:49:46 2024-06-14 15:49:46.604073 - Executing command on 10.1.1.8:22: ib_write_bw -q 1 -x 3 --tclass 34 -p 10301 -F 10.1.1.9 -d mlx5_0 --report_gbits -N --run_infinitely
2024/06/14 15:49:46 2024-06-14 15:49:46.607896 - Executing command on 10.1.1.8:22: ib_write_bw -q 1 -x 3 --tclass 34 -p 10100 -F 10.1.1.7 -d mlx5_0 --report_gbits -N --run_infinitely
2024/06/14 15:49:46 Command started on 10.1.1.9:22
2024/06/14 15:49:46 Command started on 10.1.1.9:22
2024/06/14 15:49:47 Command started on 10.1.1.8:22
2024/06/14 15:49:47 Command started on 10.1.1.8:22
2024/06/14 15:50:47 2024-06-14 15:50:47.791487 - Script execution completed
确认生成的文件,主要关注下面两个文件:
@tme:~/frank$ tree
.
├── client_output_full_20240614155047.txt
├── client_output_summary_20240614155047.txt
├── client_x86_0614
├── credentials.txt
├── server_output.txt
└── server_x86_0614

0 directories, 6 files
把Summary文件拷贝到Excel中,就可以梳理出结果:
