Install EVE-NG by KVM in CentOS
安装KVM组件
此步骤略,具体信息可以自行查阅
通过Virsh管理KVM
[root@host] $ virsh list
 Id    Name                           State
----------------------------------------------------

[root@host] $ virsh list --all
 Id    Name                           State
----------------------------------------------------
 -     centos-test                    shut off

[root@host] $
[root@host] $ brctl show
bridge name     bridge id               STP enabled     interfaces
br0             8000.b8599f1ef79e       no              eth2
virbr0          8000.5254004de69f       yes             virbr0-nic
[root@host] $
[root@host] $ route -n
Kernel IP routing table
Destination     Gateway         Genmask         Flags Metric Ref    Use Iface
0.0.0.0         172.16.211.1    0.0.0.0         UG    0      0        0 br0
169.254.0.0     0.0.0.0         255.255.0.0     U     1007   0        0 br0
172.16.211.0    0.0.0.0         255.255.255.0   U     0      0        0 br0
192.168.122.0 0.0.0.0 255.255.255.0 U 0 0 0 virbr0为了安装EVN,我单独设置了一个br1,注意在设置br1时,不要写gateway,否则会覆盖现有br0的gateway,导致网络中断
[root@host] $more /etc/sysconfig/network-scripts/ifcfg-eve-ng
BOOTPROTO=static
TYPE=Bridge
NAME=eve-ng
DEVICE=br1
ONBOOT=yes
NETMASK=255.255.255.0
IPADDR=11.1.1.1
下面是一些常用的virsh命令:
- virsh shutdown eve-ng #关闭kvm虚拟机eve-ng
- virsh destroy eve-ng #强行关闭kvm虚拟机eve-ng
- virsh undefined eve-ng #移除kvm虚拟机eve-ng
- virsh dumpxml eve-ng #查看kvm虚拟机eve-ng的xml profile
- virsh edit eve-ng #编辑kvm虚拟机eve-ng的xml profile
安装EVE-NG
先设置qemu image,由于我环境中网络受限不能访问外网(EVE安装完后必须联网更新些内容),所以请朋友帮忙单独做了一个qemu image放到了相应的目录下,如果最开始设置,可以通过下面这个命令,创建qemu image,然后就可以通过virsh-install指定位置安装
[root@host] $sudo qemu-img create -f qcow2 eve-ng.qcow2 200g除了要先建立image外,还要注意bus需要用“sata”,我参考的这篇文章中 https://freelinuxtutorials.com/installation-of-kvm-kernel-based-virtual-machine-virtualization-and-eve-ng-in-centos/ 用的是“virtio”,但在我的环境里,会有问题
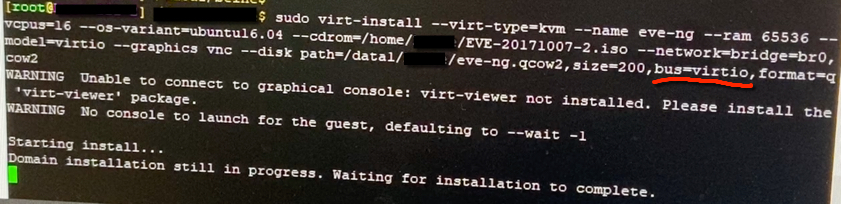
如果用了这个“virtio”参数,会导致在“starting up the partitioner”后找不到硬盘,并告知“No root file system is defined”:
另外下面红色标记的是开启嵌套虚拟化,因为我不是裸机安装EVE的ISO,而是在CentOS通过KVM安装,这样在KVM EVE中开启仿真软件,就需要嵌套虚拟化,打穿EVE中的KVM使用宿主机的硬件虚拟化资源,类似我安装vSTC时的场景,如:How To Deploy STC VM by QEMU?
另外因为我已经有image了,所以加参数“–boot hd”,如果需要重新安装,那么指定“–cdrom=”的实际路径即可
[root@host] $sudo virt-install --virt-type=kvm --name eve-ng --ram 65536 --vcpus=20 --cpu Skylake-Server-IBRS,+x2apic,+vmx --os-variant=ubuntu16.04 --network=bridge=br1,model=virtio --graphics vnc, --disk path=/data1/xxxx/eve-ng.qcow2,size=200,bus=sata,format=qcow2 --boot hd

WARNING  Unable to connect to graphical console: virt-viewer not installed. Please install the 'virt-viewer' package.
WARNING  No console to launch for the guest, defaulting to --wait -1

Starting install...
Allocating 'eve-ng.qcow2'                                                            |  10 GB  00:00:00
Domain installation still in progress. Waiting for installation to complete.
确认嵌套虚拟化状态
root@eve-ng:~# lscpu
Architecture:          x86_64
CPU op-mode(s):        32-bit, 64-bit
Byte Order:            Little Endian
CPU(s):                20
On-line CPU(s) list:   0-19
Thread(s) per core:    1
Core(s) per socket:    1
Socket(s):             20
NUMA node(s):          1
Vendor ID:             GenuineIntel
CPU family:            6
Model:                 85
Model name:            Intel Xeon Processor (Skylake, IBRS)
Stepping:              4
CPU MHz:               2394.374
BogoMIPS:              4788.74
Virtualization:        VT-x
Hypervisor vendor:     KVM
Virtualization type:   full
L1d cache:             32K
L1i cache:             32K
L2 cache:              4096K
NUMA node0 CPU(s):     0-19
Flags:                 fpu vme de pse tsc msr pae mce cx8 apic sep mtrr pge mca cmov pat pse36 clflush mmx fxsr sse sse2 syscall nx pdpe1gb rdtscp lm constant_tsc rep_good nopl cpuid tsc_known_freq pni pclmulqdq vmx ssse3 fma cx16 pcid sse4_1 sse4_2 x2apic movbe popcnt tsc_deadline_timer aes xsave avx f16c rdrand hypervisor lahf_lm abm 3dnowprefetch invpcid_single pti ibrs ibpb tpr_shadow vnmi flexpriority ept vpid ept_ad fsgsbase bmi1 hle avx2 smep bmi2 erms invpcid rtm mpx avx512f avx512dq rdseed adx smap clwb avx512cd avx512bw avx512vl xsaveopt xsavec xgetbv1
root@eve-ng:~#
root@eve-ng:~#
root@eve-ng:~# kvm-ok
INFO: /dev/kvm exists
KVM acceleration can be used
打一个“洞”
由于安全问题,我的PC不能随意访问服务器的资源,所以目前只申请到两个端口,一个是vnc的端口5900,另一个是8181。vnc算是带外管理口,不能动,所以需要想办法利用8181打一个SSL的tunnel,这样从我PC到EVE-NG的任何端口都可以完成了

“NC”命令
对于“打洞”,有两种方法,第一种是“nc”。下面指令是监听8181端口,如果有访问此端口的session,那么直接重定向到EVE-NG的22端口,这样就完成了“打洞”。通过8181这个端口,可以访问EVE-NG上的任何服务
[root@host] ~$ nc -l -p 8181 -c "nc 11.1.1.11 22" &
[1] 124224
[root@host] ~$
[root@host] ~$ netstat -nptl |grep 81
tcp        0      0 0.0.0.0:111             0.0.0.0:*               LISTEN      1681/rpcbind
tcp        0      0 0.0.0.0:8181            0.0.0.0:*               LISTEN      124224/nc
tcp6       0      0 :::111                  :::*                    LISTEN      1681/rpcbind
tcp6       0      0 :::8080                 :::*                    LISTEN      70812/./dashboard
tcp6       0      0 :::8181                 :::*                    LISTEN      124224/nc
tcp6       0      0 :::9527                 :::*                    LISTEN      16681/main
在PC上,可以通过ssh直接访问EVE-NG的主机
C:\Users\xxxxx> ssh [email protected] -p 8181
The authenticity of host '[172.16.211.2]:8181 ([172.16.211.2]:8181)' can't be established.
ECDSA key fingerprint is SHA256:P4d88LVPsdDXazrwn/6bwtqYAWuFSVNVO2x1qIRzqt4.
Are you sure you want to continue connecting (yes/no)? yes
Warning: Permanently added '[172.16.211.2]:8181' (ECDSA) to the list of known hosts.
[email protected]'s password:
Welcome to Ubuntu 16.04.3 LTS (GNU/Linux 4.20.17-eve-ng-ukms+ x86_64)

 * Documentation:  https://help.ubuntu.com
 * Management:     https://landscape.canonical.com
 * Support:        https://ubuntu.com/advantage
Last login: Tue Mar 23 01:49:17 2021
root@eve-ng:~#
如果想访问EVE-NG的80端口,直接开个代理即可,linux开代理比较容易,win10开代理可以使用WSL2,这个是什么稍后再说,进入wsl2后,就跟真的linxu一样,直接ssh代理命令,这样就可以了,然后直接在游览器中输入“http://127.0.0.1:8181”就可以访问80端口了
root@xxxxx:/mnt/d# ssh -N -L 8080:localhost:80 [email protected] -p 8181
The authenticity of host '[172.16.211.2]:8181 ([172.16.211.2]:8181)' can't be established.
ECDSA key fingerprint is SHA256:P4d88LVPsdDXazrwn/6bwtqYAWuFSVNVO2x1qIRzqt4.
Are you sure you want to continue connecting (yes/no/[fingerprint])? yes
Warning: Permanently added '[172.16.211.2]:8181' (ECDSA) to the list of known hosts.
[email protected]'s password:
把kvm image传送到EVE-NG中
root@xxxxx:/mnt/d/工作/quem-image# scp -P 8181 xrv9k-fullk9-x-7.3.1.qcow2 [email protected]:/opt/unetlab/addons/qemu/xrv
9k-fullk9-x-7.3.1/virtioa.qcow2
[email protected]'s password:
xrv9k-fullk9-x-7.3.1.qcow2                                                            100% 1492MB 103.7MB/s   00:14
root@xxxxx:/mnt/d/工作/quem-image#
虽然看上去已经解决问题了,但nc命令生成的端口只能保留一次,只要触发一次后,监听端口就会消失,所以需要反复开,不是很方便。尝试screen放入后台监听,同样的结果
“Socat”命令
参考这篇文章:Linux socat轻松实现TCP/UDP端口转发
用这个命令
[root@host] ~$ socat -d TCP4-LISTEN:8181,reuseaddr,fork TCP4:11.1.1.11:22
[root@host] ~$ netstat -ntpl|grep 8181
tcp        0      0 0.0.0.0:8181            0.0.0.0:*               LISTEN      216592/socat
安装并使用WSL2
如上所述,我是通过wsl2使用linux的命令来完成的SSH tunnel的设置,在win10上,wsl2比putty或者crt方便的多。网上有很多内容讲解WSL2以及安装方法,我就不细说了,简单罗列下过程
PS D:\> wsl --import Ubuntu-20.04 c:\wsl\ubuntu .\focal-server-cloudimg-amd64-wsl.rootfs.tar.gz
PS D:\> wsl --list
适用于 Linux 的 Windows 子系统分发版:
Ubuntu-20.04 (默认)
PS D:\> wsl -l -v
  NAME            STATE           VERSION
* Ubuntu-20.04    Stopped         1
PS D:\> wsl --set-version Ubuntu-20.04 2
正在进行转换,这可能需要几分钟时间...
有关与 WSL 2 的主要区别的信息,请访问 https://aka.ms/wsl2
转换完成。
PS D:\>
PS D:\> wsl -l -v
  NAME            STATE           VERSION
* Ubuntu-20.04    Stopped         2
PS D:\> wsl
Welcome to Ubuntu 20.04.2 LTS (GNU/Linux 5.4.72-microsoft-standard-WSL2 x86_64)

 * Documentation:  https://help.ubuntu.com
 * Management:     https://landscape.canonical.com
 * Support:        https://ubuntu.com/advantage

  System information as of Wed Mar 24 20:42:48 CST 2021

  System load:  0.0                Processes:             8
  Usage of /:   0.4% of 250.98GB   Users logged in:       0
  Memory usage: 0%                 IPv4 address for eth0: 172.22.229.147
  Swap usage:   0%

1 update can be installed immediately.
0 of these updates are security updates.
To see these additional updates run: apt list --upgradable

This message is shown once a day. To disable it please create the
/root/.hushlogin file.