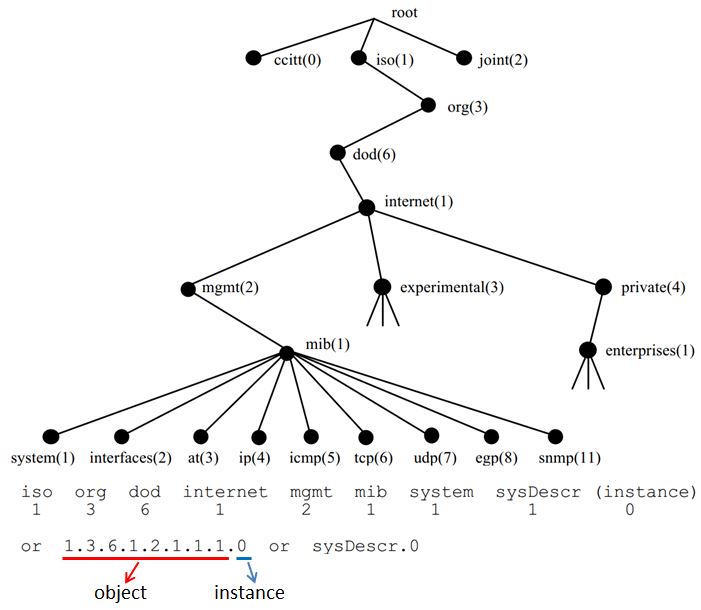
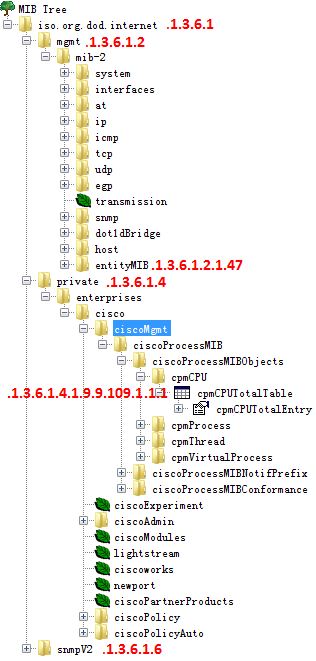
All methods are summarized from my own CASE, base on the same method, you can find other OID E.g: transceiver temperatures, fan speed and so on. If have other special OID, I will add to the article. At first, what is OID? You can check follow PIC:
Useful Tools
Commands:
Windows: You can install Net-SNMP, then support SNMP command.
MAC OS: Native support SNMP command.
PS:SNMPv3需要经过认证才能进行snmpwalk,如下是example:
$ snmpwalk -v3 -l authPriv -u Monitor -a MD5 -A "passtest" -x DES -X "passtest" x.x.x.x oid
Graphics Tools
Refer to graphics tools, you can use free software “iReasoning MIB Browser”, that support load 5 MIB, and support for Win and MAC.
Support Tools
SNMP Object Navigator
CPU OID Get
1. C:\Users\yonzhao2>snmpwalk -v2c -c cisco 10.75.49.17 1.3.6.1.2.1.47.1.1.1.1.7
SNMPv2-SMI::mib-2.47.1.1.1.1.7.22353429 = STRING: "module 0/5/CPU0"
SNMPv2-SMI::mib-2.47.1.1.1.1.7.38557239 = STRING: "module 0/RSP0/CPU0"
SNMPv2-SMI::mib-2.47.1.1.1.1.7.49175796 = STRING: "module 0/6/CPU0"
SNMPv2-SMI::mib-2.47.1.1.1.1.7.52299895 = STRING: "module 0/6/CPU0“
2. C:\Users\yonzhao2>snmpwalk -v2c -c cisco 10.75.49.17 .1.3.6.1.4.1.9.9.109.1.1.1.1.2
SNMPv2-SMI::enterprises.9.9.109.1.1.1.1.2.66 = INTEGER: 38557239
SNMPv2-SMI::enterprises.9.9.109.1.1.1.1.2.2162 = INTEGER: 7571408
SNMPv2-SMI::enterprises.9.9.109.1.1.1.1.2.2178 = INTEGER: 52299895
Follow is N5k describes:
YONZHAO2-M-Q4TL:~ zhaoyong$ snmpwalk -v2c -c cisco 10.75.49.3 1.3.6.1.4.1.9.9.109.1.1.1.1.2
SNMPv2-SMI::enterprises.9.9.109.1.1.1.1.2.1 = INTEGER: 4109
SNMPv2-SMI::enterprises.9.9.109.1.1.1.1.2.33 = INTEGER: 4107
SNMPv2-SMI::enterprises.9.9.109.1.1.1.1.2.257 = INTEGER: 8205
SNMPv2-SMI::enterprises.9.9.109.1.1.1.1.2.289 = INTEGER: 8203
SNMPv2-SMI::enterprises.9.9.109.1.1.1.1.2.4097 = INTEGER: 110605
SNMPv2-SMI::enterprises.9.9.109.1.1.1.1.2.4129 = INTEGER: 110603
SNMPv2-SMI::enterprises.9.9.109.1.1.1.1.2.8225 = INTEGER: 86027
SNMPv2-SMI::enterprises.9.9.109.1.1.1.1.2.8481 = INTEGER: 90123
SNMPv2-SMI::enterprises.9.9.109.1.1.1.1.2.8737 = INTEGER: 94219
SNMPv2-SMI::enterprises.9.9.109.1.1.1.1.2.8993 = INTEGER: 98315
SNMPv2-SMI::enterprises.9.9.109.1.1.1.1.2.9249 = INTEGER: 102411
SNMPv2-SMI::enterprises.9.9.109.1.1.1.1.2.9505 = INTEGER: 106507
SNMPv2-SMI::enterprises.9.9.109.1.1.1.1.2.49185 = INTEGER: 118795
SNMPv2-SMI::enterprises.9.9.109.1.1.1.1.2.49441 = INTEGER: 122891

YONZHAO2-M-Q4TL:~ zhaoyong$ snmpwalk -v2c -c cisco 10.75.49.3 1.3.6.1.2.1.47.1.1.1.1.7 |grep 4109
SNMPv2-SMI::mib-2.47.1.1.1.1.7.4109 = STRING: "0/0-Virtual processor for RP XR"
YONZHAO2-M-Q4TL:~ zhaoyong$ snmpwalk -v2c -c cisco 10.75.49.3 1.3.6.1.2.1.47.1.1.1.1.7 |grep 4107
SNMPv2-SMI::mib-2.47.1.1.1.1.7.4107 = STRING: "0/0-Virtual processor for admin"
YONZHAO2-M-Q4TL:~ zhaoyong$ snmpwalk -v2c -c cisco 10.75.49.3 1.3.6.1.2.1.47.1.1.1.1.7 |grep 8205
SNMPv2-SMI::mib-2.47.1.1.1.1.7.8205 = STRING: "0/1-Virtual processor for RP XR"
YONZHAO2-M-Q4TL:~ zhaoyong$ snmpwalk -v2c -c cisco 10.75.49.3 1.3.6.1.2.1.47.1.1.1.1.7 |grep 8203
SNMPv2-SMI::mib-2.47.1.1.1.1.7.8203 = STRING: "0/1-Virtual processor for admin"
YONZHAO2-M-Q4TL:~ zhaoyong$ snmpwalk -v2c -c cisco 10.75.49.3 1.3.6.1.2.1.47.1.1.1.1.7 |grep 110605
SNMPv2-SMI::mib-2.47.1.1.1.1.7.110605 = STRING: "0/RP0-Virtual processor for RP XR"
YONZHAO2-M-Q4TL:~ zhaoyong$ snmpwalk -v2c -c cisco 10.75.49.3 1.3.6.1.2.1.47.1.1.1.1.7 |grep 110603
SNMPv2-SMI::mib-2.47.1.1.1.1.7.110603 = STRING: "0/RP0-Virtual processor for admin"
YONZHAO2-M-Q4TL:~ zhaoyong$ snmpwalk -v2c -c cisco 10.75.49.3 1.3.6.1.2.1.47.1.1.1.1.7 |grep 86027
SNMPv2-SMI::mib-2.47.1.1.1.1.7.86027 = STRING: "0/FC0-Virtual processor for admin"
YONZHAO2-M-Q4TL:~ zhaoyong$ snmpwalk -v2c -c cisco 10.75.49.3 1.3.6.1.2.1.47.1.1.1.1.7 |grep 90123
SNMPv2-SMI::mib-2.47.1.1.1.1.7.90123 = STRING: "0/FC1-Virtual processor for admin"
YONZHAO2-M-Q4TL:~ zhaoyong$ snmpwalk -v2c -c cisco 10.75.49.3 1.3.6.1.2.1.47.1.1.1.1.7 |grep 94219
SNMPv2-SMI::mib-2.47.1.1.1.1.7.94219 = STRING: "0/FC2-Virtual processor for admin"
YONZHAO2-M-Q4TL:~ zhaoyong$ snmpwalk -v2c -c cisco 10.75.49.3 1.3.6.1.2.1.47.1.1.1.1.7 |grep 98315
SNMPv2-SMI::mib-2.47.1.1.1.1.7.98315 = STRING: "0/FC3-Virtual processor for admin"
3. We can see RP0 CPU MIB is mib-2.47.1.1.1.1.7.38557239, while 38557239 correspond to enterprises.9.9.109.1.1.1.1.2.66
   - -- cpmCPUTotalTable (1)
      |
       - -- cpmCPUTotalEntry (1)
         | --   cpmCPUTotalIndex (1)
         | --   cpmCPUTotalPhysicalIndex (2) object Details
         | --   cpmCPUTotal5secRev (6)
         | --   cpmCPUTotal1minRev (7)
4. Base on the above trees, try to find exact OID enterprises.9.9.109.1.1.1.1.x.66 we can see enterprises.9.9.109.1.1.1.1.8.66 refer to the RP0 CPU usage, Eg:
C:\Users\yonzhao2>snmpwalk -v2c -c cisco 10.75.49.17 enterprises.9.9.109.1.1.1.1.8.66
SNMPv2-SMI::enterprises.9.9.109.1.1.1.1.8.66 = Gauge32: 4 >>> 5 minutes
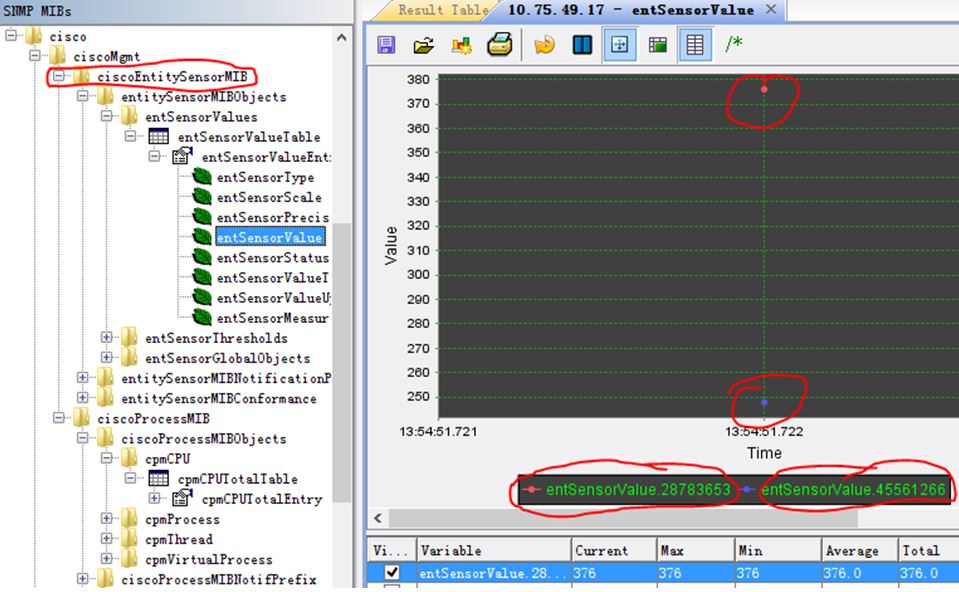
Follow MIB Browser analyzing result:
Temperatures OID Get
1. C:\>snmpwalk -v2c -c cisco 10.75.49.17 1.3.6.1.2.1.47.1.1.1.1.7
SNMPv2-SMI::mib-2.47.1.1.1.1.7.28783653 = STRING: "temperature 0/RSP0/CPU0"
SNMPv2-SMI::mib-2.47.1.1.1.1.7.45561266 = STRING: "temperature 0/RSP0/CPU0“
2. Find the mapping relation, same value 38557239 that indicate two sensors in the same slot
C:\>snmpwalk -v2c -c cisco 10.75.49.17 1.3.6.1.2.1.47.1.1.1.1.4
SNMPv2-SMI::mib-2.47.1.1.1.1.4.28783653 = INTEGER: 38557239
SNMPv2-SMI::mib-2.47.1.1.1.1.4.45561266 = INTEGER: 38557239
3. Get sensor name description
C:\Users\yonzhao2>snmpwalk -v2c -c cisco 10.75.49.17 1.3.6.1.2.1.47.1.1.1.1.2
SNMPv2-SMI::mib-2.47.1.1.1.1.2.28783653 = STRING: "Hot Temperature SensorHotspot0"
SNMPv2-SMI::mib-2.47.1.1.1.1.2.45561266 = STRING: "Inlet Temperature SensorInlet0“
4. Get temperature value
C:\Users\yonzhao2>snmpwalk -v2c -c cisco 10.75.49.17 1.3.6.1.4.1.9.9.91.1.1.1.1.4.28783653
SNMPv2-SMI::enterprises.9.9.91.1.1.1.1.4.28783653 = INTEGER: 379
C:\Users\yonzhao2>snmpwalk -v2c -c cisco 10.75.49.17 1.3.6.1.4.1.9.9.91.1.1.1.1.4.45561266
SNMPv2-SMI::enterprises.9.9.91.1.1.1.1.4.45561266 = INTEGER: 250
5. Check information:
RP/0/RSP0/CPU0:ASR9K-1# show environment temperatures
Tue Aug 21 01:45:42.330 UTC
R/S/I   Modules Sensor            (deg C)
0/RSP0/*
        host    Inlet0             25.0
        host    Hotspot0           37.9
Follow MIB Browser analyzing result:
Interface Input/Output Rate OID Get
We couldn’t direct get the input/output rate by OID, but we can get the total input/output byte, then calculate the average rate. As the follow example:
RP/0/RP0/CPU0:HK-HK#show int tenGigE 0/3/0/1 | in packets
Wed Dec 25 15:46:00.223 GMT
  30 second input rate 1392790000 bits/sec, 359663 packets/sec
  30 second output rate 3284104000 bits/sec, 485129 packets/sec
     3948749701 packets input, 1922601093239 bytes, 0 total input drops
     5353048351 packets output, 4591216874548 bytes, 0 total output drops

RP/0/RP0/CPU0:HK-HK#show int tenGigE 0/3/0/1 | in packets
Wed Dec 25 15:47:00.276 GMT
  30 second input rate 1419539000 bits/sec, 360974 packets/sec
  30 second output rate 3330562000 bits/sec, 480283 packets/sec
     3970580990 packets input, 1933354797631 bytes, 0 total input drops
     5382021312 packets output, 4616287298982 bytes, 0 total output drops

>>> (4616287298982-4591216874548)*8/60 = 3,342,723,257.8 = 3.342G
How to get totally byte? Use “1.3.6.1.2.1.31.1.1.1.10“
yonzhao2-mac:python zhaoyong$ snmpwalk -v2c -c cisco 10.75.41.73 1.3.6.1.2.1.31.1.1.1.1 |grep 0/15/5/0
IF-MIB::ifName.34 = STRING: TenGigE0/15/5/0
IF-MIB::ifName.59 = STRING: tunnel-te1
yonzhao2-mac:python zhaoyong$
yonzhao2-mac:python zhaoyong$ snmpwalk -v2c -c cisco 10.75.41.73 1.3.6.1.2.1.31.1.1.1.10.34
IF-MIB::ifHCOutOctets.34 = Counter64: 1528125340524
Fan speed OID Get
1. Check speed sensor’s index:
yonzhao2-mac:~ zhaoyong$ snmpwalk -v2c -c cisco 10.75.13.15 1.3.6.1.2.1.47.1.1.1.1.7 |grep speed
SNMPv2-SMI::mib-2.47.1.1.1.1.7.6869781 = STRING: "speed 0/FT1/SP"
SNMPv2-SMI::mib-2.47.1.1.1.1.7.11741762 = STRING: "speed 0/FT1/SP"
SNMPv2-SMI::mib-2.47.1.1.1.1.7.13443524 = STRING: "speed 0/FT1/SP"
SNMPv2-SMI::mib-2.47.1.1.1.1.7.13805629 = STRING: "speed 0/FT0/SP"
SNMPv2-SMI::mib-2.47.1.1.1.1.7.15177601 = STRING: "speed 0/FT0/SP"
2. Get sensor’s value:
yonzhao2-mac:~ zhaoyong$ snmpwalk -v2c -c cisco 10.75.13.15 1.3.6.1.4.1.9.9.91.1.1.1.1.4.6869781
SNMPv2-SMI::enterprises.9.9.91.1.1.1.1.4.6869781 = INTEGER: 8490
yonzhao2-mac:~ zhaoyong$ snmpwalk -v2c -c cisco 10.75.13.15 1.3.6.1.4.1.9.9.91.1.1.1.1.4.11741762
SNMPv2-SMI::enterprises.9.9.91.1.1.1.1.4.11741762 = INTEGER: 8550
yonzhao2-mac:~ zhaoyong$ snmpwalk -v2c -c cisco 10.75.13.15 1.3.6.1.4.1.9.9.91.1.1.1.1.4.13443524
SNMPv2-SMI::enterprises.9.9.91.1.1.1.1.4.13443524 = INTEGER: 8460
3. Show fans speed in 9k:
RP/0/RSP0/CPU0:ASR9006-4#admin show environment fans
Mon Nov  3 14:24:16.456 GMT
  Fan speed (rpm) and run time (in hours) :
        FAN0    FAN1    FAN2    FAN3    FAN4    FAN5

0/FT0/* (Speed)
        8430    8400    8430    8430    8430    8400
Memory OID Get
Physical memory <= 4G
1. Check memory use by “cempMemPoolUsed”, you can found location is “7858209”
yonzhao2-:~ zhaoyong$ snmpwalk -v2c -c cisco 10.75.49.110 1.3.6.1.4.1.9.9.221.1.1.1.1.7
SNMPv2-SMI::enterprises.9.9.221.1.1.1.1.7.7858209.1 = Gauge32: 1222515685
SNMPv2-SMI::enterprises.9.9.221.1.1.1.1.7.7858209.2 = Gauge32: 163311616
SNMPv2-SMI::enterprises.9.9.221.1.1.1.1.7.7858209.3 = Gauge32: 32756764
2. Check memory free by “cempMemPoolFree”, you can found location not change
yonzhao2-:~ zhaoyong$ snmpwalk -v2c -c cisco 10.75.49.110 1.3.6.1.4.1.9.9.221.1.1.1.1.8
SNMPv2-SMI::enterprises.9.9.221.1.1.1.1.8.7858209.1 = Gauge32: 2794577920
SNMPv2-SMI::enterprises.9.9.221.1.1.1.1.8.7858209.2 = Gauge32: 69480448
SNMPv2-SMI::enterprises.9.9.221.1.1.1.1.8.7858209.3 = Gauge32: 0
3. Check what’s location id:
yonzhao2-:~ zhaoyong$ snmpwalk -v2c -c cisco 10.75.49.110 .1.3.6.1.2.1.47.1.1.1.1.7 | grep 7858209
SNMPv2-SMI::mib-2.47.1.1.1.1.7.7858209 = STRING: "0/RP0/* - cpu"
4. Check what is .1, .2 and .3 mean by “cempMemPoolName”:
yonzhao2-:~ zhaoyong$ snmpwalk -v2c -c cisco 10.75.49.110 1.3.6.1.4.1.9.9.221.1.1.1.1.3
SNMPv2-SMI::enterprises.9.9.221.1.1.1.1.3.7858209.1 = STRING: "processor"
SNMPv2-SMI::enterprises.9.9.221.1.1.1.1.3.7858209.2 = STRING: "reserved"
SNMPv2-SMI::enterprises.9.9.221.1.1.1.1.3.7858209.3 = STRING: "image“
5. Follow is cempMemPoolType:
yonzhao2-:~ zhaoyong$ snmpwalk -v2c -c cisco 10.75.49.110 1.3.6.1.4.1.9.9.221.1.1.1.1.2
SNMPv2-SMI::enterprises.9.9.221.1.1.1.1.2.7858209.1 = INTEGER: 2
SNMPv2-SMI::enterprises.9.9.221.1.1.1.1.2.7858209.2 = INTEGER: 11
SNMPv2-SMI::enterprises.9.9.221.1.1.1.1.2.7858209.3 = INTEGER: 12
1:other
2:processorMemory
3:ioMemory
4:pciMemory
5:fastMemory
6:multibusMemory
7:interruptStackMemory
8:processStackMemory
9:localExceptionMemory
10:virtualMemory
11:reservedMemory
12:imageMemory
13:asicMemory
14:posixMemory
Physical memory > 4G
When physical memory greater than 4G, you need use follow OID to get use and free memory:
cempMemPoolHCUsed: .1.3.6.1.4.1.9.9.221.1.1.1.1.18 cempMemPoolHCFree: .1.3.6.1.4.1.9.9.221.1.1.1.1.20
Follow example for NCS6008:
RP/0/RP1/CPU0:pani#sh platform
Mon Aug 11 07:55:19.193 CEST
Node name         Node type             Node state       Admin state   Config state
-----------------------------------------------------------------------------------
0/0               NC6-10X100G-M-P       OPERATIONAL      UP            NSHUT
0/0/NPU0          Slice                 UP               UP
0/0/NPU1          Slice                 UP               UP
0/0/NPU2          Slice                 UP               UP
0/0/NPU3          Slice                 UP               UP
0/0/NPU4          Slice                 UP               UP
0/RP0             NC6-RP                OPERATIONAL      UP            NSHUT

RP/0/RP1/CPU0:pani#sh memory sum location 0/rp0/cpu0
Mon Aug 11 08:22:05.406 CEST

 Physical Memory: 11838M total (9533M available)
 Application Memory : 11838M (9533M available)
 Image: 4M (bootram: 0M)
 Reserved: 0M, IOMem: 0M,        flashfsys: 0M

RP/0/RP1/CPU0:pani#sh memory sum location 0/0/cpu0
Mon Aug 11 08:22:13.114 CEST

 Physical Memory: 5638M total (2881M available)
 Application Memory : 5638M (2881M available)
 Image: 4M (bootram: 0M)
 Reserved: 0M, IOMem: 0M,        flashfsys: 0M

yonzhao2-mac:~ zhaoyong$ snmpwalk -v2c -c public 10.48.32.161  .1.3.6.1.4.1.9.9.221.1.1.1.1.18
SNMPv2-SMI::enterprises.9.9.221.1.1.1.1.18.10.1 = Counter64: 2416496640
SNMPv2-SMI::enterprises.9.9.221.1.1.1.1.18.10.2 = Counter64: 0
SNMPv2-SMI::enterprises.9.9.221.1.1.1.1.18.10.3 = Counter64: 4194304
SNMPv2-SMI::enterprises.9.9.221.1.1.1.1.18.65546.1 = Counter64: 2890944512
SNMPv2-SMI::enterprises.9.9.221.1.1.1.1.18.65546.2 = Counter64: 0
SNMPv2-SMI::enterprises.9.9.221.1.1.1.1.18.65546.3 = Counter64: 4194304

yonzhao2-mac:~ zhaoyong$ snmpwalk -v2c -c public 10.48.32.161  .1.3.6.1.4.1.9.9.221.1.1.1.1.20
SNMPv2-SMI::enterprises.9.9.221.1.1.1.1.20.10.1 = Counter64: 9996664832
SNMPv2-SMI::enterprises.9.9.221.1.1.1.1.20.10.2 = Counter64: 0
SNMPv2-SMI::enterprises.9.9.221.1.1.1.1.20.10.3 = Counter64: 0
SNMPv2-SMI::enterprises.9.9.221.1.1.1.1.20.65546.1 = Counter64: 3020886016
SNMPv2-SMI::enterprises.9.9.221.1.1.1.1.20.65546.2 = Counter64: 0
SNMPv2-SMI::enterprises.9.9.221.1.1.1.1.20.65546.3 = Counter64: 0
Transceiver TX/RX Power OID Get
10G Port
1. Target port TE 0/5/0/0, we couldn’t direct get dBm, and need get mW, then convert to dBm by formula
RP/0/RSP1/CPU0:ios#sho controllers tenGigE 0/5/0/0 phy
Thu Mar 21 03:31:45.953 UTC

        Tx Power:  0.510 mW (-2.92 dBm)    <<<==
        Rx Power:  0.220 mW (-6.58 dBm)    <<<==
2. Check the interface index via “entPhysicalName” OID 1.3.6.1.2.1.47.1.1.1.1.7
iso.3.6.1.2.1.47.1.1.1.1.7.63431564 = STRING: "power Tx 0/5/CPU0/0"
iso.3.6.1.2.1.47.1.1.1.1.7.13100313 = STRING: "power Rx 0/5/CPU0/0"
3. Check sensor value OID : 1.3.6.1.4.1.9.9.91.1.1.1.1.4 to look for the TX/RX power
C:\>snmpwalk -v 2c -c cisco 10.75.49.17 1.3.6.1.4.1.9.9.91.1.1.1.1.4.63431564
iso.3.6.1.4.1.9.9.91.1.1.1.1.4.63431564 = INTEGER: 510

C:\>snmpwalk -v 2c -c cisco 10.75.49.17 1.3.6.1.4.1.9.9.91.1.1.1.1.4.13100313
iso.3.6.1.4.1.9.9.91.1.1.1.1.4.13100313 = INTEGER: 226
Notes: Not all XFP support CISCO-ENTITY-SENSOR-MIB, so you need check it by follow command (example for ASR9k ):
RP/0/RSP1/CPU0:ASR9010-1#admin show inventory raw | i Power
Fri Jan 10 09:54:30.682 UTC
NAME: "power Tx 0/2/0/1", DESCR: "Transceiver Tx Power Sensor"
NAME: "power Rx 0/2/0/1", DESCR: "Transceiver Rx Power Sensor"
NAME: "power Tx 0/2/1/2", DESCR: "Transceiver Tx Power Sensor"
NAME: "power Rx 0/2/1/2", DESCR: "Transceiver Rx Power Sensor”
Notes: We couldn’t directly get dBm by OID, so need compute that by know formula:
dBm = 10 * log10(mW)
    = 10 * log10( 0.510)
    = 10 * -0.292
    = -2.92
100G Port
2014-9-19 update:
After checked with DE, now panini not support Tx/Rx power sensor by OID, so base on follow step, will return “0“, had filed a new DDTS:CSCuq86603
Refer XFP/CXP/… Tx/Rx power, looks like only ASR9k support(some parts that have DOM feature) under XR platform, CRS maybe not support that too.
Btw, refer to 100G port, checked ASR9k have same issue, return “0”. After NCS support that, use follow way will get correct result.
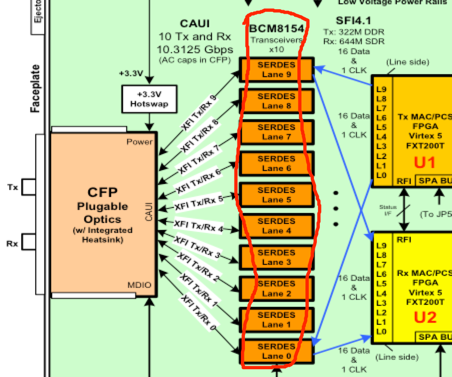
Not the same as 10G, 100G port constitute by lane (SERDES), following is a 1X100G CFP diagram example, other similar. So when you need to get 100G transceiver TX/RX Power, we need to check each Lane power.
Follow example for CPAK-100G-LR4 on NCS6008:
1. Check port TX/RX power:
CPAK Detail Info:
================

Temp: 26.00 C
Tx bias: 30.12 mA
Total Tx power: 2.96 mW (  4.72 dBm)
  Lane 0 Tx power: 0.74 mW ( -1.33 dBm)
  Lane 1 Tx power: 0.74 mW ( -1.28 dBm)
  Lane 2 Tx power: 0.75 mW ( -1.22 dBm)
  Lane 3 Tx power: 0.73 mW ( -1.37 dBm)
Total Rx power: 1.91 mW (  2.82 dBm)
  Lane 0 Rx power: 0.51 mW ( -2.90 dBm)
  Lane 1 Rx power: 0.54 mW ( -2.68 dBm)
  Lane 2 Rx power: 0.42 mW ( -3.74 dBm)
  Lane 3 Rx power: 0.44 mW ( -3.57 dBm)
2. Check sensor index:
SNMPv2-SMI::mib-2.47.1.1.1.1.7.655630 = STRING: "0/0-PORT-0-Tx Lane 0 Power"
SNMPv2-SMI::mib-2.47.1.1.1.1.7.655631 = STRING: "0/0-PORT-0-Tx Lane 1 Power"
SNMPv2-SMI::mib-2.47.1.1.1.1.7.655632 = STRING: "0/0-PORT-0-Tx Lane 2 Power"
SNMPv2-SMI::mib-2.47.1.1.1.1.7.655633 = STRING: "0/0-PORT-0-Tx Lane 3 Power"
SNMPv2-SMI::mib-2.47.1.1.1.1.7.655642 = STRING: "0/0-PORT-0-Rx Lane 0 Power"
SNMPv2-SMI::mib-2.47.1.1.1.1.7.655643 = STRING: "0/0-PORT-0-Rx Lane 1 Power"
SNMPv2-SMI::mib-2.47.1.1.1.1.7.655644 = STRING: "0/0-PORT-0-Rx Lane 2 Power"
SNMPv2-SMI::mib-2.47.1.1.1.1.7.655645 = STRING: "0/0-PORT-0-Rx Lane 3 Power"
3. Then use follow OID to get those sensor information, then SUM(Lane 0-3):
snmpwalk -v2c -c public x.x.x.x 1.3.6.1.4.1.9.9.91.1.1.1.1.4.655630
Power OID Get
1. We need get OID for “Total power input/output”
sysadmin-vm:0_RP1# show env power
Mon Aug  11 08:03:42.557 UTC
================================================================================
CHASSIS LEVEL POWER INFO: chassisinfo
================================================================================
   Total output power capacity (Shelf 0 + Shelf 1) :    9000W +    9000W
   Total output power required                     :    6500W
   Total power input                               :    2392W
   Total power output                              :    1871W

Power Shelf 0:
================================================================================
   Power       Supply     ------Input----   ------Output---      Status
   Module      Type        Volts     Amps    Volts     Amps
================================================================================
   0/PT0-PM0   3KW-AC      228.7      1.8     55.4      5.7    OK
   0/PT0-PM1   3KW-AC      226.1      1.8     55.3      5.9    OK
   0/PT0-PM2   3KW-AC      228.7      1.8     55.3      5.7    OK

Total of Power Shelf 0:        1230W/ 5.4A        957W/17.3A

Power Shelf 1:
================================================================================
   Power       Supply     ------Input----   ------Output---      Status
   Module      Type        Volts     Amps    Volts     Amps
================================================================================
   0/PT3-PM0   3KW-AC      228.7      1.8     55.3      5.7    OK
   0/PT3-PM1   3KW-AC      229.6      1.7     55.4      5.7    OK
   0/PT3-PM2   3KW-AC      224.9      1.6     55.5      5.1    OK

Total of Power Shelf 1:        1162W/ 5.1A        914W/16.5A
2. After checked, no totally power data, so need check each PEM, follow only input power, same way for output power
yonzhao2-mac:~ zhaoyong$ snmpwalk -v2c -c public 10.48.32.161 .1.3.6.1.2.1.47.1.1.1.1.7 |grep 0/PT

SNMPv2-SMI::mib-2.47.1.1.1.1.7.1966350 = STRING: "0/PT0-PM0-Input Power"
SNMPv2-SMI::mib-2.47.1.1.1.1.7.1966351 = STRING: "0/PT0-PM0-Output Power"
SNMPv2-SMI::mib-2.47.1.1.1.1.7.1970446 = STRING: "0/PT0-PM1-Input Power"
SNMPv2-SMI::mib-2.47.1.1.1.1.7.1970447 = STRING: "0/PT0-PM1-Output Power"
SNMPv2-SMI::mib-2.47.1.1.1.1.7.1974542 = STRING: "0/PT0-PM2-Input Power"
SNMPv2-SMI::mib-2.47.1.1.1.1.7.1974543 = STRING: "0/PT0-PM2-Output Power"
SNMPv2-SMI::mib-2.47.1.1.1.1.7.2212110 = STRING: "0/PT3-PM0-Input Power"
SNMPv2-SMI::mib-2.47.1.1.1.1.7.2212111 = STRING: "0/PT3-PM0-Output Power"
SNMPv2-SMI::mib-2.47.1.1.1.1.7.2216206 = STRING: "0/PT3-PM1-Input Power"
SNMPv2-SMI::mib-2.47.1.1.1.1.7.2216207 = STRING: "0/PT3-PM1-Output Power"
SNMPv2-SMI::mib-2.47.1.1.1.1.7.2220302 = STRING: "0/PT3-PM2-Input Power"
SNMPv2-SMI::mib-2.47.1.1.1.1.7.2220303 = STRING: "0/PT3-PM2-Output Power"

yonzhao2-mac:~ zhaoyong$ snmpwalk -v2c -c public 10.48.32.161 1.3.6.1.4.1.9.9.91.1.1.1.1.4.1966350
SNMPv2-SMI::enterprises.9.9.91.1.1.1.1.4.1966350 = INTEGER: 387092 <<< "0/PT0-PM0-Input Power"
yonzhao2-mac:~ zhaoyong$ snmpwalk -v2c -c public 10.48.32.161 1.3.6.1.4.1.9.9.91.1.1.1.1.4.1970446
SNMPv2-SMI::enterprises.9.9.91.1.1.1.1.4.1970446 = INTEGER: 390611 <<< "0/PT0-PM1-Input Power"
yonzhao2-mac:~ zhaoyong$ snmpwalk -v2c -c public 10.48.32.161 1.3.6.1.4.1.9.9.91.1.1.1.1.4.1974542
SNMPv2-SMI::enterprises.9.9.91.1.1.1.1.4.1974542 = INTEGER: 390611 <<< "0/PT0-PM2-Input Power"
yonzhao2-mac:~ zhaoyong$
yonzhao2-mac:~ zhaoyong$ snmpwalk -v2c -c public 10.48.32.161 1.3.6.1.4.1.9.9.91.1.1.1.1.4.2212110
SNMPv2-SMI::enterprises.9.9.91.1.1.1.1.4.2212110 = INTEGER: 387092 <<< "0/PT3-PM0-Input Power"
yonzhao2-mac:~ zhaoyong$ snmpwalk -v2c -c public 10.48.32.161 1.3.6.1.4.1.9.9.91.1.1.1.1.4.2216206
SNMPv2-SMI::enterprises.9.9.91.1.1.1.1.4.2216206 = INTEGER: 383573 <<< "0/PT3-PM1-Input Power"
yonzhao2-mac:~ zhaoyong$ snmpwalk -v2c -c public 10.48.32.161 1.3.6.1.4.1.9.9.91.1.1.1.1.4.2220302
SNMPv2-SMI::enterprises.9.9.91.1.1.1.1.4.2220302 = INTEGER: 351902 <<< "0/PT3-PM2-Input Power"
Totally power input:
387092 + 390611 + 390611 + 387092 + 383573 + 351902 = 2290,881
sysadmin-vm:0_RP1# show environment power | i "Total power input"
Mon Aug  11 09:14:11.744 UTC
   Total power input                               :    2394W
MAC Accounting OID – 2015-2-25 update:
We can config mac accounting on l3 Ethernet port:
RP/0/RSP0/CPU0:ASR9006-3#sh snmp interface g0/0/0/1 ifindex
Wed Feb 25 01:22:30.230 UTC
ifName : GigabitEthernet0/0/0/1 ifIndex : 38
RP/0/RSP0/CPU0:ASR9006-3#
RP/0/RSP0/CPU0:ASR9006-3#
RP/0/RSP0/CPU0:ASR9006-3#sh arp location 0/0/cpu0 | i 0/0/0/1
Wed Feb 25 01:22:56.612 UTC
192.168.0.1 - 4055.395e.94e9 Interface ARPA GigabitEthernet0/0/0/1
192.168.0.2 02:52:16 d867.d97f.3846 Dynamic ARPA GigabitEthernet0/0/0/1
RP/0/RSP0/CPU0:ASR9006-3#
RP/0/RSP0/CPU0:ASR9006-3#
RP/0/RSP0/CPU0:ASR9006-3#sh mac-accounting gigabitEthernet 0/0/0/1
Wed Feb 25 01:23:01.182 UTC
GigabitEthernet0/0/0/1
 Input (96 free)
 d867.d97f.3846: 155 packets, 13600 bytes
 Total: 155 packets, 13600 bytes

RP/0/RSP0/CPU0:ASR9006-3#
RP/0/RSP0/CPU0:ASR9006-3#
RP/0/RSP0/CPU0:ASR9006-3#sh run int g0/0/0/1
Wed Feb 25 01:34:14.617 UTC
interface GigabitEthernet0/0/0/1
 ipv4 address 192.168.0.1 255.255.255.0
 mac-accounting ingress
 transceiver permit pid all
!
And get stat from OID 1.3.6.1.4.1.9.9.84, that belong from MIB CISCO-IP-STAT-MIB.
yonzhao2-mac:~ zhaoyong$ snmpwalk -v2c -c cisco 10.75.13.14 .1.3.6.1.4.1.9.9.84
SNMPv2-SMI::enterprises.9.9.84.1.2.1.1.3.38.1.216.103.217.127.56.70 = Counter32: 155
SNMPv2-SMI::enterprises.9.9.84.1.2.1.1.4.38.1.216.103.217.127.56.70 = Counter32: 13600
SNMPv2-SMI::enterprises.9.9.84.1.2.2.1.2.38.1 = Gauge32: 96
SNMPv2-SMI::enterprises.9.9.84.1.2.3.1.1.38.1.216.103.217.127.56.70 = Counter64: 155
SNMPv2-SMI::enterprises.9.9.84.1.2.3.1.2.38.1.216.103.217.127.56.70 = Counter64: 13600
d867.d97f.3846 = d8:67:d9:7f:38:46 = 216:103:217:127:56:70
Policy-Map OID – 2016-5-7 update:
Policy-Map / class-map name OID
cbQosPolicyMapName: 1.3.6.1.4.1.9.9.166.1.6.1.1.1 cbQosClassMapCfg: 1.3.6.1.4.1.9.9.166.1.7.1.1.1
Follow configuration, and “show policy-map”:
RP/0/RP0/CPU0:6008-A#sh run int bundle-ether 74
Thu May  5 12:57:49.756 UTC
interface Bundle-Ether74
 mtu 9192
 service-policy input CORE-QOS-IN
 service-policy output CORE-QOS-OUT
 ipv4 address x.x.x.x 255.255.255.0
 load-interval 30
 logging events link-status

RP/0/RP0/CPU0:6008-A#sh policy-map interface bundle-ether 74
Thu May  5 12:09:37.264 UTC

Bundle-Ether74 input: CORE-QOS-IN

Class VOICE
  Classification statistics          (packets/bytes)     (rate - kbps)
    Matched             :                   0/0                    0
    Transmitted         :                   0/0                    0
    Total Dropped       :                   0/0                    0
Class CONTROL
  Classification statistics          (packets/bytes)     (rate - kbps)
    Matched             :                1741/175494               0
    Transmitted         :                1741/175494               0
    Total Dropped       :                   0/0                    0
1. Find interface index:
YONZHAO2-M-Q4TL:Desktop zhaoyong$ snmpwalk -v2c -c cisco 172.18.87.115 1.3.6.1.2.1.31.1.1.1.1 |grep 74
IF-MIB::ifName.74 = STRING: TenGigE0/7/0/6/1
IF-MIB::ifName.156 = STRING: Bundle-Ether74
IF-MIB::ifName.174 = STRING: TenGigE0/0/0/22
2. Find qos index:
YONZHAO2-M-Q4TL:Desktop zhaoyong$ snmpwalk -v2c -c cisco 172.18.87.115 .1.3.6.1.4.1.9.9.166.1.1.1 |grep 156
SNMPv2-SMI::enterprises.9.9.166.1.1.1.1.4.1700684885 = INTEGER: 156
SNMPv2-SMI::enterprises.9.9.166.1.1.1.1.4.1887606559 = INTEGER: 156
3. Check direct, I: input; 2: output:
YONZHAO2-M-Q4TL:Desktop zhaoyong$ snmpwalk -v2c -c cisco 172.18.87.115 1.3.6.1.4.1.9.9.166.1.1.1.1.3 |grep 1700684885
SNMPv2-SMI::enterprises.9.9.166.1.1.1.1.3.1700684885 = INTEGER: 1
YONZHAO2-M-Q4TL:Desktop zhaoyong$
YONZHAO2-M-Q4TL:Desktop zhaoyong$ snmpwalk -v2c -c cisco 172.18.87.115 1.3.6.1.4.1.9.9.166.1.1.1.1.3 |grep 1887606559
SNMPv2-SMI::enterprises.9.9.166.1.1.1.1.3.1887606559 = INTEGER: 2
4. Find type index mapping:
OID1.3.6.1.4.1.9.9.166.1.5.1.1.3  TypeQosObjectType
1:policymap
2:classmap
3:matchStatement
4:queueing
5:randomDetect
6:trafficShaping
7:police
8:set
9:compression
10:ipslaMeasure
11:account
Policymap type index:
YONZHAO2-M-Q4TL:~ zhaoyong$ snmpwalk -v2c -c cisco 172.18.87.115 1.3.6.1.4.1.9.9.166.1.5.1.1.3.1700684885 |grep ": 1"
SNMPv2-SMI::enterprises.9.9.166.1.5.1.1.3.1700684885.410789968 = INTEGER: 1
YONZHAO2-M-Q4TL:~ zhaoyong$ snmpwalk -v2c -c cisco 172.18.87.115 1.3.6.1.4.1.9.9.166.1.5.1.1.3.1887606559 |grep ": 1"
SNMPv2-SMI::enterprises.9.9.166.1.5.1.1.3.1887606559.1471843729 = INTEGER: 1
Classmap type index:
YONZHAO2-M-Q4TL:Desktop zhaoyong$ snmpwalk -v2c -c cisco 172.18.87.115 1.3.6.1.4.1.9.9.166.1.5.1.1.3.1700684885 |grep ": 2"
SNMPv2-SMI::enterprises.9.9.166.1.5.1.1.3.1700684885.99023777 = INTEGER: 2
SNMPv2-SMI::enterprises.9.9.166.1.5.1.1.3.1700684885.342272198 = INTEGER: 2
SNMPv2-SMI::enterprises.9.9.166.1.5.1.1.3.1700684885.999086546 = INTEGER: 2
SNMPv2-SMI::enterprises.9.9.166.1.5.1.1.3.1700684885.1049873889 = INTEGER: 2
SNMPv2-SMI::enterprises.9.9.166.1.5.1.1.3.1700684885.2129476654 = INTEGER: 2
5. Find plicymap name index (cbQosConfigIndex) by qos index + type index :
YONZHAO2-M-Q4TL:Desktop zhaoyong$ snmpwalk -v2c -c cisco 172.18.87.115 1.3.6.1.4.1.9.9.166.1.5.1.1.2.1700684885 | grep 410789968
SNMPv2-SMI::enterprises.9.9.166.1.5.1.1.2.1700684885.410789968 = Gauge32: 821802964
6. Check policy-map name (cbQosPolicyMapName) by name index:
YONZHAO2-M-Q4TL:Desktop zhaoyong$ snmpwalk -v2c -c cisco 172.18.87.115 1.3.6.1.4.1.9.9.166.1.6.1.1.1.821802964
SNMPv2-SMI::enterprises.9.9.166.1.6.1.1.1.821802964 = STRING: "CORE-QOS-IN"
7. Find classmap name index (cbQosConfigIndex) by qos index + type index :
YONZHAO2-M-Q4TL:Desktop zhaoyong$ snmpwalk -v2c -c cisco 172.18.87.115 1.3.6.1.4.1.9.9.166.1.5.1.1.2.1700684885 | grep 99023777
SNMPv2-SMI::enterprises.9.9.166.1.5.1.1.2.1700684885.99023777 = Gauge32: 1123079824
8. Check classmap name (cbQosClassMapCfg) by name index:
YONZHAO2-M-Q4TL:Desktop zhaoyong$ snmpwalk -v2c -c cisco 172.18.87.115 1.3.6.1.4.1.9.9.166.1.7.1.1.1.1123079824
SNMPv2-SMI::enterprises.9.9.166.1.7.1.1.1.1123079824 = STRING: "CONTROL"
Class-map “match” and “transmit” states OID
cbQosPolicyMapName:1.3.6.1.4.1.9.9.166.1.15.1.1.2 ; The lower 32 bits count of inbound packets prior to executing any QoS policies.
cbQosClassMapCfg: 1.3.6.1.4.1.9.9.166.1.15.1.1.5 ; The lower 32 bits count of inbound octets prior to executing any QoS policies.
Please attention, above only show example that is 32bit oid, and maybe not cover all scenario, if ok, suggest you use the 64bit oid, you can each check that by SNMP Navigator tools in CCO.
Class CONTROL
  Classification statistics          (packets/bytes)     (rate - kbps)
    Matched             :                2133/220574               0
    Transmitted         :                2133/220574               0
    Total Dropped       :                   0/0                    0
1. Check class-map “match” states (cbQosClassMapStats):
YONZHAO2-M-Q4TL:Desktop zhaoyong$ snmpwalk -v2c -c cisco 172.18.87.115 1.3.6.1.4.1.9.9.166.1.15.1.1.2.1700684885.99023777
SNMPv2-SMI::enterprises.9.9.166.1.15.1.1.2.1700684885.99023777 = Counter32: 2133
YONZHAO2-M-Q4TL:Desktop zhaoyong$ snmpwalk -v2c -c cisco 172.18.87.115 1.3.6.1.4.1.9.9.166.1.15.1.1.5.1700684885.99023777
SNMPv2-SMI::enterprises.9.9.166.1.15.1.1.5.1700684885.99023777 = Counter32: 220574
2. Check class-map “Transmit” states After checked, no this OID, we need to compute that by “drop” OID:
cbQosCMDropPkt: 1.3.6.1.4.1.9.9.166.1.15.1.1.13
The lower 32 bits counter of dropped pkts per class as the result of all features that can produce drops (e.g., police, random-detect, etc.).
YONZHAO2-M-Q4TL:Desktop zhaoyong$ snmpwalk -v2c -c cisco 172.18.87.115 1.3.6.1.4.1.9.9.166.1.15.1.1.13.1700684885.99023777
SNMPv2-SMI::enterprises.9.9.166.1.15.1.1.13.1700684885.99023777 = Counter32: 0
So “Transmitted” = “match” – “drop” = 2133 – 0 = 2133.
Bundle and Member OID Mapping – 2016-10-21 update:
RP/0/RSP0/CPU0:9006-3#sh int bundle-ether 103 | i Active
Thu Oct 20 07:17:52.053 UTC
      TenGigE0/1/0/0               Full-duplex  10000Mb/s    Active
1. Get bundle index:
YONZHAO2-M-Q4TL:~ zhaoyong$ snmpwalk -v2c -c cisco 10.75.13.14 .1.3.6.1.2.1.2.2 | grep Bund
IF-MIB::ifDescr.9 = STRING: Bundle-Ether103
IF-MIB::ifDescr.27 = STRING: Bundle-Ether18
IF-MIB::ifDescr.28 = STRING: Bundle-Ether40
2. check member in if-mib:
YONZHAO2-M-Q4TL:~ zhaoyong$ snmpwalk -v2c -c cisco 10.75.13.14 ifStackStatus.9
IF-MIB::ifStackStatus.9.107 = INTEGER: active(1)

YONZHAO2-M-Q4TL:~ zhaoyong$ snmpwalk -v2c -c cisco 10.75.13.14 ifDescr.107
IF-MIB::ifDescr.107 = STRING: TenGigE0/1/0/0
Related Links
Cisco ASR 9000 Series SNMP MIB Support List