I installed the WAE 6.4.5 at formal and summaried to Blog, e.g: INSTALL CISCO WAE 6.4.5. After 7.0, install/config have big change and similar with NSO that easy/module to deploy. For this article, only talk about how to install and enable.
Auto source profile
Similar with NSO, add “source” command to “.bash_profile” that in MacOS. That will let you direct to login to WAE but not do “source wae711/waerc”, as follow:
If you found similar alarms, you can follow the guide and try to workaround the issue.
Problem
My customer found WAE REST API not workable, after checked, found wae-db have issue and report alarm, as follow. And try to restart the WAE service and reload VM, not any useful.
[root@wae-auto wae-db]# service --status-all | grep wae
JAVA_EXECUTABLE or HSQLDB_JAR_PATH in '/etc/sysconfig/hsqldb' is set to a non-file.
wae-appenginecore is running OK, with PID=18606
wae-core is running OK, with PID=18163
wae-db dead but pid file exists  <<<<<<
wae-designapiserver is running OK, with PID=18847
wae-messaging is running OK, with PID=17874
wae-ni is running OK, with PID=17525
wae-osc is running OK, with PID=18369
wae-svcs-dashui is running OK, with PID=16652
wae-svcs-db is running OK, with PID=16277
wae-svcs-localrepo is not running
wae-svcs-log is running OK, with PID=16497
wae-svcs-logagent is running OK, with PID=16570
wae-svcs-metricsbkr is running OK, with PID=16716
wae-svcs-metricsd is running OK, with PID=16806
wae-svcs-mon is running OK, with PID=16138
wae-svcs-ui is running OK, with PID=16917
wae-system-server is running OK, with PID=16186
wae-web-server is running OK, with PID=17761
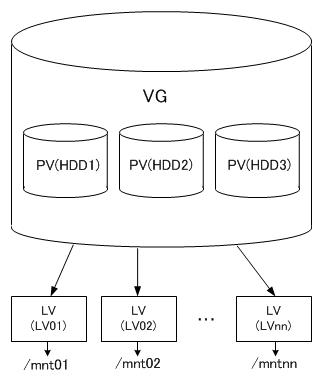
After install Centos7, found disk size less, so I need resize the disk, you can use some tools to achieve the function, e.g: GParted or disk-genius. But if your Server disk format is LVM, you can easy to manual adjust that. I don’t know how to resize LVM by Gparted or disk-genius. For this article, will discuss how to adjust Centos7/Ubuntu14.04 by LVM. That should same action/command in Centos and Ubuntu.
LV only know how mapping to VG, not care PV; And VG build up by PV, so you can easy to extended PV to increased VG’s disk.
Check VG info that is collection by PV
[root@frank ~]# vgdisplay
  --- Volume group ---
  VG Name               myvg
  System ID
  Format                lvm2
  Metadata Areas        1
  Metadata Sequence No  3
  VG Access             read/write
  VG Status             resizable
  MAX LV                0
  Cur LV                2
  Open LV               2
  Max PV                0
  Cur PV                1
  Act PV                1
  VG Size               7.52 GiB
  PE Size               4.00 MiB
  Total PE              1925
  Alloc PE / Size       1925 / 7.52 GiB
  Free  PE / Size       0 / 0   <<<
  VG UUID               0kMilm-TbT5-gs60-Vfl5-3obp-WybF-1BMwXA
Check PV that is virtual physical disk
[root@frank ~]# pvdisplay
  --- Physical volume ---
  PV Name               /dev/sda2
  VG Name               myvg
  PV Size               7.52 GiB / not usable 4.00 MiB
  Allocatable           yes (but full)
  PE Size               4.00 MiB
  Total PE              1925  <<<
  Free PE               0
  Allocated PE          1925  <<<
  PV UUID               whbkik-T1Ke-fLlF-ZBph-3pcd-loYG-yRweel
Check LV that is Partition in virtual disk
[root@frank ~]# lvdisplay
  --- Logical volume ---
  LV Path                /dev/myvg/root
  LV Name                root
  VG Name                myvg
  LV UUID                K15Fr3-QNP3-a17k-IhNU-8qIV-LQAZ-iJ9bgV
  LV Write Access        read/write
  LV Creation host, time localhost, 2014-09-23 14:38:07 +0800
  LV Status              available
  # open                 1
  LV Size                6.84 GiB
  Current LE             1750
  Segments               1
  Allocation             inherit
  Read ahead sectors     auto
  - currently set to     256
  Block device           253:0

  --- Logical volume ---
  LV Path                /dev/myvg/home
  LV Name                home
  VG Name                myvg
  LV UUID                4nCfU9-5T2S-eKve-hMnc-Ao2l-So1o-lQwlU5
  LV Write Access        read/write
  LV Creation host, time localhost, 2014-09-23 14:38:11 +0800
  LV Status              available
  # open                 1
  LV Size                700.00 MiB
  Current LE             175
  Segments               1
  Allocation             inherit
  Read ahead sectors     auto
  - currently set to     256
  Block device           253:1
Set up a new LVM
[root@frank ~]# fdisk /dev/sda
Welcome to fdisk (util-linux 2.23.2).

Changes will remain in memory only, until you decide to write them.
Be careful before using the write command.
Command (m for help): p

Disk /dev/sda: 53.7 GB, 53687091200 bytes, 104857600 sectors
Units = sectors of 1 * 512 = 512 bytes
Sector size (logical/physical): 512 bytes / 512 bytes
I/O size (minimum/optimal): 512 bytes / 512 bytes
Disk label type: dos
Disk identifier: 0x000a7fd0

   Device Boot      Start         End      Blocks   Id  System
/dev/sda1   *        2048     1026047      512000   83  Linux
/dev/sda2         1026048    16803839     7888896   8e  Linux LVM
/dev/sda3        16803840    20899839     2048000   82  Linux swap / Solaris

Command (m for help): n
Partition type:
   p   primary (3 primary, 0 extended, 1 free)
   e   extended
Select (default e):
Using default response e
Selected partition 4
First sector (20899840-104857599, default 20899840):
Using default value 20899840
Last sector, +sectors or +size{K,M,G} (20899840-104857599, default 104857599):
Using default value 104857599
Partition 4 of type Extended and of size 40 GiB is set

Command (m for help): p

Disk /dev/sda: 53.7 GB, 53687091200 bytes, 104857600 sectors
Units = sectors of 1 * 512 = 512 bytes
Sector size (logical/physical): 512 bytes / 512 bytes
I/O size (minimum/optimal): 512 bytes / 512 bytes
Disk label type: dos
Disk identifier: 0x000a7fd0

   Device Boot      Start         End      Blocks   Id  System
/dev/sda1   *        2048     1026047      512000   83  Linux
/dev/sda2         1026048    16803839     7888896   8e  Linux LVM
/dev/sda3        16803840    20899839     2048000   82  Linux swap / Solaris
/dev/sda4        20899840   104857599    41978880    5  Extended

Command (m for help): n
All primary partitions are in use
Adding logical partition 5
First sector (20901888-104857599, default 20901888):
Using default value 20901888
Last sector, +sectors or +size{K,M,G} (20901888-104857599, default 104857599): +7G
Partition 5 of type Linux and of size 7 GiB is set

Command (m for help):
Command (m for help): p

Disk /dev/sda: 53.7 GB, 53687091200 bytes, 104857600 sectors
Units = sectors of 1 * 512 = 512 bytes
Sector size (logical/physical): 512 bytes / 512 bytes
I/O size (minimum/optimal): 512 bytes / 512 bytes
Disk label type: dos
Disk identifier: 0x000a7fd0

   Device Boot      Start         End      Blocks   Id  System
/dev/sda1   *        2048     1026047      512000   83  Linux
/dev/sda2         1026048    16803839     7888896   8e  Linux LVM
/dev/sda3        16803840    20899839     2048000   82  Linux swap / Solaris
/dev/sda4        20899840   104857599    41978880    5  Extended
/dev/sda5        20901888    35581951     7340032   83  Linux

Command (m for help): t
Partition number (1-5, default 5):
Hex code (type L to list all codes): 8e
Changed type of partition 'Linux' to 'Linux LVM'

Command (m for help): w
The partition table has been altered!

Calling ioctl() to re-read partition table.

WARNING: Re-reading the partition table failed with error 16: Device or resource busy.
The kernel still uses the old table. The new table will be used at
the next reboot or after you run partprobe(8) or kpartx(8)
Syncing disks.

# 如果此时就像看到这个新增加的磁盘,可以使用“partprobe”命令进行激活
# 然后格式化mkfs.ext4 /dev/sda1
# 创建挂载目录 mkdir -p /mnt/photos
# fstab自动挂在 echo "UUID=$(blkid -s UUID -o value /dev/sda1) /mnt/photos ext4 defaults 0 2" | sudo tee -a /etc/fstab
# 测试 mount -a

[root@frank ~]# partx -a /dev/sda
partx: /dev/sda: error adding partitions 1-3

[root@frank ~]# ll /dev/sda*
brw-rw---- 1 root disk 8, 0 Sep 24 22:12 /dev/sda
brw-rw---- 1 root disk 8, 1 Sep 24 17:43 /dev/sda1
brw-rw---- 1 root disk 8, 2 Sep 24 17:43 /dev/sda2
brw-rw---- 1 root disk 8, 3 Sep 24 17:43 /dev/sda3
brw-rw---- 1 root disk 8, 4 Sep 24 22:13 /dev/sda4
brw-rw---- 1 root disk 8, 5 Sep 24 22:13 /dev/sda5

[root@frank ~]# pvcreate /dev/sda5
  Physical volume "/dev/sda5" successfully created
[root@frank ~]# pvdisplay
  --- Physical volume ---
  PV Name               /dev/sda2
  VG Name               myvg
  PV Size               7.52 GiB / not usable 4.00 MiB
  Allocatable           yes (but full)
  PE Size               4.00 MiB
  Total PE              1925
  Free PE               0
  Allocated PE          1925
  PV UUID               whbkik-T1Ke-fLlF-ZBph-3pcd-loYG-yRweel

  "/dev/sda5" is a new physical volume of "7.00 GiB"
  --- NEW Physical volume ---
  PV Name               /dev/sda5
  VG Name                          <<< no config VG, so empty
  PV Size               7.00 GiB
  Allocatable           NO
  PE Size               0
  Total PE              0
  Free PE               0
  Allocated PE          0
  PV UUID               WCKrXq-j2ZL-PoZ8-PcXd-fjb8-Riud-e5yl6m
Extend VG
[root@frank ~]# vg
vgcfgbackup    vgck           vgdisplay      vgimport       vgmknodes      vgrename       vgsplit
vgcfgrestore   vgconvert      vgexport       vgimportclone  vgreduce       vgs
vgchange       vgcreate       vgextend       vgmerge        vgremove       vgscan
[root@frank ~]# vgextend
  Please enter volume group name and physical volume(s)
  Run `vgextend --help' for more information.
[root@frank ~]#
[root@frank ~]# vgextend myvg /dev/sda5
  Volume group "myvg" successfully extended
[root@frank ~]#
[root@frank ~]# pvdisplay
  --- Physical volume ---
  PV Name               /dev/sda2
  VG Name               myvg
  PV Size               7.52 GiB / not usable 4.00 MiB
  Allocatable           yes (but full)
  PE Size               4.00 MiB
  Total PE              1925
  Free PE               0
  Allocated PE          1925
  PV UUID               whbkik-T1Ke-fLlF-ZBph-3pcd-loYG-yRweel

  --- Physical volume ---
  PV Name               /dev/sda5
  VG Name               myvg
  PV Size               7.00 GiB / not usable 4.00 MiB
  Allocatable           yes
  PE Size               4.00 MiB
  Total PE              1791
  Free PE               1791
  Allocated PE          0
  PV UUID               WCKrXq-j2ZL-PoZ8-PcXd-fjb8-Riud-e5yl6m

[root@frank ~]# vgdisplay
  --- Volume group ---
  VG Name               myvg
  System ID
  Format                lvm2
  Metadata Areas        2
  Metadata Sequence No  4
  VG Access             read/write
  VG Status             resizable
  MAX LV                0
  Cur LV                2
  Open LV               2
  Max PV                0
  Cur PV                2
  Act PV                2
  VG Size               14.52 GiB
  PE Size               4.00 MiB
  Total PE              3716
  Alloc PE / Size       1925 / 7.52 GiB
  Free  PE / Size       1791 / 7.00 GiB
  VG UUID               0kMilm-TbT5-gs60-Vfl5-3obp-WybF-1BMwXA
Extend LV
As above info, VG had increased, now we need add those VG to LC, you can add by G/MB/PE, suggest use PE that is more accurate, as follow:
[root@frank ~]# lvresize -l +1791 /dev/myvg/root
  Extending logical volume root to 13.83 GiB
  Logical volume root successfully resized
[root@frank ~]# lvdisplay
  --- Logical volume ---
  LV Path                /dev/myvg/root
  LV Name                root
  VG Name                myvg
  LV UUID                K15Fr3-QNP3-a17k-IhNU-8qIV-LQAZ-iJ9bgV
  LV Write Access        read/write
  LV Creation host, time localhost, 2014-09-23 14:38:07 +0800
  LV Status              available
  # open                 1
  LV Size                13.83 GiB
  Current LE             3541
  Segments               2
  Allocation             inherit
  Read ahead sectors     auto
  - currently set to     8192
  Block device           253:0
Activate by “resize2fs”, but found command couldn’t use:
[root@frank ~]# resize2fs /dev/myvg/root
resize2fs 1.42.9 (28-Dec-2013)
resize2fs: Bad magic number in super-block while trying to open /dev/myvg/root
Couldn't find valid filesystem superblock.
After checked,that due to root system should xfs in Centos7/Ubuntu 14.04, “resize2fs” only support ext2, ext3 and ext4 (check type by “df -T”), so replaced “resize2fs” by “xfs_growfs”: Trying to resize2fs EB volume fails [closed]
After adding new NVME, you will find the disk but cannot use:
[root@gcspr-vxr pyvxr]# lsblk
NAME                 MAJ:MIN RM   SIZE RO TYPE MOUNTPOINT
sda                    8:0    0 894.3G  0 disk
├─sda1                 8:1    0    63M  0 part /boot/efi
├─sda2                 8:2    0   500M  0 part /boot
├─sda3                 8:3    0     1M  0 part
└─sda4                 8:4    0 893.7G  0 part
  ├─xfs_vol-root     253:0    0  97.7G  0 lvm  /
  ├─xfs_vol-swap     253:1    0  23.6G  0 lvm  [SWAP]
  └─xfs_vol-nobackup 253:2    0 772.5G  0 lvm  /nobackup
nvme0n1              259:0    0   2.9T  0 disk <<<
nvme1n1              259:1    0   2.9T  0 disk <<<
Need to fdisk, format and mount, as follow:
[root@gcspr-vxr /]# fdisk /dev/nvme1n1
WARNING: fdisk GPT support is currently new, and therefore in an experimental phase. Use at your own discretion.
Welcome to fdisk (util-linux 2.23.2).

Changes will remain in memory only, until you decide to write them.
Be careful before using the write command.


Command (m for help): n
Partition number (1-128, default 1):
First sector (34-6251233934, default 2048):
Last sector, +sectors or +size{K,M,G,T,P} (2048-6251233934, default 6251233934):
Created partition 1


Command (m for help): w
The partition table has been altered!

Calling ioctl() to re-read partition table.
Syncing disks.
[root@gcspr-vxr /]# mkfs.ext4 /dev/nvme1n1p1
mke2fs 1.42.9 (28-Dec-2013)
Discarding device blocks: done
Filesystem label=
OS type: Linux
Block size=4096 (log=2)
Fragment size=4096 (log=2)
Stride=0 blocks, Stripe width=0 blocks
195354624 inodes, 781403985 blocks
39070199 blocks (5.00%) reserved for the super user
First data block=0
Maximum filesystem blocks=2929721344
23847 block groups
32768 blocks per group, 32768 fragments per group
8192 inodes per group
Superblock backups stored on blocks:
	32768, 98304, 163840, 229376, 294912, 819200, 884736, 1605632, 2654208,
	4096000, 7962624, 11239424, 20480000, 23887872, 71663616, 78675968,
	102400000, 214990848, 512000000, 550731776, 644972544

Allocating group tables: done
Writing inode tables: done
Creating journal (32768 blocks): done
Writing superblocks and filesystem accounting information: done

[root@gcspr-vxr /]# mkdir vxrbackup
[root@gcspr-vxr /]# mount /dev/nvme1n1p1 /vxrbackup
[root@gcspr-vxr /]# chmod 777 /vxrbackup/ -R
[root@gcspr-vxr /]# lsblk
NAME                 MAJ:MIN RM   SIZE RO TYPE MOUNTPOINT
sda                    8:0    0 894.3G  0 disk
├─sda1                 8:1    0    63M  0 part /boot/efi
├─sda2                 8:2    0   500M  0 part /boot
├─sda3                 8:3    0     1M  0 part
└─sda4                 8:4    0 893.7G  0 part
  ├─xfs_vol-root     253:0    0  97.7G  0 lvm  /
  ├─xfs_vol-swap     253:1    0  23.6G  0 lvm  [SWAP]
  └─xfs_vol-nobackup 253:2    0 772.5G  0 lvm  /nobackup
nvme0n1              259:0    0   2.9T  0 disk
└─nvme0n1p1          259:2    0   2.9T  0 part /vxr       <<<
nvme1n1              259:1    0   2.9T  0 disk
└─nvme1n1p1          259:3    0   2.9T  0 part /vxrbackup <<<