Linux/Unix tips
Awk and xargs
grep: 过滤
awk:文本分析工具
xargs: 跟其他命令配合如使用,扩展名了
ps -ef | grep frank | grep soft_router | awk '{print $2}' | xargs killawk也可以获取特定列的信息,如下把文本中的第二列输出到新文本中:
more bgptablev6.txt | awk '{print $2}'> bgptable-birdv6.txtSed
通过sed可以替换文本中的特定字符,如下原始文本:
[root@bird-162 ~]# more route-internet
1.0.0.0/24 dev lo:1
1.0.4.0/22 dev lo:1
1.0.4.0/24 dev lo:1
1.0.5.0/24 dev lo:1
我要把“lo:1”改成“internet”,可以直接用sed,-i是直接对文本修改,/s是开始,/g是直到结束:
[root@bird-162 ~]# sed -i 's/lo:1/internet/g' route-internet
[root@bird-162 ~]# more route-internet
1.0.0.0/24 dev internet
1.0.4.0/22 dev internet
1.0.4.0/24 dev internet
1.0.5.0/24 dev internet如果替换的文本中带有空格,需要怎么操作呢?经过Google后,找的了解决方法:Replacing text with sed containing whitespace in variable [duplicate],例如原始文本:
[root@trex-161 ~]# more bgptable-bird.txt
1.0.0.0/24 dev lo:1
1.0.4.0/22 dev lo:1
1.0.4.0/24 dev lo:1
1.0.5.0/24 dev lo:1
1.0.6.0/24 dev lo:1
我要把“lo:1”改成“eth1 table 84”,需要用变量来替代字符串,所以需要写一个简单的shell脚本,如下:
[root@trex-161 ~]# more sedscript
#!/bin/sh

old='lo:1'
new='eth1 table 84'
sed -i 's/'"$old"'/'"$new"'/g' /root/bgptable-bird.txt
[root@trex-161 ~]# chmod +x sedscript
[root@trex-161 ~]# ./sedscript
[root@trex-161 ~]# more bgptable-bird.txt
1.0.0.0/24 dev eth1 table 84
1.0.4.0/22 dev eth1 table 84
1.0.4.0/24 dev eth1 table 84
1.0.5.0/24 dev eth1 table 84
2021 12-25更新:vim中的全局替换
如果不是很复杂的操作,直接在vim中就可以直接替换,如果中间有空格,可以写两次就可以了,如下把原有的ubuntu更新源替换成阿里云的,因为url含有”/“,所以用”#“做分隔符:
vim /etc/apt/sources.list
:%s#http://cn.archive.ubuntu.com/ubuntu#http://mirrors.aliyun.com/ubuntu/#g
:%s#groovy#focal#g
2022 08-05更新:vim中黏贴设置
有些时候黏贴文本时,会出现很多空行,导致文本混乱,可以通过“:set paste”,然后再输入i 进行黏贴,就避免了这种问题;
Tar and Zip
tar -cvf test-tar.tar nvgen_traces     >>> create test folder to zip file
tar -xvf test-tar.tar     >>> extract tar file
zip -r 661-yang.zip yang
unzip 661-yang.zip
Find command
$find ~ -name "*.txt" -print
$find /(查找范围) -name '查找关键字' -type d   <<< 查找目录
$find / -type f -size +100M   <<< 列出大于100M的文件
#du -h / | sort -rh | head -n 10  <<< 列出占用磁盘空间最多的top10目录
8.9G    /
3.8G    /var
3.5G    /var/lib/docker
3.5G    /var/lib
3.4G    /var/lib/docker/overlay2
2.0G    /home
1.7G    /usr
1.3G    /opt
1.2G    /opt/my_wordpress
740M    /opt/my_wordpress/wordpress_data
$find ./ -name "index.html*" -exec rm -rf {} \; <<<删除找到的文件http://blog.csdn.net/windone0109/article/details/2817792
http://www.qnx.com/developers/docs/6.4.1/neutrino/utilities/f/find.html
http://blog.csdn.net/ldl22847/article/details/761111
Split和Cat
split分割文件,cat合并文件
$ split -C 1000M fullk9-R-XRV9000-731.tar fullk9-R-XRV9000-731.tar
$ cat fullk9-R-XRV9000-731.tar.xa* > fullk9-R-XRV9000-731.tar
Grep常用Option:
-c:只输出匹配行的计数。
-i:不区分大 小写(只适用于单字符)。
-h:查询多文件时不显示文件名。
-l:查询多文件时只输出包含匹配字符的文件名。
-n:显示匹配行及 行号。
-s:不显示不存在或无匹配文本的错误信息。
-v:显示不包含匹配文本的所有行。
$more size.txt | grep -inv 'test' <<<查找不包含“test”的匹配项的行
$more size.txt | grep -inv 'test' >>xxx  <<<过滤后的信息重定向到一个文件中,xxx是你的文件名
$grep -E '10G|VID' file  <<<查找包含10G或包含VID的行,-E是扩展模式,同等于egrep
$grep -rn 'ALLOWED_HOSTS' *  <<<查找在此目录中包括子目录中的所有文件,如果包含关键字,打印出来,非常实用的命令
update:more和其他命令也可以结合grep -E使用,如下
root@k8s-work:/home/lab# kubectl get namespaces |grep -E "app-team|system"
app-team1          Active   22h
calico-system      Active   50d
kube-system        Active   50d
update:-A和-B分别是后几行,前几行
[root@localhost ~]# more test.cfg |grep 0/0/0/0
interface HundredGigE0/0/0/0
 interface HundredGigE0/0/0/0

[root@localhost ~]# more test.cfg |grep 0/0/0/0 -A 2
interface HundredGigE0/0/0/0
 ipv4 address 25.1.1.2 255.255.255.0
 load-interval 30
--
 interface HundredGigE0/0/0/0
  circuit-type level-2-only
  point-to-point
[root@localhost ~]# more test.cfg |grep 0/0/0/0 -B 2
 shutdown
!
interface HundredGigE0/0/0/0
--
  !
 !
 interface HundredGigE0/0/0/0
[root@localhost ~]# more test.cfg |grep 0/0/0/0 -B 2 -A 2
 shutdown
!
interface HundredGigE0/0/0/0
 ipv4 address 25.1.1.2 255.255.255.0
 load-interval 30
--
  !
 !
 interface HundredGigE0/0/0/0
  circuit-type level-2-only
point-to-point用grep还能直接过滤文本中的关键字,如下,详细内容在另一篇文章中介绍过《Install/Use Yangsuite by Docker》
$ grep -rn 'ALLOWED_HOSTS' *
docker/yangsuite/production.py:13:if 'DJANGO_ALLOWED_HOSTS' in os.environ:
docker/yangsuite/production.py:14:    ALLOWED_HOSTS = os.getenv('DJANGO_ALLOWED_HOSTS', 'localhost').split()
docker/yangsuite/production.py:16:    ALLOWED_HOSTS = 'localhost'
docker/docker-compose.yml:11:        - DJANGO_ALLOWED_HOSTS=localhost
Pattern正则表达式主要参数:
\: 忽略正则表达式中特殊字符的原有含义。
^:匹配正则表达式的开始行。
$: 匹配正则表达式的结束行。
\<:从匹配正则表达式的行开始。
\>:到匹配正则表达式的行结束。
[ ]:单个字符,如[A]即A符合要求 。
[ – ]:范围,如[A-Z],即A、B、C一直到Z都符合要求 。
. :所有的单个字符。
* :有字符,长度可以为0。
文本输出太多,可以用下面命令,然后左划线过滤:
在命令后面加 | more. 可以每屏按键后翻。想退出按 q
命令后面加| less ,可以前后翻。想退出按 q
加路由并查看路由表:
$sudo route add -net 10.10.10.0/24 192.168.255.131
Password:
add net 10.10.10.0: gateway 192.168.255.131
$ netstat -r
Routing tables

Internet:
Destination        Gateway            Flags        Refs      Use   Netif Expire
default            hsrp-10-140-0-0.ci UGSc           31        0     en0
10.10.10/24        192.168.255.131    UGSc            0        0  vmnet8

$ netstat -in
Name  Mtu   Network       Address            Ipkts Ierrs    Opkts Oerrs  Coll
lo0   16384 <link#1>                         64058     0    64058     0     0
关闭防火墙
[root@frank ~]# systemctl stop firewalld.service
[root@frank ~]# systemctl disable firewalld.service
Removed symlink /etc/systemd/system/multi-user.target.wants/firewalld.service.
Removed symlink /etc/systemd/system/dbus-org.fedoraproject.FirewallD1.service.
2020-07-07 更新:关闭ubuntu 防火墙
最近拿ubuntu做测试,发现ipv6流量被防火墙block了。。。花了很长时间才找到原因,由于是测试的是SRv6,所以怀疑内核不稳定,同事还尝试升级了内核。。。按理说ubuntu默认应该是关闭防火墙的。。。用下面命令关闭ubuntu的防火墙:
[root@frank ~]# ufw disable
[root@frank ~]# ufw status
临时开启httpserver,remote直接wget即可
下面的方法只能单进程,简单测试没问题,但没法上生产,如果需要更好的性能,可以安装“caddy”
$ python -m SimpleHTTPServer
Serving HTTP on 0.0.0.0 port 8000 ...
or
$ python -m http.server <port>私钥和公钥
加密算法分两种,对称加密和非对称加密。非对称加密需要更多资源,速度慢,但相对更安全;对称加密速度快,但不太安全;这里简单总结下非对称加密,非对称加密有很多算法,如常见的RSA,Diffie-Hellman,DSA
非对称算法计算完后会生成两把钥匙,公钥和私钥。顾名思义,公钥即可以分发给所有人的;而私钥只是自己保留的;对不同秘钥加密会有不同的应用场景
之前在学安全认证时总结过一些,可以参考 https://www.zhaocs.info/security-vpn-theory.html
公钥加密,私钥解密
主要用于数据加密
私钥加密,公钥解密
主要用于数字签名,因为私钥可视为不可泄露,代表个人或机构的,所以如果公钥可以解密,那么可以证明数据分发者没有被篡改
SSH举例
过程主要是Server端拿Client的公钥加密随机数并发给Client;Client用私钥解密,并md5随机数和SessionKey并发给Server;Server 收到后用同样算法计算并对比Client发来的信息,如果匹配,通过认证
经过查找,这篇 图解SSH原理 总结的很好!建议直接跳转查看;所以在这里只实操,不涉及理论。为了防止文章失效,我做了截屏保留,放到这里:
客户端生成公钥私钥
client:~ frank$ cd .ssh
client:.ssh frank$ ssh-keygen -t rsa
Generating public/private rsa key pair.
Enter file in which to save the key (/Users/frank/.ssh/id_rsa):
Enter passphrase (empty for no passphrase): <<< 真实环境建议增加密码
Enter same passphrase again:
Your identification has been saved in /Users/frank/.ssh/id_rsa.
Your public key has been saved in /Users/frank/.ssh/id_rsa.pub.
The key fingerprint is:
SHA256:3zinN8lMY79WaSRDzbaBLQsT4KSlb9MDwrQfFc9FK+o frank@client
The key's randomart image is:
+---[RSA 3072]----+
|       . +.+o *o |
|      o B .oo+.*.|
|       * +  +++.o|
|        + + .+.o |
|        S= +  + .|
|        ..oo=  o.|
|          +Eo+.. |
|           +* o  |
|          .. o.. |
+----[SHA256]-----+
client:.ssh frank$ ls -l
total 120
-rw-r--r--  1 frank  staff    751 May 11  2020 config
-rw-------  1 frank  staff   2610 Feb 24 11:59 id_rsa <<< 私钥
-rw-r--r--  1 frank  staff    578 Feb 24 11:59 id_rsa.pub <<< 公钥
-rw-------  1 frank  staff  23022 Feb 23 19:25 known_hosts
-rw-r--r--@ 1 frank  staff  23377 Feb 22 21:00 known_hosts.old
拷贝的Server端
Frank@Yongs-MacBook-Pro ~ % ssh-copy-id -p 8080 -i ~/.ssh/id_rsa.pub [email protected]
/usr/bin/ssh-copy-id: INFO: Source of key(s) to be installed: "/Users/Frank/.ssh/id_rsa.pub"
The authenticity of host '[10.114.251.163]:8080 ([10.114.251.163]:8080)' can't be established.
ED25519 key fingerprint is SHA256:xxxxxxx
This key is not known by any other names
Are you sure you want to continue connecting (yes/no/[fingerprint])? yes
/usr/bin/ssh-copy-id: INFO: attempting to log in with the new key(s), to filter out any that are already installed
/usr/bin/ssh-copy-id: INFO: 1 key(s) remain to be installed -- if you are prompted now it is to install the new keys
[email protected]'s password:

Number of key(s) added:        1

Now try logging into the machine, with:   "ssh -p '8080' '[email protected]'"
and check to make sure that only the key(s) you wanted were added.
登录Server端改权限
“authorized_keys”必须是“0600”,如果有更多的client,直接用命令追加公钥即可:
[root@server ~]# cd .ssh
[root@server .ssh]# ls -l
total 4
-rw-r--r-- 1 root root 578 Feb 24 13:04 authorized_keys.pub
[root@server .ssh]# chmod 0600 authorized_keys.pub
[root@server .ssh]# ls -l
total 4
-rw------- 1 root root 578 Feb 24 13:04 authorized_keys.pub
[root@server .ssh]#cat /root/.ssh/other_client_rsa.pub >> /root/.ssh/authorized_keys关闭默认22端口和密码认证
[root@server ~]# diff /etc/ssh/sshd_config /etc/ssh/sshd_config.bak
18d17
< Port xxxxx
44c43
< PubkeyAuthentication yes
---
> #PubkeyAuthentication yes
66c65
< PasswordAuthentication no
---
> PasswordAuthentication yes
[root@server ~]# systemctl restart sshd.service
如果存放公钥的文件名已经改了,那么在sshd_config中也要更改,如下:
root@eve-ng:~/.ssh# more /etc/ssh/sshd_config |grep author
AuthorizedKeysFile      %h/.ssh/authorized_pub_keys
建立连接
client:.ssh frank$ ssh -i id_rsa -p xxxxx [email protected]
Last login: Wed Feb 24 13:46:16 2021 from 64.104.125.227
[root@server ~]#
2021-12 关于SecureCRT中的证书认证
在CRT的ssh2 session中,如果选择证书认证,默认是Publickey,这点让我很困惑,不应该是像上面那样选择PrivateKey去解密么。。。后来跟朋友讨论了下,感觉这就是SSH加密机制(公钥加密私钥解密)的名称而已,虽然叫PublicKey,但其中选择证书那里仍然需要选择PrivateKey;不管用Terminal还是CRT,都需要提前把PublicKey上传到服务器上。
2020-02 安装并打开流量监控
[root@nso ~]# yum -y install iftop[root@nso ~]# iftop
interface: ens192
IP address is: 10.75.37.87
MAC address is: 00:50:56:80:32:2c
12.5Kb 25.0Kb 37.5Kb 50.0Kb 62.5Kb
+-------------+--------------+--------------+--------------+--------------
nso => xxx 3.47Kb 3.19Kb 3.19Kb
<= 416b 624b 624b
nso => yyy 0b 566b 566b
<= 0b 1.66Kb 1.66Kb
nso => gateway 672b 504b 504b
<= 672b 504b 504b
--------------------------------------------------------------------------
TX: cum: 2.12KB peak: 4.rates: 4.12Kb 4.23Kb 4.23Kb
RX: 1.38KB 4.47Kb 1.06Kb 2.77Kb 2.77Kb
[root@nso ~]# 3.50KB 8.80Kb 5.19Kb 7.00Kb 7.00Kb
这里有一篇文章总结了一些常用监控的命令:Linux 服务器上监控网络带宽的18个常用命令;
2020-02 安装并使用NSF的cache
针对服务器用NSF搭建的环境,跨广域网挂载非常慢,而且每次都经理很通过的下载,如何解决类似问题?我们可以开启cache,这样第二次打开后就不会有问题了,下面是安装和配置:
[root@nso ~]# yum install -y cachefilesd
[root@nso ~]# cat /etc/cachefilesd.conf
安装后我们要找到NSF的挂载点,然后在NSF中设置cache,可以通过安装lsof这个工具来找到挂载点
[root@nso ~]# sudo yum install lsof安装后打开lsof并触发一个automount的挂载点,我们可以找到相应的挂载服务器,找到后去automount文件给相应的服务器加上cache标识,如下:
[root@nso ~]# more /etc/auto.indirect |grep /abc/xyz
xxx -rw,hard,intr,quota,fsc frank-server:/abc/xyz
fcs是cache的标识,默认没有,就是要对这个挂载点开启cache;frank-server就是 NSF server的hostname;/abc/xyz就是从lsof中查到的挂载点的真正位置信息;xxx就是/auto目录下自动挂载的目录名称
2021-04 添加别名
由于要做混合组网测试,需要频繁登录设备,所以Linux做Terminal Server,为了避免反复输入“telnet x.x.x.x xxxx”,所以添加了别名,这样登录就方便很多了,直接修改用户profile文件即可“~/.bashrc”
[root@localhost ~]# more ~/.bashrc
# .bashrc

# User specific aliases and functions

alias rm='rm -i'
alias cp='cp -i'
alias mv='mv -i'

alias TG26='telnet 172.16.211.154 32897'
alias PR11='telnet 172.16.211.154 32907'
alias PR12='telnet 172.16.211.154 32908'
2022-01 确认Docker仓库Image的版本信息
当使用 ”docker pull“ 从仓库安装一个软件时,默认是最新版本。但如果想指定版本,需要单独写好版本号,但docker没有命令去仓库中查询改软件的版本信息,目前有两种方法可以实现:
- 通过web去 hub.docker.com 上search,并查看详细版本信息;
- 直接用api查看:curl https://registry.hub.docker.com/v1/repositories/nginx/tags ;
默认输出的jason信息无法阅读,通过 apt install libjsoncpp-dev 安装json工具,通过下面命令可以格式化json信息,tac是倒序显示:
root@frank0-15:/opt/harbor# curl https://registry.hub.docker.com/v1/repositories/nginx/tags | json_pp | tac
......
   },
      "name" : "1.9.9"
      "layer" : "",
   {
   },
      "name" : "1.9.8"
      "layer" : "",
   {
   },
      "name" : "1.9.7"
      "layer" : "",
   {
2022-03 TCPDUMP filter inner address in IPinIP packets
[ansible@test] ~$ sudo tcpdump  -i eth0 -w beihe.pcap 'ip[32:4]=0x79c4ec6d or ip[36:4]=0x79c4ec6d'
tcpdump: listening on eth0, link-type EN10MB (Ethernet), capture size 262144 bytes
^C120 packets captured
122 packets received by filter
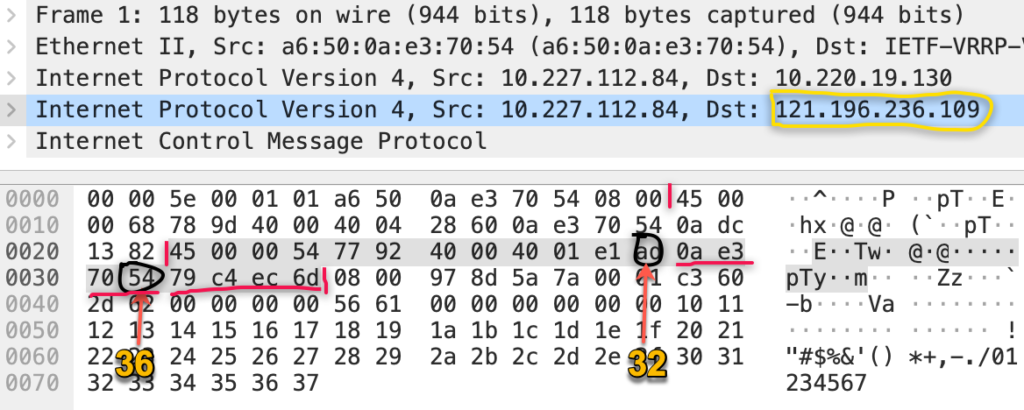
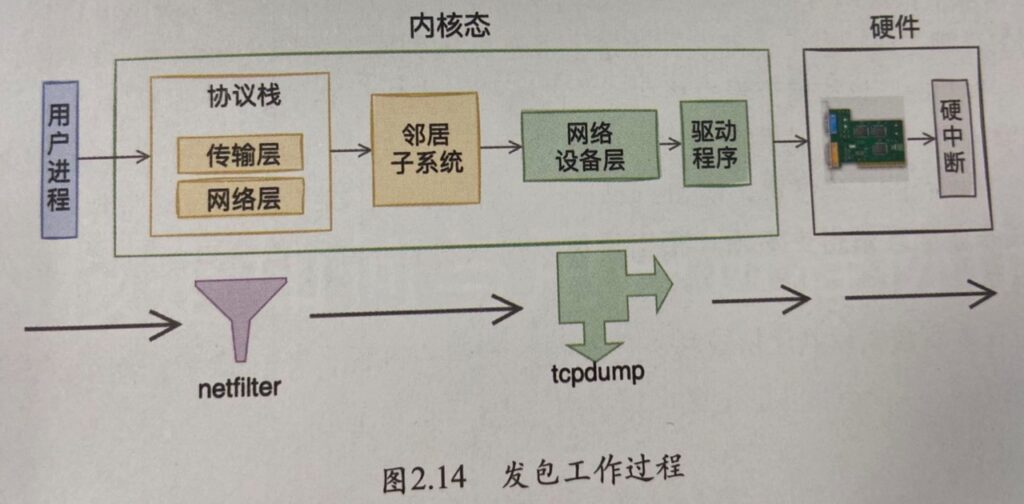
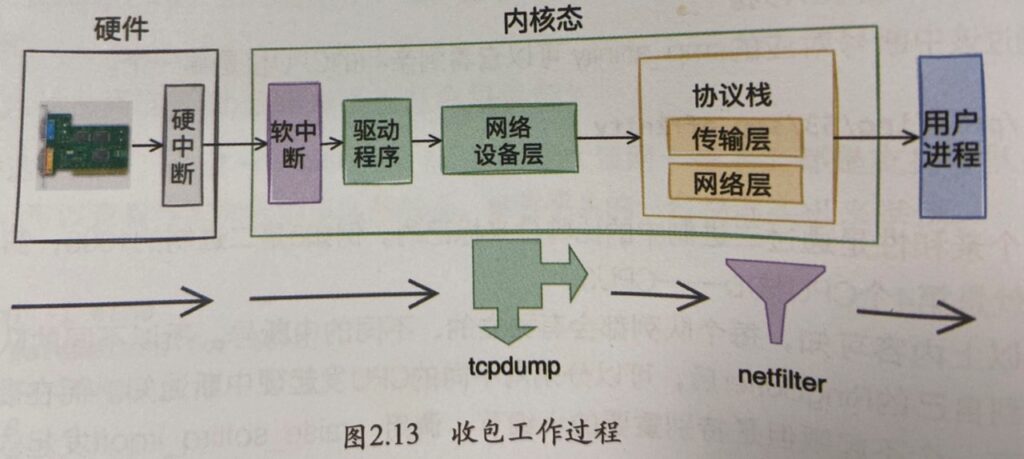
题外话:Tcpdump是否可以抓到iptables封禁的包呢?看下面两张图就明白了,出自《深入理解Linux网络》:
另外有时候我们使用tcpdump抓包往往很大,但我们只想看一部分,此时就像是否能把这个报文分拆,其实tcpdump可以很容易的实现这个需求,用下面的命令就可以从一个3G的抓包文件中只保存前1000个报文,而且速度很快:
[root@server1] ~$ tcpdump -r test.pcap -c 1000 -w test-split.pcap
reading from file jiasentemp.pcap, link-type EN10MB (Ethernet)
Reference
- Tcpdump Examples; <<< 这个blog很好,很多实用的例子
- tcpdump ;
- A tcpdump Tutorial with Examples — 50 Ways to Isolate Traffic ;
- How to filter a packet capture on GRE/IPIP encapsulated IP address ;
2025-10 TCPDUMP Capture RDMA/ROCE Packet
为了测试ROCEv2,需要在服务器上抓包,但tcpdump无法抓取ROCEv2的报文,经过与老同事讨论,应该是libpcap版本较低,无法抓取CX6 MLX的ROCEv2的报文。下载tcpdump和libpcap,安装:
# mv libpcap-1.10.4.tar.gz /usr/local/src/
# mv tcpdump-4.99.4.tar.gz /usr/local/src/
# cd /usr/local/src
# tar -xvf libpcap-1.10.4.tar.gz
# tar -xvf tcpdump-4.99.4.tar.gz

# cd libpcap-1.10.4
# ./configure
# make
# make install

# cd ../tcpdump-4.99.4
# ./configure
# make
# make install

# tcpdump --version
tcpdump version 4.99.4
libpcap version 1.10.4 (with TPACKET_V3)
验证升级后是否支持RDMA:
# tcpdump -D
......
21.mlx5_0 (RDMA sniffer)
22.mlx5_1 (RDMA sniffer)
23.mlx5_2 (RDMA sniffer)
24.mlx5_3 (RDMA sniffer)

# tcpdump -i mlx5_1 -c 100 -w mlx5_1_rdma_capture.pcap
tcpdump: listening on mlx5_1, link-type EN10MB (Ethernet), snapshot length 10000 bytes
100 packets captured
100 packets received by filter
0 packets dropped by kernel
2022-06 设置NTP客户端
在”ntp.conf”中指定ntp server的域名或者IP:
[root@server2] ~$ diff /etc/ntp.conf /etc/ntp.conf.bak
33d32
< server time01.xxx.xxx.net iburst minpoll 4 maxpoll 10
重启ntp进程,以激活新的配置:
[root@server2] ~$ systemctl restart ntpd
[root@server2] ~$ systemctl status ntpd
● ntpd.service - Network Time Service
   Loaded: loaded (/usr/lib/systemd/system/ntpd.service; enabled; vendor preset: disabled)
   Active: active (running) since Wed 2022-06-29 11:23:01 CST; 4s ago
  Process: 28046 ExecStart=/usr/sbin/ntpd -u ntp:ntp $OPTIONS (code=exited, status=0/SUCCESS)
 Main PID: 28047 (ntpd)
    Tasks: 1
   Memory: 1000.0K
   CGroup: /system.slice/ntpd.service
           └─28047 /usr/sbin/ntpd -u ntp:ntp -g

Jun 29 11:23:01 server2 systemd[1]: Starting Network Time Service...
Jun 29 11:23:01 server2 ntpd[28047]: proto: precision = 0.054 usec
Jun 29 11:23:01 server2 systemd[1]: Started Network Time Service.
Jun 29 11:23:01 server2 ntpd[28047]: 0.0.0.0 c01d 0d kern kernel time sync enabled
查看客户端设备是否与ntp server同步,如果想实时查看,可以用watch “ntpq -p”命令替代反复输入ntpd -p:
[root@server2] ~$ ntpq -p
     remote           refid      st t when poll reach   delay   offset  jitter
==============================================================================
 LOCAL(0)        .LOCL.          10 l  137   64    4    0.000    0.000   0.000
*10.xx.xxx.133   100.xx.xxx.1     3 u   68   64    3    4.699    0.194   2.290
 169.254.0.79    .STEP.          16 u    -  128    0    0.000    0.000   0.000
 169.254.0.80    .STEP.          16 u    -  128    0    0.000    0.000   0.000
 169.254.0.81    .STEP.          16 u    -  128    0    0.000    0.000   0.000
 169.254.0.82    .STEP.          16 u    -  128    0    0.000    0.000   0.000
 169.254.0.83    .STEP.          16 u    -  128    0    0.000    0.000   0.000
[root@server2] ~$ ntpq -p
     remote           refid      st t when poll reach   delay   offset  jitter
==============================================================================
 LOCAL(0)        .LOCL.          10 l  138   64    4    0.000    0.000   0.000
*10.xx.xxx.133   100.xx.xxx.1     3 u    1   64    7    4.569    0.313   2.085
 169.254.0.79    .STEP.          16 u    -  128    0    0.000    0.000   0.000
 169.254.0.80    .STEP.          16 u    -  128    0    0.000    0.000   0.000
 169.254.0.81    .STEP.          16 u    -  128    0    0.000    0.000   0.000
 169.254.0.82    .STEP.          16 u    -  128    0    0.000    0.000   0.000
 169.254.0.83    .STEP.          16 u    -  128    0    0.000    0.000   0.000
下面是相关信息解释:
| * | 本地与该ntp server同步了时钟; |
| refid | 远程ntp server的上级服务器IP地址或域名; |
| st | 即stratum,越小表示越靠近时钟源,精准度越高,从上面可以看到后面5个地址均是初始化,没有同步,所以精度最差,是16级; |
| t | 与远端ntp server之间的通讯方式,u表示单播;b表示广播;l表示本地; |
| when | 多少秒前同步过时间(有一点不理解,这个时间不是poll的最大值么,为什么会超过poll?) |
| poll | 每隔多少秒与ntp server同步一次(但这个值为什么会增加呢?看最后贴出的信息); |
| reach | 是一个八进制数字,指出源的可存取性。值 377 表示源已应答了前八个连续轮询;正常情况下值为[0, 1, 3, 7, 17, 37, 77, 177, 377],对应的二进制为[0, 1, 11, 111, 1111, 11111, 111111, 1111111, 11111111],ntp服务启动后,reach就以poll值为周期与ntp server通信,为了方便理解,我们可以简单的认为每次ping一下上层ntp server,如果成功,那reach就向左移一位,右边补1,如果失败,则右边补0,所以如果reach不是上面给出的枚举值,那就是在通信过程中出错了。当reach 达到17时(对应1111,即最近的四次通信都成功了),那才开始同步时间,这时remote项对应的域名或IP前面会有*号。每次重启ntpd,都需要4倍的poll值,才能达成同步; |
查看与ntp server的时间偏差:
[root@server2] ~$ ntpdc -c loopinfo
offset:               -0.000156 s
frequency:            7.456 ppm
poll adjust:          14
watchdog timer:       562 s
查看ntp version,有时候client跟server ntp server差的太大,也会导致无法同步时钟:
[root@server2] ~$ ntpq -c version
ntpq [email protected] Tue Jun 23 15:38:21 UTC 2020 (1)
早期的ntp可能只会同步系统时间,要想让系统时间(用$ date查看)跟硬件时间(用$ hwclock –show 或$ clock –show)进行同步,还需要做些额外的操作,但至少在我测试的Centos中,ntp默认同步系统时间到硬件时间,可以在这里查看:
[root@server2] ~$ more /etc/sysconfig/ntpd
# Command line options for ntpd
OPTIONS="-g"
SYNC_HWCLOCK=yes
可以通过tcpdump的方式查看ntp交互报文:
[root@server2] ~$ tcpdump dst port 123 &
[1] 3948
[root@server2] ~$ tcpdump: verbose output suppressed, use -v or -vv for full protocol decode
listening on eth0, link-type EN10MB (Ethernet), capture size 262144 bytes

[root@server2] ~$ ntpq -p
     remote           refid      st t when poll reach   delay   offset  jitter
==============================================================================
 LOCAL(0)        .LOCL.          10 l 155m   64    0    0.000    0.000   0.000
*10.xx.xxx.133   100.xx.xxx.3     3 u  257  256  377    4.189   -0.337   0.085
 169.254.0.79    .STEP.          16 u    - 1024    0    0.000    0.000   0.000
 169.254.0.80    .STEP.          16 u    - 1024    0    0.000    0.000   0.000
14:22:37.227668 IP server2.ntp > 10.xx.xxx.133.ntp: NTPv4, Client, length 48
14:22:37.232086 IP 10.xx.xxx.133.ntp > server2.ntp: NTPv4, Server, length 48
 169.254.0.81    .STEP.          16 u    - 1024    0    0.000    0.000   0.000
 169.254.0.82    .STEP.          16 u    - 1024    0    0.000    0.000   0.000
 169.254.0.83    .STEP.          16 u    - 1024    0    0.000    0.000   0.000
[root@server2] ~$
[root@server2] ~$ ntpq -p
     remote           refid      st t when poll reach   delay   offset  jitter
==============================================================================
 LOCAL(0)        .LOCL.          10 l 155m   64    0    0.000    0.000   0.000
*10.xx.xxx.133   100.xx.xxx.3     3 u    6  256  377    4.189   -0.337   0.102
 169.254.0.79    .STEP.          16 u    - 1024    0    0.000    0.000   0.000
 169.254.0.80    .STEP.          16 u    - 1024    0    0.000    0.000   0.000
 169.254.0.81    .STEP.          16 u    - 1024    0    0.000    0.000   0.000
 169.254.0.82    .STEP.          16 u    - 1024    0    0.000    0.000   0.000
 169.254.0.83    .STEP.          16 u    - 1024    0    0.000    0.000   0.000
Reference
2022-08 FTP客户端指定端口连接
root@f0-13:~# ftp
ftp> open x.x.x.x 11111
Connected to x.x.x.x.
220 frank-server FTP server ready.
Name (x.x.x.x:root): xxx
331 Password required for xxx.
Password:
230 User xxx logged in, access restrictions apply.
Remote system type is UNIX.
Using binary mode to transfer files.
ftp> pas
Passive mode on.
2023-02 Limit user to execute selective commands
在多用户的主机中,尝尝会遇到限制不同用户使用root权限的场景,但有时这些账户为了执行某些root命令,又不得不把这些账号在sudoers文件中赋权,如下:
% sudo more /etc/sudoers
......
# root and users in group wheel can run anything on any machine as any user
root            ALL = (ALL) ALL
%admin          ALL = (ALL) ALL
xxx             ALL = (ALL) ALL
但这么做,此用户就有root权限了,那有什么方法可以限制这个用户只能使用某些命令呢?答案当然是可以的,sudoers远比我们想的强大,这里只关心自己的需求。在说明前,先说下这3列分别代表了什么:
- 第一列(xxx)代表了用户或者用户组;
- 第二列(ALL)代表了主机,这里基本都是用ALL表述;
- 第三列(ALL)切换到哪些用户或组的权限;
- 第四列(可选项)是否需要输入密码验证;
- 第五列(ALL)命令
知道了具体意思,那么就可以很容易实现需求了,比如限制xxx用户可以用root权限执行特定命令,并且不用输入xxx的密码验证,注意nopasswd只会让后面第一个命令不用密码验证,第二个命令仍然需要密码验证:
xxx ALL = (root) NOPASSWD: /usr/bin/more, /sbin/reboot也可以限制用户不能执行哪些命令,比如能用root进行more,但不能执行reboot:
xxx ALL = (root) NOPASSWD: /usr/bin/more, !/sbin/reboot2023-03 AB压力测试
最近为了测试需求,需要模拟正常业务发送TCP流量,选用了AB(Apache Bench)来进行测试,具体原理就是和被测设备进行建联,然后通过TCP传输报文,从而达到测试服务器性能的目的,比如下面是测试我自己网站的结果:
[root@localhost ~]# yum install -y httpd-tools[root@localhost ~]# ab -n 100 -c 10 https://www.zhaocs.info/
This is ApacheBench, Version 2.3 <$Revision: 1430300 $>
Copyright 1996 Adam Twiss, Zeus Technology Ltd, http://www.zeustech.net/
Licensed to The Apache Software Foundation, http://www.apache.org/
Benchmarking www.zhaocs.info (be patient).....done
Server Software: Apache/2.4.54
Server Hostname: www.zhaocs.info
Server Port: 80
Document Path: /
Document Length: 71061 bytes #压测中的页面总字节数,这个可以看下面
Concurrency Level: 10 #请求并发用户数是10
Time taken for tests: 29.854 seconds #压测时间,如果想指定压测时间,可以直接“-t xxx” seconds
Complete requests: 100 #总请求成功数量
Failed requests: 34 #总请求失败数量
(Connect: 0, Receive: 0, Length: 34, Exceptions: 0)
Write errors: 0
Total transferred: 7132199 bytes #请求总数据大小
HTML transferred: 7105899 bytes #上面减去了http header后的数据
Requests per second: 3.35 [#/sec] (mean) #平均每秒3个请求,衡量服务器吞吐量的重要参数
#如果发生重传,这个值会下降,计算公式:
#Complete requests/Time taken for tests = 100/29.854 = 3.35
Time per request: 2985.400 [ms] (mean)#用户平均请求等待时间,计算公式:
#Time token for tests/(Complete requests/Concurrency Level = 29.854/(100/10) = 29.854/10 = 2.9854s = 2985.4ms
Time per request: 298.540 [ms] (mean, across all concurrent requests)
#服务器平均处理时间,计算公式:
#Time taken for tests/Complete requests = 29.854/100 = 298.540ms,正好是吞吐量的倒数
Transfer rate: 233.30 [Kbytes/sec] received
#每秒获得数据的大小
Connection Times (ms)
min mean[+/-sd] median max
Connect: 0 90 66.3 132 157
Processing: 1476 2744 343.9 2687 3618
Waiting: 992 1954 303.2 1962 3143
Total: 1629 2834 360.3 2815 3630
#上面的TCP连接处理时间,都可以作为网路传输以及服务器处理能力的参考指标
#如果网络上有问题导致重传,那么min和max之间变化也会很大
Percentage of the requests served within a certain time (ms)
50% 2815
66% 2940
75% 3001
80% 3065
90% 3397
95% 3592
98% 3619
99% 3630
100% 3630 (longest request)
#上面这部分数据用于描述每个请求处理时间的分布情况
#比如以上测试,80%的请求处理时间都不超过3065ms
#这个例子中是正常状态,所以基本差不多,但如果重传发生,就会发一部分时间很短,一部分时间很长
#这个处理时间是指前面的Time per request,即对于单个用户而言,平均每个请求的处理时间关于为什么测试总字节数是71061 bytes,可以wget下验证,这个大小稍微有些偏差是正常的:
[root@localhost ~]# wget https://www.zhaocs.info/
--2023-04-20 13:17:09-- https://www.zhaocs.info/
Resolving www.zhaocs.info (www.zhaocs.info)... 104.243.22.186
Connecting to www.zhaocs.info (www.zhaocs.info)|104.243.22.186|:80... connected.
HTTP request sent, awaiting response... 200 OK
Length: unspecified [text/html]
Saving to: ‘index.html’
[ <=> ] 71,509 137KB/s in 0.5s
2023-04-20 13:17:10 (137 KB/s) - ‘index.html’ saved [71509]
[root@localhost ~]# ls -l index.html
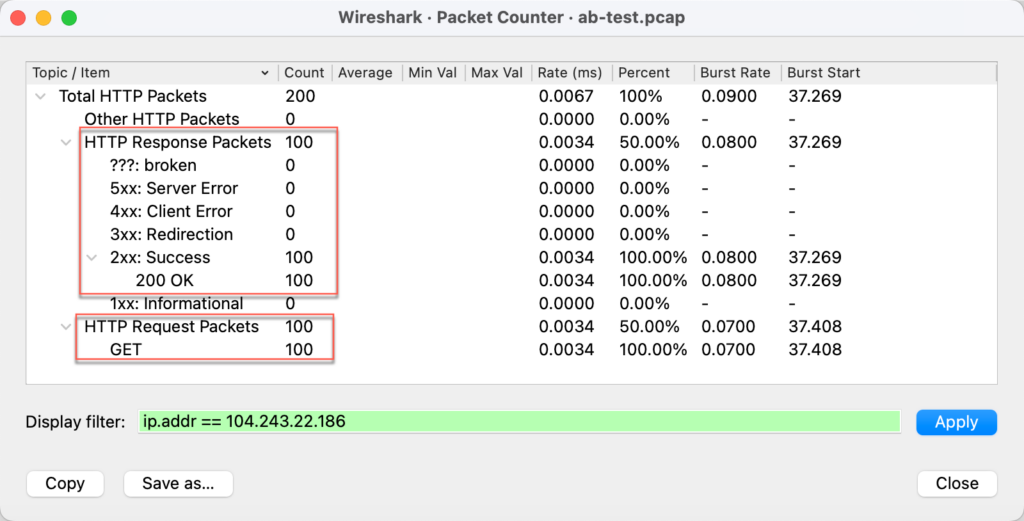
-rw-r--r--. 1 root root 71509 Apr 20 13:17 index.html下面是抓包统计,符合探测的结果:
2023-08 使用SAR监控CPU历史利用率
搬瓦工的KVM CPU高,怀疑他们的监控不准确,所以想看看Linux是否可以自动采集利用率,然后对其历史信息进行分析。不想在Linux上使用SNMP,经过查找后锁定了SAR这个工具。这个工具既可以查看实时数据,也可以查看历史数据(采集信息,统一归档,供分析),如下:
安装SAR
[root@frank ~]# yum install sysstat -y
[root@frank ~]# systemctl start sysstat
[root@frank ~]# systemctl enable sysstat
配置SAR
默认Sar 10分钟采集一次信息,并把信息存放到“/var/log/sa/saxx”这个二进制文件中,可以通过更改下面文件来改变采集周期,我已经改成5分钟了:
[root@frank ~]# more /etc/cron.d/sysstat
# Run system activity accounting tool every 5 minutes
*/5 * * * * root /usr/lib64/sa/sa1 1 1
# 0 * * * * root /usr/lib64/sa/sa1 600 6 &
# Generate a daily summary of process accounting at 23:53
53 23 * * * root /usr/lib64/sa/sa2 -A
查看SAR
只列几种常用的命令,具体可以通过-h查看更多option:
[root@frank ~]# sar -u  #这里的信息是从二进制文件中读取的
Linux 4.10.4-1.el7.elrepo.x86_64 (frank)        08/09/2023      _x86_64_        (1 CPU)

01:57:57 AM       LINUX RESTART

02:00:01 AM     CPU     %user     %nice   %system   %iowait    %steal     %idle
02:10:01 AM     all      1.34      0.00      0.50      0.25      0.00     97.91
Average:        all      1.34      0.00      0.50      0.25      0.00     97.91
[root@frank ~]# sar -f /var/log/sa/sa09 #通过sar读取二进制文件
Linux 4.10.4-1.el7.elrepo.x86_64 (frank) 08/09/2023 _x86_64_ (1 CPU)
01:57:57 AM LINUX RESTART
02:00:01 AM CPU %user %nice %system %iowait %steal %idle
02:10:01 AM all 1.34 0.00 0.50 0.25 0.00 97.91
Average: all 1.34 0.00 0.50 0.25 0.00 97.91注意,下面这部分网卡的信息也是从上面的二进制文件读出来,这个二进制文件就相当于一个简易数据库:
[root@frank ~]# sar -n EDEV |egrep 'eth0|IFACE'
02:00:01 AM     IFACE   rxerr/s   txerr/s    coll/s  rxdrop/s  txdrop/s  txcarr/s  rxfram/s  rxfifo/s  txfifo/s
02:10:01 AM      eth0      0.00      0.00      0.00      0.00      0.00      0.00      0.00      0.00      0.00
Average:         eth0      0.00      0.00      0.00      0.00      0.00      0.00      0.00      0.00      0.00
02:15:01 AM     IFACE   rxerr/s   txerr/s    coll/s  rxdrop/s  txdrop/s  txcarr/s  rxfram/s  rxfifo/s  txfifo/s
02:20:02 AM      eth0      0.00      0.00      0.00      0.00      0.00      0.00      0.00      0.00      0.00
02:25:01 AM      eth0      0.00      0.00      0.00      0.00      0.00      0.00      0.00      0.00      0.00
02:30:01 AM      eth0      0.00      0.00      0.00      0.00      0.00      0.00      0.00      0.00      0.00
02:35:01 AM      eth0      0.00      0.00      0.00      0.00      0.00      0.00      0.00      0.00      0.00
比如读取二进制文件:
[root@frank ~]# sar -n DEV -f /var/log/sa/sa09 |egrep 'eth0|IFACE'
02:00:01 AM     IFACE   rxpck/s   txpck/s    rxkB/s    txkB/s   rxcmp/s   txcmp/s  rxmcst/s
02:10:01 AM      eth0      2.83      2.89      0.33      3.86      0.00      0.00      0.00
Average:         eth0      2.83      2.89      0.33      3.86      0.00      0.00      0.00
02:15:01 AM     IFACE   rxpck/s   txpck/s    rxkB/s    txkB/s   rxcmp/s   txcmp/s  rxmcst/s
02:20:02 AM      eth0      1.62      1.32      0.19      0.40      0.00      0.00      0.00
02:25:01 AM      eth0      1.98      2.06      0.30      2.28      0.00      0.00      0.00
02:30:01 AM      eth0      1.07      1.01      0.12      0.52      0.00      0.00      0.00
[root@frank ~]# sar -h
Usage: sar [ options ] [ <interval> [ <count> ] ]
Main options and reports:
-b I/O and transfer rate statistics
-B Paging statistics
-d Block device statistics
-F [ MOUNT ]
Filesystems statistics
-H Hugepages utilization statistics
-I { <int> | SUM | ALL | XALL }
Interrupts statistics
-m { <keyword> [,...] | ALL }
Power management statistics
Keywords are:
CPU CPU instantaneous clock frequency
FAN Fans speed
FREQ CPU average clock frequency
IN Voltage inputs
TEMP Devices temperature
USB USB devices plugged into the system
-n { <keyword> [,...] | ALL }
Network statistics
Keywords are:
DEV Network interfaces
EDEV Network interfaces (errors)
NFS NFS client
NFSD NFS server
SOCK Sockets (v4)
IP IP traffic (v4)
EIP IP traffic (v4) (errors)
ICMP ICMP traffic (v4)
EICMP ICMP traffic (v4) (errors)
TCP TCP traffic (v4)
ETCP TCP traffic (v4) (errors)
UDP UDP traffic (v4)
SOCK6 Sockets (v6)
IP6 IP traffic (v6)
EIP6 IP traffic (v6) (errors)
ICMP6 ICMP traffic (v6)
EICMP6 ICMP traffic (v6) (errors)
UDP6 UDP traffic (v6)
-q Queue length and load average statistics
-r Memory utilization statistics
-R Memory statistics
-S Swap space utilization statistics
-u [ ALL ]
CPU utilization statistics
-v Kernel table statistics
-w Task creation and system switching statistics
-W Swapping statistics
-y TTY device statistics2023-09 统一CentOS的时区和时间
上面我有整理NTP客户端的使用,这里说下Linux系统中时间的同步。之所以整理这块,是因为我遇到使用crontab执行脚本时,发现其中记录的时间跟系统直接执行脚本的时间差了12小时。经过排查后,是由于我使用tzselect选择时区后,又在/etc/profile中增加了TZ=’Asia/Shanghai’; export TZ,虽然date、hwclock都被改成了CST时间,但是/etc/localtime 仍然是美国时间,导致一些程序使用了此文件。因此不建议使用tzselect选择时区,而是使用timedatectl选择时区:
没修改前:
[root@frank ~]# date
Mon Sep  4 23:40:42 EDT 2023
[root@frank ~]# hwclock --show
Mon 04 Sep 2023 11:40:49 PM EDT  -0.710753 seconds
[root@frank ~]# timedatectl
      Local time: Mon 2023-09-04 23:41:06 EDT
  Universal time: Tue 2023-09-05 03:41:06 UTC
        RTC time: Tue 2023-09-05 03:41:06
       Time zone: America/New_York (EDT, -0400)
     NTP enabled: yes
NTP synchronized: yes
 RTC in local TZ: no
      DST active: yes
修改时区(这个命令会自动替换/etc/localtime):
[root@frank ~]# timedatectl set-timezone Asia/Shanghai同步时间(如果需要):
[root@frank ~]# timedatectl set-time "2025-01-07 10:19:00"再次查看时间:
[root@frank ~]# date
Tue Sep  5 11:46:15 CST 2023
[root@frank ~]# hwclock --show
Tue 05 Sep 2023 11:46:21 AM CST  -0.375053 seconds
[root@frank ~]# timedatectl
      Local time: Tue 2023-09-05 11:46:50 CST
  Universal time: Tue 2023-09-05 03:46:50 UTC
        RTC time: Tue 2023-09-05 03:46:49
       Time zone: Asia/Shanghai (CST, +0800)
     NTP enabled: yes
NTP synchronized: yes
 RTC in local TZ: no
      DST active: n/a
2024-01 重装APT
在解决软件冲突时,不小心把APT删掉了,导致什么都安不了😂 最后只能重新安装APT,还好不是无解,具体步骤如下:
为了避免冲突,先删除下面包:
sudo dpkg -r apt-transport-https下载3个包,可以从国内源中下载,不过注意版本必须符合你的ubuntu版本,否则会有更多兼容性问题
# cat /etc/lsb-release
DISTRIB_ID=Ubuntu
DISTRIB_RELEASE=20.04
DISTRIB_CODENAME=focal
DISTRIB_DESCRIPTION="Ubuntu 20.04.4 LTS"

# wget https://mirrors.ustc.edu.cn/ubuntu/pool/main/a/apt/apt_2.0.10_amd64.deb
# wget https://mirrors.ustc.edu.cn/ubuntu/pool/main/a/apt/libapt-pkg6.0_2.0.10_amd64.deb
# wget https://mirrors.ustc.edu.cn/ubuntu/pool/main/u/ubuntu-keyring/ubuntu-keyring_2020.02.11.4_all.deb
安装完后更新下即可,dpkg -l可以查看已安装的软件版本和信息:
# dpkg -l |grep apt
# dpkg -i ubuntu-keyring_2020.02.11.4_all.deb
# dpkg -i libapt-pkg6.0_2.0.10_amd64.deb
# dpkg -i apt_2.0.10_amd64.deb
# apt update
# apt upgrade
2025-10 端口诊断命令
IP link show xxx
端口故障经常会遇到,如何快速有效的确认端口是否插线,可以用下面命令进行排查:
root@sonic:/home/admin# ip link show Ethernet13
104: Ethernet13: <NO-CARRIER,BROADCAST,MULTICAST,UP> mtu 9000 qdisc fq_codel state DOWN mode DEFAULT group default qlen 1000
    link/ether 00:90:fb:7f:e1:2c brd ff:ff:ff:ff:ff:ff
Networkctl status xxx
此命令输出的信息会更详细
root@tme91:/home/tmelab# networkctl status ens3np0
● 4: ens3np0
             Link File: /usr/lib/systemd/network/99-default.link
          Network File: /run/systemd/network/10-netplan-ens3np0.network
                  Type: ether
                 State: routable (configured)
                  Path: pci-0000:27:00.0
                Driver: mlx5_core
                Vendor: Mellanox Technologies
                 Model: MT2910 Family [ConnectX-7]
            HW Address: 58:a2:e1:xx:xx:xx
                   MTU: 4200 (min: 68, max: 9978)
  Queue Length (Tx/Rx): 768/63
      Auto negotiation: yes
                 Speed: 400Gbps
                Duplex: full
               Address: 192.168.100.1
                        fe80::5aa2:e1ff:fe06:3014
     Activation Policy: up
   Required For Online: yes
          Connected To: sonic on port Ethernet27 (Ethernet27)

Sep 12 10:14:25 tme91 systemd-networkd[2372]: ens3np0: Lost carrier
Sep 12 10:14:39 tme91 systemd-networkd[2372]: ens3np0: Gained carrier
Ethtool
此命令很强大,之前一直用,为了方便,也列在这里方便后面review
root@tme91:/home/tmelab# ethtool ens3np0
Settings for ens3np0:
        Supported ports: [ Backplane ]
        Supported link modes:   1000baseT/Full
                                ......
                                200000baseCR4/Full
        Supported pause frame use: Symmetric
        Supports auto-negotiation: Yes
        Supported FEC modes: None BaseR RS
        Advertised link modes:  Not reported
        Advertised pause frame use: No
        Advertised auto-negotiation: Yes
        Advertised FEC modes: RS
        Speed: 400000Mb/s
        Duplex: Full
        Port: Direct Attach Copper
        PHYAD: 0
        Transceiver: internal
        Auto-negotiation: on
        Supports Wake-on: d
        Wake-on: d
        Current message level: 0x00000004 (4)
                               link
        Link detected: yes
Ethtool命令可以show很多信息,可以用下面命令快速过滤错误告警:
# ethtool -S ens3 | grep -iE "miss|err|dis" | awk -F ':' 'NF < 2 || $2 != 0'
     rx_steer_missed_packets: 372458
     rx_discards_phy: 129182405     #fec纠后counter,这个就异常了
     rx_err_lane_0_phy: 3855489327   #fec纠前counter
     rx_err_lane_1_phy: 359223058
     rx_prio0_discards: 129182405
Mellonaox 网卡描述,PN,端口类型和Lane数量
1. 网卡类型
大部分网卡都有专属命令,比如nvidia的cx7,可以用 mlxconfig -d /dev/mst/mt4129_pciconf0 q |grep Des 查看端口的描述:
root@tme91:/home/tmelab# mst start  #必须开启,否则读不到mst对应的dev
root@tme91:/home/tmelab# mst status -v
MST modules:
------------
    MST PCI module is not loaded
    MST PCI configuration module loaded
PCI devices:
------------
DEVICE_TYPE             MST                           PCI       RDMA            NET                                     NUMA
ConnectX7(rev:0)        /dev/mst/mt4129_pciconf1      98:00.0   mlx5_1          net-ens6np0                             1

ConnectX7(rev:0)        /dev/mst/mt4129_pciconf0      27:00.0   mlx5_0          net-ens3np0                             0

root@tme91:/home/tmelab# mlxconfig -d /dev/mst/mt4129_pciconf0 q |grep Des
Description:        NVIDIA ConnectX-7 HHHL Adapter card; 400GbE / NDR IB (default mode); Single-port OSFP; PCIe 5.0 x16; Crypto Disabled; Secure Boot Enabled;
2. 网卡PN
# lspci |grep Mellanox
27:00.0 Ethernet controller: Mellanox Technologies MT2910 Family [ConnectX-7]
98:00.0 Ethernet controller: Mellanox Technologies MT2910 Family [ConnectX-7]

# lspci -vvvns 27:00.0 | grep -i PN
[PN] Part number: MCX75310AAS-NEAT 去官网查找下这个PN:https://docs.nvidia.com/networking/display/connectx7vpi/specifications
3. 端口类型和Lane数量
可以通过下面命令查看端口支持的端口类型,以及几个serdes lane:
root@tme91:/home/tmelab# mlxlink -d mlx5_0

Operational Info
----------------
State                              : Active
Physical state                     : ETH_AN_FSM_ENABLE
Speed                              : 400G
Width                              : 4x
FEC                                : Standard_RS-FEC - (544,514)
Loopback Mode                      : No Loopback
Auto Negotiation                   : ON

Supported Info
--------------
Enabled Link Speed (Ext.)          : 0x00013ff2 (400G_4X,200G_2X,200G_4X,100G_1X,100G_2X,100G_4X,50G_1X,50G_2X,40G,25G,10G,1G)
Supported Cable Speed (Ext.)       : 0x00013ffe (400G_4X,200G_2X,200G_4X,100G_1X,100G_2X,100G_4X,50G_1X,50G_2X,40G,25G,10G,5G,2.5G,1G)

Troubleshooting Info
--------------------
Status Opcode                      : 0
Group Opcode                       : N/A
Recommendation                     : No issue was observed

Tool Information
----------------
Firmware Version                   : 28.39.3560
amBER Version                      : 2.22
MFT Version                        : mft 4.26.1-6
2025-12 Ubuntu 24.04 RDP
有时候为了方便,会装一个桌面版本的ubuntu,管理通过rdp过去操作。但发现ubuntu 24.04自带的功能+GNOME用起来太费劲,各种问题,所以直接用xrdp + xfce替代(安装时注意选择lightdm),确实简单好用!操作如下,操作完建议重启,在尝试rdp:
sudo apt update
sudo apt install -y xfce4 xfce4-goodies xfce4-session dbus-x11
echo "exec startxfce4" > ~/.xsession
sudo systemctl restart xrdp xrdp-sesman
sudo systemctl disable gdm3
sudo systemctl stop gdm3
sudo systemctl enable lightdm
sudo systemctl restart lightdm
sudo reboot

cat /etc/X11/default-display-manager  #不能是gdm3
journalctl -u xrdp -n 30    #排障查看
journalctl -u xrdp-sesman --since "11:28:00" --until "11:35:00"  #排障查看
2026-01 Ubuntu Excel编辑查看
# Ubuntu/Debian
sudo apt install visidata
# 或者通过 Python 安装(版本更新)
pip3 install visidata openpyxl
vd filename.xlsx打开文件- 按下
Enter进入选定的工作表(Sheet) - 移动到某个单元格,按
e即可编辑内容,输入完按回车 - 按
Ctrl + s保存修改,按q退出