TRex Advance stateful mode Example
16 8 月, 2021,由 frank撰写
详细内容可以查阅:TRex Advance stateful support
在之前的文章中,介绍过Trex Stateless Mode的简单使用方法,在这里介绍下ASTF模式是如何工作的,并且如何统计信息的;另外在这个例子中,主要是通过变更PCAP报文中的原和目的地址,并以Server/Client方式发送流量并统计;
Topology
Trex-Server1 (100.0.0.1)------ (100.0.0.2)Router1 ---- network ----- Router2(100.1.1.2) ------ (100.1.1.1)Trex-Server2Trex-Server1 Config
Trex 配置文件
[root@trex-161 v2.87]# more /etc/trex_cfg.yaml
     - port_limit    : 2
       version       : 2
       interfaces    : ["00:04.0", "dummy"]

       port_info       :
            - default_gw : 100.0.0.2
              ip         : 100.0.0.1
            - default_gw : 100.1.1.2
              ip         : 100.1.1.1
python文件
[root@trex-161 v2.87]# more astf/http_simple_port_tunable.py
from trex.astf.api import *


class Prof1():
    def __init__(self):
        pass

    def create_profile(self,port):
        # ip generator
        ip_gen_c = ASTFIPGenDist(ip_range=["1.0.0.0", "1.0.0.255"], distribution="seq")
        ip_gen_s = ASTFIPGenDist(ip_range=["211.0.0.0", "211.0.0.255"], distribution="seq")
        ip_gen = ASTFIPGen(glob=ASTFIPGenGlobal(ip_offset="1.0.0.0"),
                           dist_client=ip_gen_c,
                           dist_server=ip_gen_s)

        return ASTFProfile(default_ip_gen=ip_gen,
                            cap_list=[ASTFCapInfo(file="../avl/delay_10_http_browsing_0.pcap",
                            cps=2.776,
                            port=port)])

    def get_profile(self, **kwargs):
        port= kwargs.get('port',80)
        return self.create_profile(port)

def register():
    return Prof1()
Trex-Server2 Config
Trex 配置文件
[root@trex-162 v2.87]# more /etc/trex_cfg.yaml
     - port_limit    : 2
       version       : 2
       interfaces    : ["00:04.0", "dummy"]

       port_info       :
            - default_gw : 100.0.0.2
              ip         : 100.0.0.1
            - default_gw : 100.1.1.2
              ip         : 100.1.1.1
python文件
[root@trex-162 v2.87]# more astf/http_simple_port_tunable.py
from trex.astf.api import *


class Prof1():
    def __init__(self):
        pass

    def create_profile(self,port):
        # ip generator
        ip_gen_c = ASTFIPGenDist(ip_range=["211.0.0.0", "211.0.0.255"], distribution="seq")
        ip_gen_s = ASTFIPGenDist(ip_range=["1.0.0.0", "1.0.0.255"], distribution="seq")
        ip_gen = ASTFIPGen(glob=ASTFIPGenGlobal(ip_offset="1.0.0.0"),
                           dist_client=ip_gen_c,
                           dist_server=ip_gen_s)

        return ASTFProfile(default_ip_gen=ip_gen,
                            cap_list=[ASTFCapInfo(file="../avl/delay_10_http_browsing_0.pcap",
                            cps=2.776,
                            port=port)])

    def get_profile(self, **kwargs):
        port= kwargs.get('port',80)
        return self.create_profile(port)

def register():
    return Prof1()
在Server/Client上启动Trex
[root@trex-161 v2.87]# ./t-rex-64 -i --astf[root@trex-162 v2.87]# ./t-rex-64 -i --astf在Server/Client上开启双向流量
进入Trex Console中,可以在这里控制打流,停流,更新流,以及查看报文收发信息等;注意需要先在Server测start 流量,此时流量不会立即发送,直到在Client测start流量后,两边才开始发送流量并统计,但反过来则会立即发送单向流量,所以这点需要注意;
[root@trex-161 v2.87]# ./trex-console

Using 'python' as Python interpeter


Connecting to RPC server on localhost:4501                   [SUCCESS]


Connecting to publisher server on localhost:4500             [SUCCESS]


Acquiring ports [0]:                                         [SUCCESS]


Server Info:

Server version:   v2.87 @ ASTF
Server mode:      Advanced Stateful
Server CPU:       1 x QEMU Virtual CPU version 2.5+
Ports count:      1 x 10Gbps @ Virtio network device

-=TRex Console v3.0=-

Type 'help' or '?' for supported actions

trex>ping -p 0 -d 100.0.0.2

Pinging 100.0.0.2 from port 0 with 64 bytes of data:
Reply from 100.0.0.2: bytes=64, time=52.90ms, TTL=255
Reply from 100.0.0.2: bytes=64, time=3.88ms, TTL=255
Reply from 100.0.0.2: bytes=64, time=4.65ms, TTL=255
Reply from 100.0.0.2: bytes=64, time=4.40ms, TTL=255
Reply from 100.0.0.2: bytes=64, time=2.97ms, TTL=255
trex>
trex>start -h
usage: start [-h] -f FILE [-m MULT] [-d TIME] [-t T1=VAL[,T2=VAL ...]] [--nc]
             [-l LATENCY_PPS] [--ipv6] [--clients CLIENTS [CLIENTS ...] |
             --servers-only] [--pid PROFILE]

Start traffic command

optional arguments:
  -h, --help            show this help message and exit
  -f FILE               File path to use
  -m MULT               Sent traffic numeric multiplier
  -d TIME               Set duration time for job.
  -t T1=VAL[,T2=VAL ...]
                        Sets tunables for a profile. Example: '-t
                        fsize=100,pg_id=7'
  --nc                  Faster flow termination at the end of the test, see
                        --nc in the manual
  -l LATENCY_PPS        start latency streams
  --ipv6                Convert traffic to IPv6
  --clients CLIENTS [CLIENTS ...]
                        Only those client interfaces will send traffic.
  --servers-only        All client interfaces will be disabled.
  --pid PROFILE         A list of profiles on which to apply the command.
                        Default profile id is "_" when not specified.

trex>
trex>start -f astf/http_simple_port_tunable.py -m 1000 -d 1000 --servers-only

Loading traffic at acquired ports.                           [SUCCESS]


Starting traffic.                                            [SUCCESS]

31.82 [ms]
[root@trex-162 v2.87]# ./trex-console
Using 'python' as Python interpeter
Connecting to RPC server on localhost:4501 [SUCCESS]
Connecting to publisher server on localhost:4500 [SUCCESS]
Acquiring ports [0]: [SUCCESS]
*** Warning - Port 0 destination is unresolved ***
Server Info:
Server version: v2.87 @ ASTF
Server mode: Advanced Stateful
Server CPU: 1 x QEMU Virtual CPU version 2.5+
Ports count: 1 x 10Gbps @ Virtio network device
-=TRex Console v3.0=-
Type 'help' or '?' for supported actions
trex>
trex>start -f astf/http_simple_port_tunable.py -m 1000 -d 1000 --clients 0
Loading traffic at acquired ports. [SUCCESS]
Starting traffic. [SUCCESS]
43.10 [ms]在Console中通过“TUI”查看流量
下面是Server测输出,主要以Server信息为主,在这个界面下,按“ESC”可以调出控制版面,并根据需求选择输出信息;在不退出TUI的情况下,也可以对流量进行控制,并实时观察流量的变化;
Global Statistitcs

connection   : localhost, Port 4501                       total_tx_L2  : 85.09 Kbps
version      : ASTF @ v2.87                               total_tx_L1  : 114.43 Kbps
cpu_util.    : 0.49% @ 1 cores (1 per dual port)          total_rx     : 114.55 Kbps
rx_cpu_util. : 0.0% / 0 pps                               total_pps    : 183.38 pps
async_util.  : 0.07% / 9.95 Kbps                          drop_rate    : 0 bps
total_cps.   : 0 cps                                      queue_full   : 0 pkts

Port Statistics

   port    |         0
-----------+------------------
owner      |              root
link       |                UP
state      |      TRANSMITTING
speed      |           10 Gb/s
CPU util.  |             0.49%
--         |
Tx bps L2  |        85.09 Kbps
Tx bps L1  |       114.43 Kbps
Tx pps     |        183.38 pps
Line Util. |               0 %
---        |
Rx bps     |       114.55 Kbps
Rx pps     |        183.51 pps
----       |
opackets   |             16646
ipackets   |             16662
obytes     |            965518
ibytes     |           1300162
tx-pkts    |       16.65 Kpkts
rx-pkts    |       16.66 Kpkts
tx-bytes   |         965.52 KB
rx-bytes   |            1.3 MB
-----      |
oerrors    |                 0
ierrors    |                 0

status:  /

browse:     'ESC' - console, 'q' - quit, 'd' - dashboard, 'u' - util, 't' - astf, 'l' - latency,
dashboard:  'n' - reset view, 'o' - owned ports, 'a' - all ports, 'c' - clear,
下面是按了“ESC”后输出的信息
status:  -

browse:     'ESC' - console, 'q' - quit, 'd' - dashboard, 'u' - util, 't' - astf, 'l' - latency,
dashboard: 'n' - reset view, 'o' - owned ports, 'a' - all ports, 'c' - clear, 下面是Client测,注意里面的drop需要被忽略掉,主要是因为在Server/Client模式使用了双向流量,详细可以看这个帖子;
Global Statistitcs

connection   : localhost, Port 4501                       total_tx_L2  : 6.94 Mbps
version      : ASTF @ v2.87                               total_tx_L1  : 8.72 Mbps
cpu_util.    : 3.6% @ 1 cores (1 per dual port)           total_rx     : 364.75 bps
rx_cpu_util. : 0.0% / 0 pps                               total_pps    : 11.12 Kpps
async_util.  : 0.08% / 10.02 Kbps                         drop_rate    : 6.94 Mbps
total_cps.   : 2.78 Kcps                                  queue_full   : 0 pkts

Port Statistics

   port    |         0
-----------+------------------
owner      |              root
link       |                UP
state      |      TRANSMITTING
speed      |           10 Gb/s
CPU util.  |              3.6%
--         |
Tx bps L2  |         6.94 Mbps
Tx bps L1  |         8.72 Mbps
Tx pps     |        11.12 Kpps
Line Util. |            0.09 %
---        |
Rx bps     |        364.75 bps
Rx pps     |          0.99 pps
----       |
opackets   |           1390674
ipackets   |               127
obytes     |         108472572
ibytes     |              5842
tx-pkts    |        1.39 Mpkts
rx-pkts    |          127 pkts
tx-bytes   |         108.47 MB
rx-bytes   |           5.84 KB
-----      |
oerrors    |                 0
ierrors    |                 0

status:  -

Press 'ESC' for navigation panel...
status:
验证报文信息
原始PCAP报文
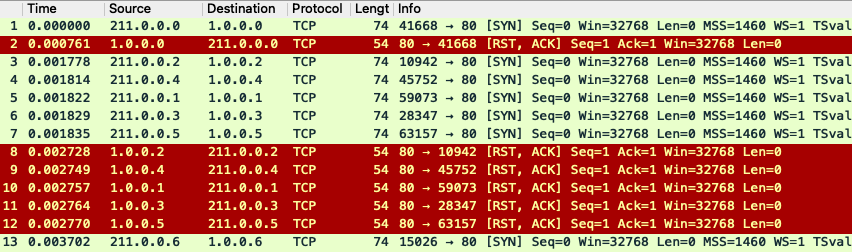
“delay_10_http_browsing_0.pcap”这个报文可以在Trex的“avl”目录中找到,如下是报文截图:

下面是通过trex打出来的报文截图,报文是在Router1面向Trex Server的端口抓的:
版权声明:
本文链接:TRex Advance stateful mode Example
版权声明:本文为原创文章,仅代表个人观点,版权归 Frank Zhao 所有,转载时请注明本文出处及文章链接
Hi Frank. 能請教你關於trex的問題嗎,我的公司想利用此軟體測試低階switch的throughput ,遇到了一個小問題是switch的interface是5port 我利用虛擬port去滿足偶數時,他會有drop rate是正常的嗎
正常5个port直接蛇形,只需连2个port就可以把流量打起来了,你说的虚拟port满足偶数是什么意思?此时哪端有drop?多大流量时有drop?
Hi Frank,查看了你ASTF模式打流的数据包,看到都只有client端SYN和server端RESET的报文,看起来TREX并没有后端服务让TCP建联起来,这种ASTF打流模式和stateless模式对于被测试的链路或者设备来说,有什么区别吗?如果我两段各构造SYN包和RESET包是不是也能实现这种流量呢?
好问题呀,事实上在ASTF模式下,TRex会根据profile/pcap 生成连接模板,只是在TRex自己的用户态内,我之前的测试估计哪里有问题了,有时间我重新操作下再回复你