For detail info, please refer to following Akshat’s article, for my article only simply summary step to build openr on ncs5500. Thanks Akshat’s help for the openr set up 🙂
[root@nso ~]# nano /etc/yum.repos.d/docker.repo
[root@nso ~]# yum install docker-engine
[root@nso ~]# systemctl start docker
[root@nso ~]# docker run -d -p 5000:5000 --restart=always --name registry registry:2
[root@nso ~]# docker pull akshshar/openr-xr
[root@nso ~]# docker ps -a
CONTAINER ID        IMAGE               COMMAND                  CREATED             STATUS              PORTS                    NAMES
c4636568f48a        registry:2          "/entrypoint.sh /e..."   6 minutes ago       Up 6 minutes        0.0.0.0:5000->5000/tcp   registry

[root@nso ~]# docker images
REPOSITORY          TAG                 IMAGE ID            CREATED             SIZE
registry            2                   f32a97de94e1        13 days ago         25.8MB
akshshar/openr-xr   latest              b51c260b060e        2 months ago        1.76GB

[root@nso ~]# docker tag akshshar/openr-xr 10.75.58.72:5000/openr-xr
[root@nso ~]# docker images
REPOSITORY                  TAG                 IMAGE ID            CREATED             SIZE
registry                    2                   f32a97de94e1        13 days ago         25.8MB
akshshar/openr-xr           latest              b51c260b060e        2 months ago        1.76GB
10.75.58.72:5000/openr-xr   latest              b51c260b060e        2 months ago        1.76GB
[root@nso ~]# docker push 10.75.58.72:5000/openr-xr
The push refers to a repository [10.75.58.72:5000/openr-xr]
Get https://10.75.58.72:5000/v1/_ping: http: server gave HTTP response to HTTPS client
[root@nso ~]#
2. Add follow at “/etc/sysconfig/docker”
After changing the docker opts, please wait some seconds, docker will auto restart.
Now more customer complains their Peering network not flexible and hard to control, that will cause peering link’s utilization not balance and waste of resources. As follow the example on Router-2, customer peering device connect to multi ISP, each ISP sends full internet route, select only based on the BGP. BGP select rule only based on the route but not real traffics, that may be cause port-A’s traffics have 8G, but port-B and port-C only have 4G, if want to adjust BGP select, only change RPL that more complex, and due to route from internet and multi ISP, so route maybe change at some time, in order to balance peering link, customer must continue to adjust their RPL.
Could we have more flexible and simplest way to resolve the issue? The answer is Yes 🙂 we can achieve the task by Segment Routing – Egress Peer Engineering. Now some customer had deployed the solution, that combine NetFlow, Openbmp to check AS/traffics of prefix, then send BGP LU(EPE label) to ingress node, and easy to control traffics.
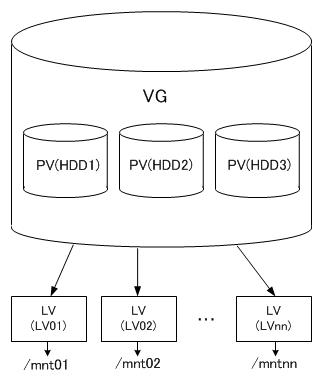
After install Centos7, found disk size less, so I need resize the disk, you can use some tools to achieve the function, e.g: GParted or disk-genius. But if your Server disk format is LVM, you can easy to manual adjust that. I don’t know how to resize LVM by Gparted or disk-genius. For this article, will discuss how to adjust Centos7/Ubuntu14.04 by LVM. That should same action/command in Centos and Ubuntu.
LV only know how mapping to VG, not care PV; And VG build up by PV, so you can easy to extended PV to increased VG’s disk.
Check VG info that is collection by PV
[root@frank ~]# vgdisplay
  --- Volume group ---
  VG Name               myvg
  System ID
  Format                lvm2
  Metadata Areas        1
  Metadata Sequence No  3
  VG Access             read/write
  VG Status             resizable
  MAX LV                0
  Cur LV                2
  Open LV               2
  Max PV                0
  Cur PV                1
  Act PV                1
  VG Size               7.52 GiB
  PE Size               4.00 MiB
  Total PE              1925
  Alloc PE / Size       1925 / 7.52 GiB
  Free  PE / Size       0 / 0   <<<
  VG UUID               0kMilm-TbT5-gs60-Vfl5-3obp-WybF-1BMwXA
Check PV that is virtual physical disk
[root@frank ~]# pvdisplay
  --- Physical volume ---
  PV Name               /dev/sda2
  VG Name               myvg
  PV Size               7.52 GiB / not usable 4.00 MiB
  Allocatable           yes (but full)
  PE Size               4.00 MiB
  Total PE              1925  <<<
  Free PE               0
  Allocated PE          1925  <<<
  PV UUID               whbkik-T1Ke-fLlF-ZBph-3pcd-loYG-yRweel
Check LV that is Partition in virtual disk
[root@frank ~]# lvdisplay
  --- Logical volume ---
  LV Path                /dev/myvg/root
  LV Name                root
  VG Name                myvg
  LV UUID                K15Fr3-QNP3-a17k-IhNU-8qIV-LQAZ-iJ9bgV
  LV Write Access        read/write
  LV Creation host, time localhost, 2014-09-23 14:38:07 +0800
  LV Status              available
  # open                 1
  LV Size                6.84 GiB
  Current LE             1750
  Segments               1
  Allocation             inherit
  Read ahead sectors     auto
  - currently set to     256
  Block device           253:0

  --- Logical volume ---
  LV Path                /dev/myvg/home
  LV Name                home
  VG Name                myvg
  LV UUID                4nCfU9-5T2S-eKve-hMnc-Ao2l-So1o-lQwlU5
  LV Write Access        read/write
  LV Creation host, time localhost, 2014-09-23 14:38:11 +0800
  LV Status              available
  # open                 1
  LV Size                700.00 MiB
  Current LE             175
  Segments               1
  Allocation             inherit
  Read ahead sectors     auto
  - currently set to     256
  Block device           253:1
Set up a new LVM
[root@frank ~]# fdisk /dev/sda
Welcome to fdisk (util-linux 2.23.2).

Changes will remain in memory only, until you decide to write them.
Be careful before using the write command.
Command (m for help): p

Disk /dev/sda: 53.7 GB, 53687091200 bytes, 104857600 sectors
Units = sectors of 1 * 512 = 512 bytes
Sector size (logical/physical): 512 bytes / 512 bytes
I/O size (minimum/optimal): 512 bytes / 512 bytes
Disk label type: dos
Disk identifier: 0x000a7fd0

   Device Boot      Start         End      Blocks   Id  System
/dev/sda1   *        2048     1026047      512000   83  Linux
/dev/sda2         1026048    16803839     7888896   8e  Linux LVM
/dev/sda3        16803840    20899839     2048000   82  Linux swap / Solaris

Command (m for help): n
Partition type:
   p   primary (3 primary, 0 extended, 1 free)
   e   extended
Select (default e):
Using default response e
Selected partition 4
First sector (20899840-104857599, default 20899840):
Using default value 20899840
Last sector, +sectors or +size{K,M,G} (20899840-104857599, default 104857599):
Using default value 104857599
Partition 4 of type Extended and of size 40 GiB is set

Command (m for help): p

Disk /dev/sda: 53.7 GB, 53687091200 bytes, 104857600 sectors
Units = sectors of 1 * 512 = 512 bytes
Sector size (logical/physical): 512 bytes / 512 bytes
I/O size (minimum/optimal): 512 bytes / 512 bytes
Disk label type: dos
Disk identifier: 0x000a7fd0

   Device Boot      Start         End      Blocks   Id  System
/dev/sda1   *        2048     1026047      512000   83  Linux
/dev/sda2         1026048    16803839     7888896   8e  Linux LVM
/dev/sda3        16803840    20899839     2048000   82  Linux swap / Solaris
/dev/sda4        20899840   104857599    41978880    5  Extended

Command (m for help): n
All primary partitions are in use
Adding logical partition 5
First sector (20901888-104857599, default 20901888):
Using default value 20901888
Last sector, +sectors or +size{K,M,G} (20901888-104857599, default 104857599): +7G
Partition 5 of type Linux and of size 7 GiB is set

Command (m for help):
Command (m for help): p

Disk /dev/sda: 53.7 GB, 53687091200 bytes, 104857600 sectors
Units = sectors of 1 * 512 = 512 bytes
Sector size (logical/physical): 512 bytes / 512 bytes
I/O size (minimum/optimal): 512 bytes / 512 bytes
Disk label type: dos
Disk identifier: 0x000a7fd0

   Device Boot      Start         End      Blocks   Id  System
/dev/sda1   *        2048     1026047      512000   83  Linux
/dev/sda2         1026048    16803839     7888896   8e  Linux LVM
/dev/sda3        16803840    20899839     2048000   82  Linux swap / Solaris
/dev/sda4        20899840   104857599    41978880    5  Extended
/dev/sda5        20901888    35581951     7340032   83  Linux

Command (m for help): t
Partition number (1-5, default 5):
Hex code (type L to list all codes): 8e
Changed type of partition 'Linux' to 'Linux LVM'

Command (m for help): w
The partition table has been altered!

Calling ioctl() to re-read partition table.

WARNING: Re-reading the partition table failed with error 16: Device or resource busy.
The kernel still uses the old table. The new table will be used at
the next reboot or after you run partprobe(8) or kpartx(8)
Syncing disks.

[root@frank ~]# partx -a /dev/sda
partx: /dev/sda: error adding partitions 1-3

[root@frank ~]# ll /dev/sda*
brw-rw---- 1 root disk 8, 0 Sep 24 22:12 /dev/sda
brw-rw---- 1 root disk 8, 1 Sep 24 17:43 /dev/sda1
brw-rw---- 1 root disk 8, 2 Sep 24 17:43 /dev/sda2
brw-rw---- 1 root disk 8, 3 Sep 24 17:43 /dev/sda3
brw-rw---- 1 root disk 8, 4 Sep 24 22:13 /dev/sda4
brw-rw---- 1 root disk 8, 5 Sep 24 22:13 /dev/sda5

[root@frank ~]# pvcreate /dev/sda5
  Physical volume "/dev/sda5" successfully created
[root@frank ~]# pvdisplay
  --- Physical volume ---
  PV Name               /dev/sda2
  VG Name               myvg
  PV Size               7.52 GiB / not usable 4.00 MiB
  Allocatable           yes (but full)
  PE Size               4.00 MiB
  Total PE              1925
  Free PE               0
  Allocated PE          1925
  PV UUID               whbkik-T1Ke-fLlF-ZBph-3pcd-loYG-yRweel

  "/dev/sda5" is a new physical volume of "7.00 GiB"
  --- NEW Physical volume ---
  PV Name               /dev/sda5
  VG Name                          <<< no config VG, so empty
  PV Size               7.00 GiB
  Allocatable           NO
  PE Size               0
  Total PE              0
  Free PE               0
  Allocated PE          0
  PV UUID               WCKrXq-j2ZL-PoZ8-PcXd-fjb8-Riud-e5yl6m
Extend VG
[root@frank ~]# vg
vgcfgbackup    vgck           vgdisplay      vgimport       vgmknodes      vgrename       vgsplit
vgcfgrestore   vgconvert      vgexport       vgimportclone  vgreduce       vgs
vgchange       vgcreate       vgextend       vgmerge        vgremove       vgscan
[root@frank ~]# vgextend
  Please enter volume group name and physical volume(s)
  Run `vgextend --help' for more information.
[root@frank ~]#
[root@frank ~]# vgextend myvg /dev/sda5
  Volume group "myvg" successfully extended
[root@frank ~]#
[root@frank ~]# pvdisplay
  --- Physical volume ---
  PV Name               /dev/sda2
  VG Name               myvg
  PV Size               7.52 GiB / not usable 4.00 MiB
  Allocatable           yes (but full)
  PE Size               4.00 MiB
  Total PE              1925
  Free PE               0
  Allocated PE          1925
  PV UUID               whbkik-T1Ke-fLlF-ZBph-3pcd-loYG-yRweel

  --- Physical volume ---
  PV Name               /dev/sda5
  VG Name               myvg
  PV Size               7.00 GiB / not usable 4.00 MiB
  Allocatable           yes
  PE Size               4.00 MiB
  Total PE              1791
  Free PE               1791
  Allocated PE          0
  PV UUID               WCKrXq-j2ZL-PoZ8-PcXd-fjb8-Riud-e5yl6m

[root@frank ~]# vgdisplay
  --- Volume group ---
  VG Name               myvg
  System ID
  Format                lvm2
  Metadata Areas        2
  Metadata Sequence No  4
  VG Access             read/write
  VG Status             resizable
  MAX LV                0
  Cur LV                2
  Open LV               2
  Max PV                0
  Cur PV                2
  Act PV                2
  VG Size               14.52 GiB
  PE Size               4.00 MiB
  Total PE              3716
  Alloc PE / Size       1925 / 7.52 GiB
  Free  PE / Size       1791 / 7.00 GiB
  VG UUID               0kMilm-TbT5-gs60-Vfl5-3obp-WybF-1BMwXA
Extend LV
As above info, VG had increased, now we need add those VG to LC, you can add by G/MB/PE, suggest use PE that is more accurate, as follow:
[root@frank ~]# lvresize -l +1791 /dev/myvg/root
  Extending logical volume root to 13.83 GiB
  Logical volume root successfully resized
[root@frank ~]# lvdisplay
  --- Logical volume ---
  LV Path                /dev/myvg/root
  LV Name                root
  VG Name                myvg
  LV UUID                K15Fr3-QNP3-a17k-IhNU-8qIV-LQAZ-iJ9bgV
  LV Write Access        read/write
  LV Creation host, time localhost, 2014-09-23 14:38:07 +0800
  LV Status              available
  # open                 1
  LV Size                13.83 GiB
  Current LE             3541
  Segments               2
  Allocation             inherit
  Read ahead sectors     auto
  - currently set to     8192
  Block device           253:0
Activate by “resize2fs”, but found command couldn’t use:
[root@frank ~]# resize2fs /dev/myvg/root
resize2fs 1.42.9 (28-Dec-2013)
resize2fs: Bad magic number in super-block while trying to open /dev/myvg/root
Couldn't find valid filesystem superblock.
After checked,that due to root system should xfs in Centos7/Ubuntu 14.04, “resize2fs” only support ext2, ext3 and ext4, so replaced “resize2fs” by “xfs_growfs”: Trying to resize2fs EB volume fails [closed]
After adding new NVME, you will find the disk but cannot use:
[root@gcspr-vxr pyvxr]# lsblk
NAME                 MAJ:MIN RM   SIZE RO TYPE MOUNTPOINT
sda                    8:0    0 894.3G  0 disk
├─sda1                 8:1    0    63M  0 part /boot/efi
├─sda2                 8:2    0   500M  0 part /boot
├─sda3                 8:3    0     1M  0 part
└─sda4                 8:4    0 893.7G  0 part
  ├─xfs_vol-root     253:0    0  97.7G  0 lvm  /
  ├─xfs_vol-swap     253:1    0  23.6G  0 lvm  [SWAP]
  └─xfs_vol-nobackup 253:2    0 772.5G  0 lvm  /nobackup
nvme0n1              259:0    0   2.9T  0 disk <<<
nvme1n1              259:1    0   2.9T  0 disk <<<
Need to fdisk, format and mount, as follow:
[root@gcspr-vxr /]# fdisk /dev/nvme1n1
WARNING: fdisk GPT support is currently new, and therefore in an experimental phase. Use at your own discretion.
Welcome to fdisk (util-linux 2.23.2).

Changes will remain in memory only, until you decide to write them.
Be careful before using the write command.


Command (m for help): n
Partition number (1-128, default 1):
First sector (34-6251233934, default 2048):
Last sector, +sectors or +size{K,M,G,T,P} (2048-6251233934, default 6251233934):
Created partition 1


Command (m for help): w
The partition table has been altered!

Calling ioctl() to re-read partition table.
Syncing disks.
[root@gcspr-vxr /]# mkfs.ext4 /dev/nvme1n1p1
mke2fs 1.42.9 (28-Dec-2013)
Discarding device blocks: done
Filesystem label=
OS type: Linux
Block size=4096 (log=2)
Fragment size=4096 (log=2)
Stride=0 blocks, Stripe width=0 blocks
195354624 inodes, 781403985 blocks
39070199 blocks (5.00%) reserved for the super user
First data block=0
Maximum filesystem blocks=2929721344
23847 block groups
32768 blocks per group, 32768 fragments per group
8192 inodes per group
Superblock backups stored on blocks:
	32768, 98304, 163840, 229376, 294912, 819200, 884736, 1605632, 2654208,
	4096000, 7962624, 11239424, 20480000, 23887872, 71663616, 78675968,
	102400000, 214990848, 512000000, 550731776, 644972544

Allocating group tables: done
Writing inode tables: done
Creating journal (32768 blocks): done
Writing superblocks and filesystem accounting information: done

[root@gcspr-vxr /]# mkdir vxrbackup
[root@gcspr-vxr /]# mount /dev/nvme1n1p1 /vxrbackup
[root@gcspr-vxr /]# chmod 777 /vxrbackup/ -R
[root@gcspr-vxr /]# lsblk
NAME                 MAJ:MIN RM   SIZE RO TYPE MOUNTPOINT
sda                    8:0    0 894.3G  0 disk
├─sda1                 8:1    0    63M  0 part /boot/efi
├─sda2                 8:2    0   500M  0 part /boot
├─sda3                 8:3    0     1M  0 part
└─sda4                 8:4    0 893.7G  0 part
  ├─xfs_vol-root     253:0    0  97.7G  0 lvm  /
  ├─xfs_vol-swap     253:1    0  23.6G  0 lvm  [SWAP]
  └─xfs_vol-nobackup 253:2    0 772.5G  0 lvm  /nobackup
nvme0n1              259:0    0   2.9T  0 disk
└─nvme0n1p1          259:2    0   2.9T  0 part /vxr       <<<
nvme1n1              259:1    0   2.9T  0 disk
└─nvme1n1p1          259:3    0   2.9T  0 part /vxrbackup <<<