6 2 月, 2022
终于尝试手动部署K8s了,在此感谢朋友分享的”老男孩“教学视频??。以及朋友分享的实验环境(基于EVE-NG);持续大半年的拉锯战,总算完成了基础组件的全部部署 ^_^
更新说明:
2022-01-17:更新拓扑信息; 2022-01-19:添加基础配置; 2022-01-23:添加证书配置及Bind9部署; 2022-01-25:添加Docker及私有仓库Harbor相关部署配置; 2022-07到08两个月时间:完成etdc,apiserver,kube-controller-manager,kube-scheduler,kubelet和kube-proxy的部署; Topology
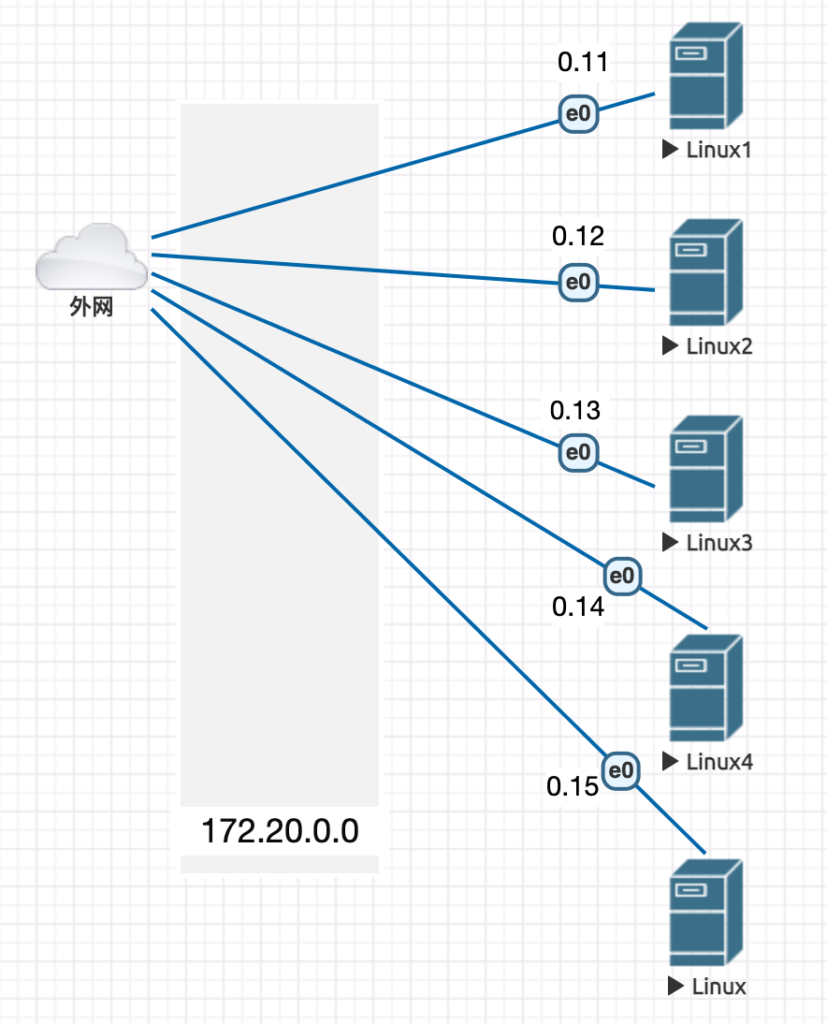
基础配置
端口配置
只展示frank0-11,其他Server等同;
root@frank0-11:~# more /etc/netplan/00-installer-config.yaml
# This is the network config written by 'subiquity'
network:
  ethernets:
    ens3:
      dhcp4: false
      addresses: [172.20.0.11/24]
      gateway4: 172.20.0.1
      nameservers:
        addresses: [114.114.114.114]
  version: 2
root@frank0-12:~# netplan apply
完整阅读
22 10 月, 2021
背景
BIRD是一个BGP守护进程,可以同真实的物理设备建立BGP邻居,并灵活控制路由的收发,尝尝可以看到IXP或云提供商(如Equinix)使用此开源软件。我将使用BIRD给Peer路由器发送Internet路由,以帮我完成演练,但看上去BIRD作为BGP Speaker或控制BGP路由比较好用,但生成路由并不是特别灵活,需要把路由批量灌到Kernel中,然后重分发到BGP并发给Peer路由器,此篇文章总结下如何使用BIRD。
相关链接
BIRD只是众多BGP开源软件中的一个,其他的还有如Quagga/FRR,ExaBGP等,我在查找BIRD时也看到了一些对比文章,一起列在下面,供以后方便查阅:
BIRD2 User Guide:
完整阅读
15 9 月, 2021
PS: 如果可以,还是建议使用物理机安装EVE NG,另外PNET也是一个不错的选择,算是另一个纯免费的开源软件,跟EVE NG用的一样的核心文件,但不像EVE NG高级功能需要收费,PNET纯免费;
安装EVE NG
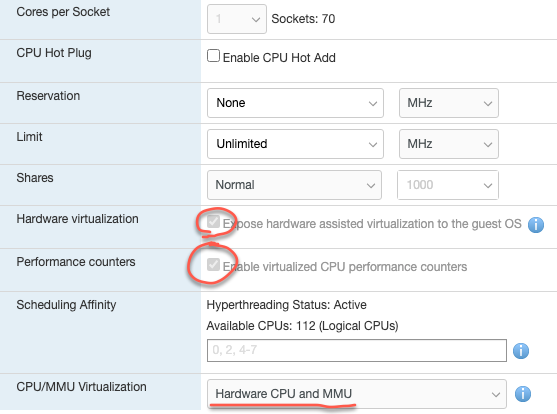
直接从官网选择OVF的Image下载,通过ESXI新建虚拟机时,拖拽OVF和VMDK两个文件进去;安装完后配置CPU/Memory/硬盘等,并且在CPU中打开嵌套虚拟化的设置;
配置EVE NG
安装完后,进去按照提示配置,完成配置启动后发现没有IP,怀疑是我的服务器不能访问外网的原因,因此手动配置IP以及调整SSH的端口:
完整阅读
7 9 月, 2021
背景
Telnet是常用的远程设备远程登录协议,通过如SecureCRT,Item2等终端软件,可以很容易的登录各种支持Telnet协议的设备,但有时候根据不同的终端设备,会需要一些特殊的设置,这就涉及Telnet协商,此篇文章就是整理下Telnet的几种模式及之间的区别,也包含如何更改这些模式的操作方法;
问题
我们可以通过一个问题来展开讨论,如下环境:
PC---(SSH)---CentOS---(Telnet)---KVM(vNE40E)我们发现登录vNE40E后无法退格,连续回车会有断行,如下所示:
[root@beihe-terminal-server ~]# CR1
Trying 172.16.211.165...
Connected to 172.16.211.165.
Escape character is '^]'.


<HUAWEI>
<HUAWEI>

<HUAWEI>
<HUAWEI>dis ver^H^H^H^H  <<< 4个退格键
通过“Crtl + ]”退出当前session,然后通过“status”来查看当前Telnet连接的模式,可以看到是 “obsolete linemode ”, 过时的Line mode??:
<HUAWEI>^]
telnet> status
Connected to 172.16.211.165.
Operating in obsolete linemode
Local character echo
Escape character is '^]'.
那么需要怎么做才能修复此问题呢?
完整阅读
18 8 月, 2021
背景
之前总结过一些Trex的内容,如下所示,这篇文章主要介绍如何在GUI中的高级模式中创建报文,并变更特定项目,如原/目IP地址,TCP/UDP 原/目端口等,以及如何修复可变TCP/UDP端口号带来的Checksum不正确的问题;另外最后还会使用另一种方法来调用流量模型;
Limited
报文统计数据不能导出到Excel或CVS; IPv6包头不能通过Field Engine改变,但API支持; 如果想打IPv6的报文,需要在网络设备上绑定nd和mac的mapping关系; Topology
拓扑同上一篇文章:
Trex-Server1 (100.0.0.1)------ (100.0.0.2)Router1 ---- network ----- Router2(100.1.1.2) ------ (100.1.1.1)Trex-Server2Trex配置文件生成
Trex里有一个程序,可以自动生成配置文件,如下所示,Platform部分是设置内核分配的(如果不设置,默认只有一个core,性能有限),启动时指明需要几个内核,那么系统就会自动按照配置进行分配,如“./t-rex-64 -i -c 27 ”
完整阅读