16 7 月, 2021
在常规测试中,经常需要在测前、测后抓取大量信息留存,不同厂商命令又不一样,黏贴复制采集工作量巨大,效率又低,所以需要写一个自动化脚本帮助自动化采集。自动化脚本有很多种方法编写,这里主要使用简单易用的Python,由于使用的是SecureCRT,所以直接选择了Python与SecureCRT的组合自动化脚本,其实之前写过一些,不过此篇用到了多个Session;
- Python独立自动化脚本,可以参考之前的文章:
- Python 与SecureCRT组合的自动化脚本,可以参考之前的文章:
SecureCRT最开始支持VB脚本,后来逐步转到Python。官网也有很多example可以供参考,如果感兴趣可以参考:
https://www.vandyke.com/support/securecrt/python_examples.html
https://www.vandyke.com/support/tips/tabscripts.html
脚本功能
此自动化脚本可以复用,根据需求任意更改,简单上手;另外Juniper带“table”的命令会扰乱SecureCRT的脚本,更改后恢复正常,代码正文中的是最终版本,同时也去掉了等待时间;其实脚本还可以优化下,但为了简单点,就写了10多个函数;
- 指定路径并按照“日_时分”格式自动创建文件夹;
- SecureCRT自动登录14台路由设备,并开启记录log功能;
- 采集14台设备信息,自动保存log,以“年-月-日-时-分”命名log文件;
- 采集后自动关闭Session;
show route yyyyyyyy extensive table C-CT |no-more\r
完整阅读
9 8 月, 2020
In the article, only show as follow (because easy to show how to work):
Protocol: UDP; Port: 5234
Encoding: KV-GPB
For more detailed information, you can reference my colleague’s GitHub, which includes more examples, e.g GRPC.
AlexFengCisco / Telemetry_Receiver
GRPC Update Info:
If use GRPC not TCP/UDP, that will have standard function, you will not need to write “DECODE_FN_MAP…”, function will auto generate, direct to use. Simple list steps:
- Get GRPC protobuf (e.g “mdt_grpc_dialout”) from cisco / bigmuddy-network-telemetry-proto
- Install/use compile tools, suggest install python virtual env, you can reference 在MacOS中部署Python虚拟开发环境
(telemetry-protocol) [root@telemetry telemetry-protocol]# python -V
Python 3.6.8
(telemetry-protocol) [root@telemetry telemetry-protocol]# easy_install pip
(telemetry-protocol) [root@telemetry telemetry-protocol]# pip install grpcio
(telemetry-protocol) [root@telemetry telemetry-protocol]# pip install protobuf
(telemetry-protocol) [root@telemetry telemetry-protocol]# pip install grpcio_tools
(telemetry-protocol) [root@telemetry telemetry-protocol]# python -m grpc_tools.protoc -I. --python_out=. --grpc_python_out=. cisco_grpc_dialout.proto
(telemetry-protocol) [root@telemetry telemetry-protocol]# ls -l|grep cisco
-rw-r--r--.  1 root    root       2695 Aug 10 16:16 cisco_grpc_dialout_pb2_grpc.py   #generated
-rw-r--r--.  1 root    root       3805 Aug 10 16:16 cisco_grpc_dialout_pb2.py   #generated
-rw-r--r--.  1 root    root        485 Aug 10 16:15 cisco_grpc_dialout.proto   #proto file
Follow all file if you need grpc protocol:
[root@telemetry grpc-dailout]# ls -l
total 36
-rw-r--r--. 1 root root  2695 Aug 10 16:16 cisco_grpc_dialout_pb2_grpc.py #Contains the server Stub class and the client Stub class, as well as the service RPC interface to be implemented.
-rw-r--r--. 1 root root  3805 Aug 10 16:16 cisco_grpc_dialout_pb2.py #message serialization classes
-rw-r--r--. 1 root root   484 Aug 10 15:36 mdt_grpc_dialout.proto
-rw-r--r--. 1 root root  3722 Aug 10 16:11 service_grpc_dialout_no_tls.py #service python
-rw-r--r--. 1 root root 19220 Aug 10 15:58 telemetry_pb2.py  #decode gpb-kv messages, generate as below
grpc-dailout.zip
Install Protobuf of python version
完整阅读
27 5 月, 2018
部署虚拟开发环境
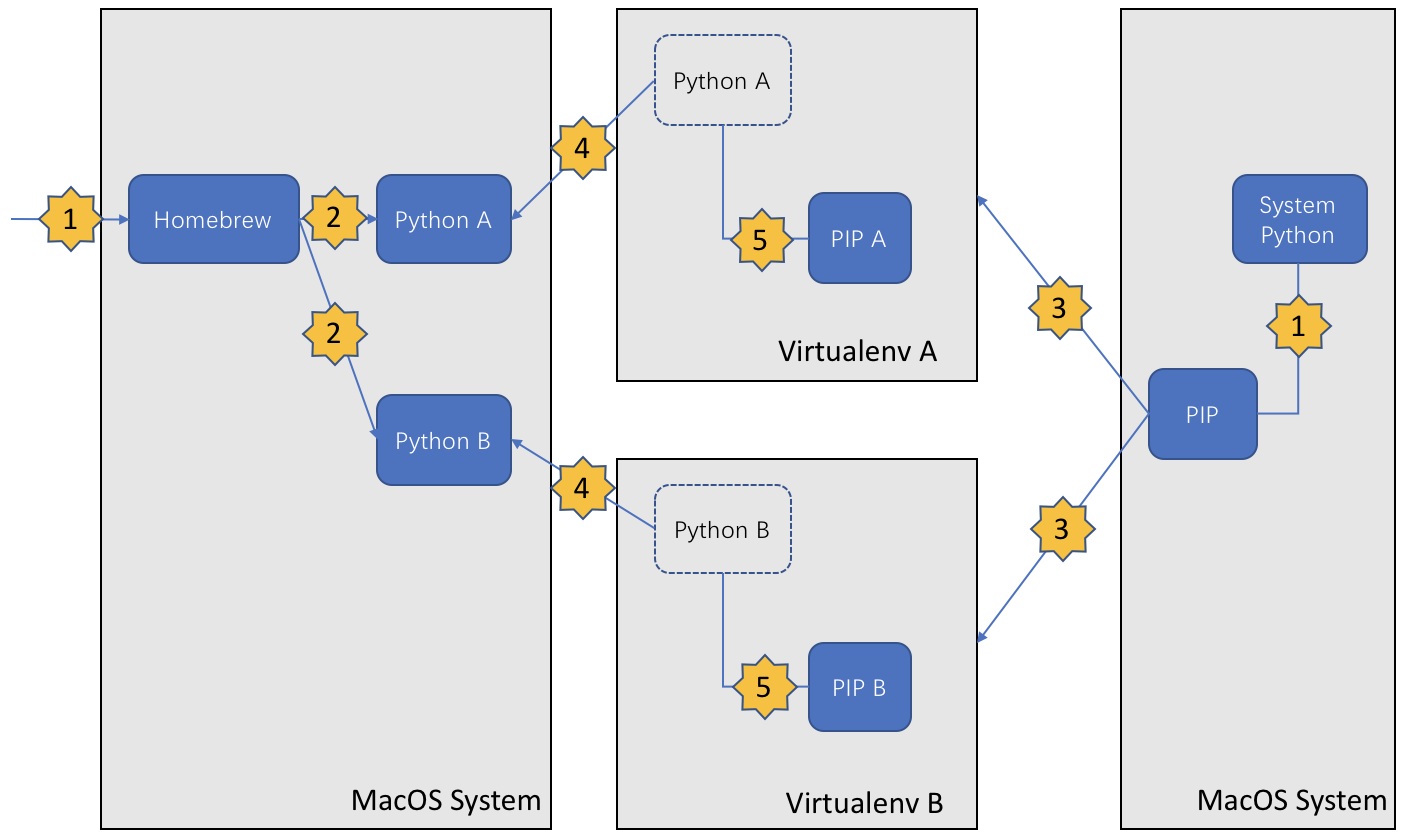
虽然自己不是软件工程师,但有时候为了测试会写一些小程序,所以常常需要在自己电脑上设置开发环境。由于MacOS原生支持Python,所以我们可以不用那么麻烦的设置开发环境。但为了系统的稳定性,还是不要随便增加或变更自带的python,所以开发环境直接用虚拟环境就可以了,大概构架如下:
完整阅读
6 12 月, 2017
Introduction
There are some internal tools that can decode SPP packets at former, but they are not work now. In some scenario, customer coudln’t do span on our asr9k, so we only need SPP, then will face to how to decode SPP result.
The article disscuss how to covert SPP original data to text2pcap readable format, then decode by text2pcap. You only do the script that can auto work. Btw, before do that, you need have python2.7 and text2pcap (integrate in wireshark). If you have python3.0 or newer, that maybe have some issue, because some function have a bit different, you need adjust them by yourself.
Solution
Original SPP data:
=~=~=~=~=~=~=~=~=~=~=~= PuTTY log 2017.12.04 17:12:19 =~=~=~=~=~=~=~=~=~=~=~=
trace p stop
Tracing stopped with 666 outstanding...
spp-ui> trace print
Packet serial 861
port4/classify:
  length 148 phys_int_index 0 next_ctx 0xdeadbeef time 09:10:41.407
  00: 00 70 72 00 00 08 00 65 7a 00 00 00 ff ff 00 07
  10: 80 30 00 00 00 00 0f 00 00 00 1f 00 00 00 00 00
  20: 00 70 05 f2 42 fb 00 00 04 00 01 40 07 01 05 27
  30: 06 03 0e 06 00 00 00 00 4c 00 00 00 00 00 58 00
  40: 00 00 00 00 00 00 06 01 00 a1 13 41 92 60 00 b2
  50: 64 41 8a 4c 08 00 45 c0 00 3e 00 00 00 00 fe 11
  60: c8 25 12 ac 79 0d 34 df d0 01 02 86 02 86 00 2a
  70: 75 5a 00 01 00 1e 3f da a4 0f 00 00 01 00 00 14
  80: 00 00 00 00 04 00 00 04 00 5a c0 00 04 01 00 04
  90: 3f da a4 0f 00 00 00 00 00 00 00 00 00 00 00 00
  a0: 00 00 00 17 00 08 05 01 00 00 af c8 00 24 14 01
  b0: 01 08 3f da d0 46 20 00 01 08 3f da d0 42 20 00
  c0: 01 08 3f da d0 41 20 00 01 08 3f da d0 07 20 00
  d0: 00 08 13 01 00 00 08 00 00 20 cf 07 00 00 07 16
  e0: 4d 50 4c 53 2d 54 45 20 74 6f 20 76 61 72 30 31
  f0: 2e 6b 6c 70 30 32 00 00 00 0c 0b 07 3f df 04 08
--------------------------
完整阅读
26 8 月, 2017
Introduction
In some scenario, we need to monitor some data in router/switch by automation. This article will show example that how to check share memory utilization. And you can easy to change the script base on your requirement/scenario.
Prepare
Due to “telnetlib” couldn’t exactly check expect messages by read_until() function (that couldn’t control exactly time when the info return to buffer), so I change to “expect”. And follow Bo’s example Python Expect Demo, and there is a good documents for expect demo from IBM too: 探索 Pexpect,第 2 部分:Pexpect 的实例分析
完整阅读
